A couple darkroom questions...

Protest.

A
Protest.

  • 3
  • 2
  • 83
Window

A
Window

  • 3
  • 0
  • 54
_DSC3444B.JPG

D
_DSC3444B.JPG

  • 0
  • 1
  • 84
20250405_094841.jpg

D
20250405_094841.jpg

  • 4
  • 0
  • 98

Recent Classifieds

Forum statistics

Threads
197,199
Messages
2,755,490
Members
99,423
Latest member
Sykopics
Recent bookmarks
0

Motopreserve

Member
Joined
Oct 14, 2024
Messages
32
Location
Brooklyn, NY
Format
35mm
Hey folks,

New to darkroom/enlarging and have found a ton of info here on the site, so thank you to all the people who take the time to share your experiences. I recently acquired an Omega B-22 (a bunch of extras) as my first-ever enlarger. I have thoroughly cleaned and aligned the enlarger, 3D printed a few negative carriers (6x6, 6x45), so I'm pretty well set up now. I have done my first few prints, and while they need a ton of work, and there is so much left to learn - the thrill of seeing the image emerge from the developer is amazing!

I still have a couple questions that I was not able to find answers to - so I appreciate your patience and any guidance/links you can provide.

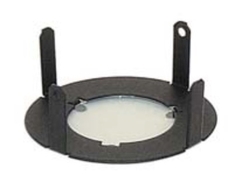
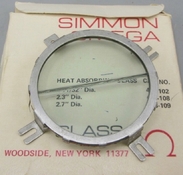
1. I read about the issue of negative popping. The B-22 did not come with the heat-absorbing glass accessory and I do not have glass neg carriers. I found that KHB carries a new version of the heat absorbing glass - but the cost of shipping from Canada to US is nearly as much as the product itself. I found a NOS version that I believe was for a D-2 for only $3, and figured I might be able to modify it for use on the B-22. This one is smaller than the B-22 lamp housing, so I made a holder that will situate it securely up inside the lamp housing (above the condensers). Unlike the KHB version, this one has split glass - which seems was standard for Omega branded heat absorbing glass inserts. I assume this was to compensate for heat expansion? My question is: Will choking down the light path to a smaller diameter (62mm down from 86mm without insert) impact the bulb's performance by the time light gets down through the condensers/lens etc? Also, is there a reason that the KHB solution has eliminated the split in the glass? Are there issues with the original split style? (Pics attached)

2. The enlarger came with a Time-o-lite P59. It has the glowing faceplate. Since it is the only non-safelight colored thing in the darkroom, I am wondering whether it is advisable to keep this far from the paper during exposure?

3. Despite aligning the enlarger according to the service manual, I still have slight light leaks around the negative carrier area. The light is not shining directly downward, but I am wonderin whether I should put some light seal material around where the condenser housing meets the nega carrier?

4. Since I'm new to all this - I assume I am taking longer to complete an enlarging session than more experienced users. Knowing that oxygen is an enemy for the chemicals (ilford multigrade developer, rapid fixer etc), I'm wondering if my chemicals will go off before the prescribed number of sheets because they are being exposed to the air for so long? I know this is vague - just curious whether there is a rule of thumb for time chems are exposed to air vs the number of sheets developed?

5. Last question is just a curiosity. The enlarger came with a rubber roller - the kind I've seen used for screen printing. What would this be used for in the darkroom?

Thanks so much for any help.

Scott
 

Attachments

  • KHB heat absorb glass Medium.jpeg
    KHB heat absorb glass Medium.jpeg
    13.4 KB · Views: 10
  • Omega heat absorb Medium.jpeg
    Omega heat absorb Medium.jpeg
    76.1 KB · Views: 10

hgernhardt

Member
Joined
Dec 24, 2012
Messages
77
Location
Brockton, MA
Format
Medium Format
Welcome to the joy of darkroom printing! It something I've dearly enjoyed every time I've engaged in it. I look forward to seeing some of the products of your endeavors!

1. I read about the issue of negative popping[…]

I can't speak to this bit—I've only ever had a Beseler 23C, and IIRC the ones I've owned have had surviving heat-absorbing glass.

2. The enlarger came with a Time-o-lite P59. It has the glowing faceplate. Since it is the only non-safelight colored thing in the darkroom, I am wondering whether it is advisable to keep this far from the paper during exposure?

I had the same in my HS darkroom. They were never an issue. IIRC they were closeish—mounted on the wall beside the enlarger—but not so close that they'd cause fogging issues. Testing can be done in a similar manner to that of light leaks.

3. Despite aligning the enlarger according to the service manual, I still have slight light leaks around the negative carrier area. The light is not shining directly downward, but I am wonderin whether I should put some light seal material around where the condenser housing meets the nega carrier?

Most photographic papers will be tolerant of some minor light spill, at least during normal exposure times. Blanket exposure is used in some procedures as a “flash” exposure for contrast and/or density control. A way you can test for this is to do a test strip: load some paper into the easel and cap the enlarger lens. Do your test strip up to the maximum exposure duration you're expecting plus a bit (I've never done an exposure for longer than 120 seconds, so if I were to do this I'd go with like five minutes or so). Make sure one segment of your test strip is always covered so you have a control with zero exposure. Develop as normal and note where fogging is first visible.

Given, there will be some variance in print density range based on the “flash” duration from the enlarger light leaks, however in my own amateur (and high school photojournalistic) experience, this has never made too much of a difference. Closing the light leaks may very well help in some circumstances, however I don't let best be the enemy of good when I'm doing darkroom things (heck, I'm just chuffed when I *do* get to do darkroom things these days).

4. Since I'm new to all this - I assume I am taking longer to complete an enlarging session than more experienced users. Knowing that oxygen is an enemy for the chemicals (ilford multigrade developer, rapid fixer etc), I'm wondering if my chemicals will go off before the prescribed number of sheets because they are being exposed to the air for so long? I know this is vague - just curious whether there is a rule of thumb for time chems are exposed to air vs the number of sheets developed?

In my experience? A bit, but I've not done enough consistent quantity for it to be a problem. The darkening of the developer as it ages was my indicator—when it became difficult for me to judge the print in the dev tray, it was time to change out the solution. YMMV, others will have more technical (and likely more correct) information, and there exist vertical orientation tray(ish) solutions that mitigate oxidation damage dramatically.

5. Last question is just a curiosity. The enlarger came with a rubber roller - the kind I've seen used for screen printing. What would this be used for in the darkroom?

If you're talking about a brayer, I've used one when drying fiber base glossy prints on a ferrotype tin. You use it to adhere the wet emulsion side to the tin and work out the air bubbles.

Hope it helps, have fun, and welcome to the rabbit hole!
 

koraks

Moderator
Moderator
Joined
Nov 29, 2018
Messages
20,319
Location
Europe
Format
Multi Format
Confirming and expanding a bit on what @hgernhardt says above, to which I mostly agree:

Will choking down the light path to a smaller diameter (62mm down from 86mm without insert) impact the bulb's performance by the time light gets down through the condensers/lens etc?

The condenser will be tuned to the geometry of the light source. So yes, there may be a problem if you reduce the aperture at that point.
I'd also recommend only solving the problem of heat popping if it turns out to be an actual problem.

2. The enlarger came with a Time-o-lite P59. It has the glowing faceplate. Since it is the only non-safelight colored thing in the darkroom, I am wondering whether it is advisable to keep this far from the paper during exposure?
I've never had any paper fog due to these kinds of dials. Unless you put the paper directly onto the face plate, I don't expect there to be any problem.

I still have slight light leaks around the negative carrier area

You need to fix those. Light spills will effectively add as a flash exposure, affecting the toe of the paper curve. It makes highlights go flat, rendering your prints lifeless and lackluster. The degree to which this happens obviously depends on a couple of factors, but in principle, your enlarger should only expose the image and not spill any light to the environment at all.

I'm wondering if my chemicals will go off before the prescribed number of sheets because they are being exposed to the air for so long?
The fixer won't mind, terribly, and I'd recommend mixing fresh fixer for each session anyway.
I've never paid any attention to the capacity in sheets of a print developer and instead just replenish or replace it once it gets slow. If you're just starting out, it can be easy to miss the signs of a developer that gets to its last legs. It's advisable to do a test strip every hour or two hours or so to see if you still get the same results with your development time as you did when the developer was fresh. Once it gets slow, either prolong development or replenish/replace.

5. Last question is just a curiosity. The enlarger came with a rubber roller - the kind I've seen used for screen printing. What would this be used for in the darkroom?
Could be anything, but maybe your predecessor used it instead of a squeegee when e.g. ferrotyping prints to glass. Just a wild guess. As said, could be anything. Hold on to it, though. Such rollers can be surprisingly expensive and it might come in handy for some kind of process once the printing virus starts to catch on!
 
OP
OP
Motopreserve

Motopreserve

Member
Joined
Oct 14, 2024
Messages
32
Location
Brooklyn, NY
Format
35mm
Thanks so much for the detailed responses! Really appreciate the help.

I will address the small light leaks for sure. Easy enough to do, and I might as well take this out of the equation.

I was going to wait to see if the popping was an issue - but read so many posts here saying it was a sure-fire issue on this specific model. So I began looking around for the accessory insert. When I found the incorrect one for so cheap - figured I’d give it a try. The one sold by KHB will also narrow the light path since the glass is inset from the edge of the bulb housing by an estimated 1/4” all around (aprox 86mm down to 74mm). I suppose I could do a test print with my prototype installed and track the differences in exposure time/quality. Or I could just wait to see if it becomes an issue at all, and then figure out how to deal with it.

I’ll keep an eye on the developer to see when it falls off. I’m sure I have plenty of practice sessions ahead - so I’m not expecting archival keepers at the moment. All part of the learning process.

It’s been a blast so far. I dodged a small area the other day for the first time. Just before hitting the timer - I hadn’t been that nervous since I rode a motorcycle on the track for the first time! As with the track, I’m still here to tell the tale :smile:
 

Don_ih

Member
Joined
Jan 24, 2021
Messages
7,246
Location
Ontario
Format
35mm RF
3. Despite aligning the enlarger according to the service manual, I still have slight light leaks around the negative carrier area. The light is not shining directly downward, but I am wonderin whether I should put some light seal material around where the condenser housing meets the nega carrier?

Check this by completely covering the enlarging lens and turning on the enlarger with no other lights on in your darkroom. If the leaking light allows you to see the place where your enlarging paper would be (the easel), then that light will impact your print (in a bad way).
 

koraks

Moderator
Moderator
Joined
Nov 29, 2018
Messages
20,319
Location
Europe
Format
Multi Format
I suppose I could do a test print with my prototype installed and track the differences in exposure time/quality.

The concern is not so much that you lose light output in an absolute sense. The problem with condenser setup is that if you 'break' the correspondence between the optical parts, you can end up with uneven coverage. You'll notice this mostly by corners on your prints getting too light and/or concentric rings of uneven illumination. It's often also directly visible on the baseboard if you insert the film carrier without a negative and open up the projection lens. The 'torture test' is to print a neutral gray sheet at grade 5.

As with the track, I’m still here to tell the tale

You'll find darkroom printing is a whole lot safer and generally speaking also a whole lot more affordable than motorcycle madness!
 

ic-racer

Member
Joined
Feb 25, 2007
Messages
16,469
Location
USA
Format
Multi Format
Even some very expensive enalrgers leak light. You can make a little skirt around the leaks with some felt or other opaque material.

If you can watch the negative pop, you can then focus, place the lens cap, insert paper in the easel, then, without jarring the enlarger, ready the timer, remove the lenscap and start the exposure. Usually you can do this while the negative stays warm and in focus.
 
OP
OP
Motopreserve

Motopreserve

Member
Joined
Oct 14, 2024
Messages
32
Location
Brooklyn, NY
Format
35mm
All great advice. Thank you all!

I’ll hold off on the heat absorbing glass for now. Keep it in the drawer for if/when it becomes an issue. I will try to determine whether the issue is present using the methods described above. Appreciate the advice.

I’ll also look at creating a skirt around the junction between condenser housing and negative carrier. Should be a fairly simple fix.

@ic-racer Agreed. Although I put that to the test when I lit the room only with the old Kodak safelite included in the sale. Nearly broke my neck moving from enlarger to trays. I’ve since grabbed some red bulbs recommended here on the forum - and my brief test makes me feel MUCH safer moving around the darkroom now :smile:
 

RalphLambrecht

Subscriber
Joined
Sep 19, 2003
Messages
14,524
Location
K,Germany
Format
Medium Format
All great advice. Thank you all!

I’ll hold off on the heat absorbing glass for now. Keep it in the drawer for if/when it becomes an issue. I will try to determine whether the issue is present using the methods described above. Appreciate the advice.

I’ll also look at creating a skirt around the junction between condenser housing and negative carrier. Should be a fairly simple fix.

@ic-racer Agreed. Although I put that to the test when I lit the room only with the old Kodak safelite included in the sale. Nearly broke my neck moving from enlarger to trays. I’ve since grabbed some red bulbs recommended here on the forum - and my brief test makes me feel MUCH safer moving around the darkroom now :smile:

Your question(s) are too complex. If you can concentrate on one at atime,you are more likely to get answers. Oterwise, I woul suggest to read a few induction drkroom books first or attend a darkroom workshop.
 

131802

Member
Joined
Dec 21, 2007
Messages
86
Format
35mm
I love my B-22. The light leaks have not caused me any problems. If you close all of your light leaks, you might find that the lamp house gets warmer. I believe some of those leaks help cool the lamp house. I control leaks from the filter drawer by making sure it’s fully closed and properly aligned.
 
OP
OP
Motopreserve

Motopreserve

Member
Joined
Oct 14, 2024
Messages
32
Location
Brooklyn, NY
Format
35mm
Your question(s) are too complex. If you can concentrate on one at atime,you are more likely to get answers. Oterwise, I woul suggest to read a few induction drkroom books first or attend a darkroom workshop.

Thanks for the reply. The folks above gave me all the answers I needed.

I do have a couple darkroom books, and they have been helpful. But these questions were primarily specific to my equipment, which the books have not addressed directly.
 
OP
OP
Motopreserve

Motopreserve

Member
Joined
Oct 14, 2024
Messages
32
Location
Brooklyn, NY
Format
35mm
I love my B-22. The light leaks have not caused me any problems. If you close all of your light leaks, you might find that the lamp house gets warmer. I believe some of those leaks help cool the lamp house. I control leaks from the filter drawer by making sure it’s fully closed and properly aligned.

Maybe they designed it this way? :smile:

Makes sense that it would help funnel off some of the heat. I will be keeping an eye on the prints to see if either light leaks or neg popping are issues. I’m not trying to create work where it’s not needed. Just trying to give myself the best chance for success, and rule out variables that may lead to bad prints.

I have noticed the odd way the filter drawer sits in the head. It’s not at all tight or parallel the way it came to me. So I’ve just used some cardboard shims to prop it level and tighter in the opening. Seems to be working ok for now. Did you come up with a better solution?
 

Hassasin

Member
Joined
Feb 23, 2023
Messages
1,297
Location
Hassasstan
Format
Multi Format
When I started out in a darkroom, last thing on my mind was negative pop. There is so much more to go wrong that can disturb the darkroom work joy, I would vote for getting things set up, go to work, and then ... either change enlarger or light source to something like LED or cold light.
 

Ian C

Member
Joined
Feb 8, 2009
Messages
1,233
Format
Large Format
1. The split in the heat-absorbing glass filter is due to overheating. It certainly wasn’t made that way. The lamp was likely left on for a considerable period causing the filter to overheat, expand, and crack. It will continue to absorb heat, even though cracked. However, if the light passing through the cracked heat filter is visible to the lens, the crack might produce a fuzzy band visible in the projection. That could be the case with the condenser head on the B22. You’d have to try it to be sure. I've seen many heat-split heat-absorbing filters on eBay offerings. One of the 4 heat-absorbing filters on my Super Chromega F head is split. I never bothered changing it because it continues to work and has no effect on the projection, as the light is thoroughly mixed before it passes out of the diffusion panel to the negative.

2. The fluorescence from the face of the timer is weak. It isn’t a problem so long as you keep it, say, 18”/46 cm from the paper.

3. It’s a photo enlarger. It’s practical for the purpose for which it was made. A small amount of light spilling about the negative area—provided it doesn’t fall directly upon the paper—is generally irrelevant.

4. The practical answer is: read the developer-maker’s instructions. A common capacity recommendation is 25 8” x 10” sheets/liter (2000 square inches regardless of paper dimensions). Then discard the developer and mix a fresh liter before continuing. Some developers have greater capacity than others. Always pour your developer back into its storage bottle and cap it tightly at the end of each printing session.

5. A rubber roller with a handle is intended for applying pressure to press adhesively mounted prints onto a firm support. I no longer use mine. I get better results by using a smooth, clean table or countertop. I use a combination square (aka “try square") to place penciled guidelines onto a Foamcore support (usually 11” x 14” for an 8” x 10” print) after first determining where the print must be located with the window mat I’ll use.

I take the print and Foamcore outdoors to spray a light coat of 3M Scotch Photo Mount spray adhesive (a type of contact cement) onto the mount and the back of the print and place the print lightly onto the mount, touching the face in a couple of places to tack it in place. I flip the mount over and lay it with the photo face-down on the table or countertop. I place the palm of my hand on the center of the back of the mat and wipe from the center to the 12 O’clock position. I continue in this way, starting in the center to the 2, 4, 6, 8, and 10 O’clock positions to flatten the print against the mount. When I flip the assembly back upright, the print is flat and permanently bonded to the mount. At this point you might have to clean the table or countertop surface with a solvent to remove any of the Photo Mount that transferred from the overspray outside of the print area. I find that lighter fuel (naphtha) works well for this. Very little is needed. It's prudent to place some sheets of wax paper on the work surface beforehand so that none of the adhesive gets transferred where it doesn't belong.


Temporary Glass Carrier

You can make a glass carrier that places the film sandwiched between two sheets of window glass. I’ve done so with enlargers for which no glass carrier could be found. Determine the size you need and have two identical sheets of window glass cut. Deburr all edges and corners with a fine-grit sharpening stone or fine-grit abrasive paper so that you can handle the sheets without cutting your fingers or damaging the negatives. You should also make a top mask that looks like a print mat. Make it of a thin black materiel. You can use a sheet of black construction paper such as is used for school children’s art projects, or you can use a totally exposed, developed, fixed, and washed sheet of enlarging paper. Thin resin coated paper works best.

Layout the opening you require with a pencil. I use a silver-lead pencil from an art supply store on black paper. If you make the mask from photo paper, you can do the layout on the white side. Use a ruler to guide the pencil. Then cutout the opening with a single-edge razor blade guided with a steel rule.

The glass and mask serve several purposes.

1. Placed atop the negative before laying down the top glass, the mask prevents the formation of Newton rings.

2. It also holds back excess spill light. You might need different masks depending on the size of the negative. You might want to apply black paint or enamel to the edges of the glass to prevent light piping.

3. Additionally, the mass of the two glass sheets serves as a heat sink to help keep the negative from getting overly warm.

To keep the sandwich together, you can temporarily tape the edges of the two sheets of glass together along the rear edge. Use flexible cloth tape. This might sound crude, and it isn’t as convenient as a commercial glass carrier, but it works. In the meanwhile, you can keep checking potential sources, such as eBay for a reasonably priced glass carrier for your enlarger. Possibly, you might find your simple home-built carrier adequate to your needs.
 
Last edited:
OP
OP
Motopreserve

Motopreserve

Member
Joined
Oct 14, 2024
Messages
32
Location
Brooklyn, NY
Format
35mm
When I started out in a darkroom, last thing on my mind was negative pop. There is so much more to go wrong that can disturb the darkroom work joy, I would vote for getting things set up, go to work, and then ... either change enlarger or light source to something like LED or cold light.

Agreed. I’ve had more than enough to keep me busy in my limited time so far in the darkroom. And while my first few prints leave much to be desired, as best I can tell, it’s not due to pop.

The only reason I asked about it was that while doing research to familiarize myself with the enlarger, I saw popping mentioned several times, specific to the B-22. I don’t think I mentioned earlier that I have been only printing 6x45 and 6x6. And the posts I read were speaking to the issue happening with larger negatives.

I appreciate all the help here. Makes me feel more confident to wait and see if the issue arises, and deal with it if need be.
 
OP
OP
Motopreserve

Motopreserve

Member
Joined
Oct 14, 2024
Messages
32
Location
Brooklyn, NY
Format
35mm
1. The split in the heat-absorbing glass filter is due to overheating. It certainly wasn’t made that way. The lamp was likely left on for a considerable period causing the filter to overheat, expand, and crack. It will continue to absorb heat, even though cracked. However, if the light passing through the cracked heat filter is visible to the lens, the crack might produce a fuzzy band visible in the projection. That could be the case with the condenser head on the B22. You’d have to try it to be sure. I've seen many heat-split heat-absorbing filters on eBay offerings. One of the 4 heat-absorbing filters on my Super Chromega F head is split. I never bothered changing it because it continues to work and has no effect on the projection, as the light is thoroughly mixed before it passes out of the diffusion panel to the negative.

2. The fluorescence from the face of the timer is weak. It isn’t a problem so long as you keep it, say, 18”/46 cm from the paper.

3. It’s a photo enlarger. It’s practical for the purpose for which it was made. A small amount of light spilling about the negative area—provided it doesn’t fall directly upon the paper—is generally irrelevant.

4. The practical answer is: read the developer-maker’s instructions. A common capacity recommendation is 25 8” x 10” sheets/liter (2000 square inches regardless of paper dimensions). Then discard the developer and mix a fresh liter before continuing. Some developers have greater capacity than others. Always pour your developer back into its storage bottle and cap it tightly at the end of each printing session.

5. A rubber roller with a handle is intended for applying pressure to press adhesively mounted prints onto a firm support. I no longer use mine. I get better results by using a smooth, clean table or countertop. I use a combination square (aka “try square") to place penciled guidelines onto a Foamcore support (usually 11” x 14” for an 8” x 10” print) after first determining where the print must be located with the window mat I’ll use.

I take the print and Foamcore outdoors to spray a light coat of 3M Scotch Photo Mount spray adhesive (a type of contact cement) onto the mount and the back of the print and place the print lightly onto the mount, touching the face in a couple of places to tack it in place. I flip the mount over and lay it with the photo face-down on the table or countertop. I place the palm of my hand on the center of the back of the mat and wipe from the center to the 12 O’clock position. I continue in this way, starting in the center to the 2, 4, 6, 8, and 10 O’clock positions flatten the print against the mount. When I flip the assembly back upright, the print is flat and permanently bonded to mount. At this point you might have to clean the table or countertop surface with a solvent to remove any of the Photo Mount that transferred from the overspray outside of the print area. I find that lighter fuel (naphtha) works well for this. Very little is needed.


Temporary Glass Carrier

You can make do with your film sandwiched between two sheets of window glass. I’ve done so with enlargers for which no glass carrier could be found. Determine the size you need and have two identical sheets of window glass cut. Deburr all edges and corners with a fine-grit sharpening stone or fine-grit abrasive paper so that you can handle the sheets without cutting your fingers or damaging the negatives. You should also make a top mask that looks like a print mat. Make it of a thin black materiel. You can use a sheet of black construction paper such as is used for school children’s art projects, or you can use a totally exposed, developed, fixed, and washed sheet of enlarging paper. Thin resin coated paper works best.

Layout the opening you require with a pencil. I use a silver-lead pencil from an art supply store on black paper. If you make the mask from photo paper, you can do the layout on the white side. Use a ruler to guide the pencil. Then cutout the opening with a single-edge razor blade guided with a steel rule.

The mask serves several purposes:

1. Placed atop the negative before laying down the top glass, it prevents the formation of Newton rings.

2. It also holds back excess spill light. You might need different masks depending on the size of the negative. You might want to apply black paint or enamel to the edges of the glass to prevent light piping.

3. Additionally, the mass of the two glass sheets serves as a heat sink to help keep the negative from getting overly warm.

To keep the sandwich together, you can temporarily tape the edges of the two sheets of glass together along the rear edge. Use flexible cloth tape. This might sound crude, and it isn’t as convenient as a commercial glass carrier, but it works. In the meanwhile, you can keep checking potential sources, such as eBay for a reasonably priced glass carrier for your enlarger. Possibly, you might find your simple home-built carrier adequate to your needs.

Thank you! All great info! I will look to make a glass carrier in the future - at least for the medium format negatives to start.

Thanks for the clarification on the heat absorbing glass. The only reason I thought it may have been manufactured that way is that there are many examples currently available on auction sites that all look identical. Heat’s a b*tch! :smile:
 

koraks

Moderator
Moderator
Joined
Nov 29, 2018
Messages
20,319
Location
Europe
Format
Multi Format
1. The split in the heat-absorbing glass filter is due to overheating. It certainly wasn’t made that way.
This may be unrelated, but I was gifted a heat absorber for my Durst 138 and that appeared to be an intentional 2-part filter with a neat vertical split in the middle. I suspect it's made that way to allow some thermal expansion of the glass esp. in the center of the light path. I don't know if the same logic was applied to this particular enlarger/filter. I've also never used the heat filter in my setup, so IDK what optical effects it may have.

The only reason I thought it may have been manufactured that way is that there are many examples currently available on auction sites that all look identical.
I suspect it's intentional.
 
OP
OP
Motopreserve

Motopreserve

Member
Joined
Oct 14, 2024
Messages
32
Location
Brooklyn, NY
Format
35mm
This may be unrelated, but I was gifted a heat absorber for my Durst 138 and that appeared to be an intentional 2-part filter with a neat vertical split in the middle. I suspect it's made that way to allow some thermal expansion of the glass esp. in the center of the light path. I don't know if the same logic was applied to this particular enlarger/filter. I've also never used the heat filter in my setup, so IDK what optical effects it may have.


I suspect it's intentional.

I think you may be right. It seemed suspicious that every example I’ve seen (other than the repop by KHB) has the split. Accounting for expansion was my initial thought. It is impressive how much heat this little bulb produces in the head. Not ‘burn your hand’ hot, but it took me by surprise the first time I touched it.

The good news is that the exposure times so far have been quite short. So hopefully I don’t run into any popping issues due to heat. And as suggested earlier in the post - there are ways to deal with it without having to risk diminishing the light path.
 

Sirius Glass

Subscriber
Joined
Jan 18, 2007
Messages
50,042
Location
Southern California
Format
Multi Format
I would not worry about the face plate fogging paper. Besides if it did you would find out quickly. Enjoy your darkroom.
 

MattKing

Moderator
Moderator
Joined
Apr 24, 2005
Messages
51,735
Location
Delta, BC Canada
Format
Medium Format
Enjoy the fun!'
I used a shared B22 to make a lot of prints from 35mm back when I was a lot younger, and I doubt there was any heat absorbing glass in that one!
There were probably similar bits of stray light leaking as well - I was young, and we were working on (newspaper) deadlines, so the fact that I didn't worry about them is probably not helpful.
Is there anything near the enlarger that can reflect the leaked light down to the paper? If so, that might be easier to deal with.
Don't worry about the elapsed time, until you observe a distinct lengthening of necessary development time for the prints. Most likely, you won't have an issue.
 
OP
OP
Motopreserve

Motopreserve

Member
Joined
Oct 14, 2024
Messages
32
Location
Brooklyn, NY
Format
35mm
Enjoy the fun!'
I used a shared B22 to make a lot of prints from 35mm back when I was a lot younger, and I doubt there was any heat absorbing glass in that one!
There were probably similar bits of stray light leaking as well - I was young, and we were working on (newspaper) deadlines, so the fact that I didn't worry about them is probably not helpful.
Is there anything near the enlarger that can reflect the leaked light down to the paper? If so, that might be easier to deal with.
Don't worry about the elapsed time, until you observe a distinct lengthening of necessary development time for the prints. Most likely, you won't have an issue.

I don’t think any of the light leaks are getting down to the paper. Of course I will keep a close eye on it - and if it becomes an issue I’ll work out a skirt of some kind.

Appreciate the help.
 

MTGseattle

Subscriber
Joined
Dec 8, 2013
Messages
1,325
Location
Seattle
Format
Multi Format
One thing I've seen in a few darkrooms is sheets of acrylic placed on top of the chemistry trays when not in use. I'm sure the efficacy of this has been discussed within photrio somewhere and barring am actual seal of some type, simply placing a flat "lid" on a typical Patterson tray would only give one vey loose protection from atmosphere (but good protection from bugs/falling debris).

It's something of a pain, but in my personal situation, I pour my chemistry back into jugs after my printing session.
 
OP
OP
Motopreserve

Motopreserve

Member
Joined
Oct 14, 2024
Messages
32
Location
Brooklyn, NY
Format
35mm
One thing I've seen in a few darkrooms is sheets of acrylic placed on top of the chemistry trays when not in use. I'm sure the efficacy of this has been discussed within photrio somewhere and barring am actual seal of some type, simply placing a flat "lid" on a typical Patterson tray would only give one vey loose protection from atmosphere (but good protection from bugs/falling debris).

It's something of a pain, but in my personal situation, I pour my chemistry back into jugs after my printing session.

I’ve been pouring the chemistry back into their jugs after each session. Never occurred to me to leave it in the trays - but I’m also not doing a ton of printing (not daily). I inherited the trays with the enlarger - and I wish they had a better pour spout on one corner. But I’ve finally reduced the mess while pouring it back in the bottles. :smile:
 

Ian C

Member
Joined
Feb 8, 2009
Messages
1,233
Format
Large Format
There's no need for any mess. Simply use a polypropylene funnel. This is how most darkroom workers put liquid chemical from a tray into its storage bottle.
 

jimjm

Subscriber
Joined
May 2, 2007
Messages
1,219
Location
San Diego CA
Format
Multi Format
I’ve been pouring the chemistry back into their jugs after each session. Never occurred to me to leave it in the trays - but I’m also not doing a ton of printing (not daily). I inherited the trays with the enlarger - and I wish they had a better pour spout on one corner. But I’ve finally reduced the mess while pouring it back in the bottles. :smile:

I'll only leave chemicals in the trays if I'm stepping away for a few hours and I plan on resuming later that day. I also place a sheet of acrylic over the developer tray to reduce oxidization of the developer during that time. This isn't necessary for the other chemicals, though. When I'm done for the day I'll pour them back into their bottles. If I've processed a large number of sheets, I often just dump the developer and start with a new batch the next day. Using a funnel makes it much easier to pour chemicals back in the bottles.
 
Photrio.com contains affiliate links to products. We may receive a commission for purchases made through these links.
To read our full affiliate disclosure statement please click Here.

PHOTRIO PARTNERS EQUALLY FUNDING OUR COMMUNITY:


Ilford ADOX Freestyle Photographic Stearman Press Weldon Color Lab Blue Moon Camera & Machine
Top Bottom