Fujimoto CP-31 teardown / cleaning

Protest.

A
Protest.

  • 6
  • 3
  • 146
Window

A
Window

  • 5
  • 0
  • 77
_DSC3444B.JPG

D
_DSC3444B.JPG

  • 0
  • 1
  • 96

Recent Classifieds

Forum statistics

Threads
197,209
Messages
2,755,602
Members
99,424
Latest member
prk60091
Recent bookmarks
0

jeffhodsdon

Member
Joined
Jan 21, 2020
Messages
13
Location
Brooklyn, NY
Format
35mm
Hi all! I am wondering how others whom use a Fujimoto CP-31 teardown and clean after use.

How do you clean the roller/racks? Running water — Or I have heard soaking them in a bucket?

Looking to get the best practices down to get this thing to last :smile:
 
Joined
Sep 11, 2018
Messages
9
Location
Between Akron and NYC
Format
Medium Format
Hi Jeff.

Sorry but I do not have any solutions for you so I hope you got the info needed. I have heard the CP31/32 should be very easy to clean and drain.
I have been looking for a Fujimoto CP31/32/51 since 2018 when I was in Tokyo and did a lot of printing on a CP51, its a really stable machine. I'm trying to set up a darkroom upstage NY with a friend.

I'm also in Brooklyn so if you ever want to rent out your darkroom let me know! I usually print at My Own Color Lab or LuxLab. I have printed on the De Vere 504 at RapidEye London.

B
www.bjarne-takata.com
 

foc

Subscriber
Joined
Jun 30, 2010
Messages
2,497
Location
Sligo, Ireland
Format
35mm
Hi all! I am wondering how others whom use a Fujimoto CP-31 teardown and clean after use.

How do you clean the roller/racks? Running water — Or I have heard soaking them in a bucket?

Looking to get the best practices down to get this thing to last :smile:

Did you get sorted or are you still looking for info?
While I haven't cleaned A Fujimoto machine, I have cleaned Fuji C41 processors and Fuji Frontier RA4 processors (cleaned gears, rollers etc)
If I can be of help just let me know.
 
Joined
Dec 28, 2021
Messages
52
Location
California
Format
Medium Format
Did you get sorted or are you still looking for info?
While I haven't cleaned A Fujimoto machine, I have cleaned Fuji C41 processors and Fuji Frontier RA4 processors (cleaned gears, rollers etc)
If I can be of help just let me know.

would love some insight on this.
i’ve been flushing my cp-31 out with water but would love some additional care for longevity.

thanks,
-b
 
Joined
Sep 11, 2018
Messages
9
Location
Between Akron and NYC
Format
Medium Format
Hi Brent.

I have a CP31 and I probably clean mine way more than needed, that's just the way I am.
Note that I have never seen it being mentioned to use soap but I use mild soap anyway, I don't think it will hurt the rubber on the rollers.

1. Drain Chems
2. Remove Racks
3. Fill up tanks with water less then 50 degrees C and run the machine for a few minutes,
4. Drain Water.
5. Wash all tanks with Soap.
6. Rinse out all the soap from the tanks.
7. Fill up tanks with water less then 50 degrees C and run the machine for 10 minutes. As I do not have a wash and dry unit I use this clean water to run through all my completed prints one more time and just hang these to dry (I usually use a hair dryer, works great)
8. Wash and rinse the Roller Racks. I use mild soap and rinse well and put to dry.
9. Drain tanks and wipe up all standing water sitting in the tanks.

Also see dropbox links to the manual incase you don't have it.
https://www.dropbox.com/s/yo2mstfngbxoa3m/CP31 Service.pdf?dl=0
 
Joined
Dec 28, 2021
Messages
52
Location
California
Format
Medium Format
Hi Brent.

I have a CP31 and I probably clean mine way more than needed, that's just the way I am.
Note that I have never seen it being mentioned to use soap but I use mild soap anyway, I don't think it will hurt the rubber on the rollers.

1. Drain Chems
2. Remove Racks
3. Fill up tanks with water less then 50 degrees C and run the machine for a few minutes,
4. Drain Water.
5. Wash all tanks with Soap.
6. Rinse out all the soap from the tanks.
7. Fill up tanks with water less then 50 degrees C and run the machine for 10 minutes. As I do not have a wash and dry unit I use this clean water to run through all my completed prints one more time and just hang these to dry (I usually use a hair dryer, works great)
8. Wash and rinse the Roller Racks. I use mild soap and rinse well and put to dry.
9. Drain tanks and wipe up all standing water sitting in the tanks.

Also see dropbox links to the manual incase you don't have it.
https://www.dropbox.com/s/yo2mstfngbxoa3m/CP31 Service.pdf?dl=0

I really appreciate this - thank you.
I’ve been pretty good about doing everything almost the same except using soap.

I’ve seen there used to be a bottled formula cleaner for the units which is for sure out of production by now & have read people using a vinegar based cleaning solution?

my biggest worry is getting rust. since getting & using my machine the last month, it’s now starting to squeak a little bit as it runs.

i was thinking of getting a gentle plant based stainless steel cleaner + polish (spray bottle) to do maybe once every 2-4 weeks on top of the daily session maintenance.

thanks again,
-b
 

tbeaman

Member
Joined
Jan 27, 2010
Messages
56
Location
Ottawa
Format
Multi Format
I have a thermaphot, and I noticed once that I was getting some build up that wouldn’t clean up. Then at the same time I realized I was overextending my chems. As soon as I refreshed the batch, the build up magically disappeared. Because the chems themselves did it. So don’t overthink it. These things are designed to operate full time with chems in them.
 

btaylor

Subscriber
Joined
Dec 28, 2010
Messages
2,214
Location
Los Angeles
Format
Large Format
If you do some Google searches you’ll find that toilet bowl cleaner will effectively dissolve some pretty nasty R4 residue. I got a Durst Printo
in a darkroom deal- the chemistry had been allowed to just evaporate in the machine. It was frozen solid. I disassembled, soaked and scrubbed and got it all clean and running again with the toilet cleaner which did not attack the plastic.
 

foc

Subscriber
Joined
Jun 30, 2010
Messages
2,497
Location
Sligo, Ireland
Format
35mm
would love some insight on this.
i’ve been flushing my cp-31 out with water but would love some additional care for longevity.

thanks,
-b

As I said in my earlier post, I have no experience with the CP31 machine but have had plenty of years experience with Fuji C41 processors and Frontier processors.

I had a look at the manual @Bjarne Jonasson posted and some of the parts are similar to Frontier processors.
This is what I would suggest.
  • Remove entrance racks, starting at dev tank end and soak,fully submerged, in warm water. You may have to use a large basin for this. Be sure to finish all dev rack washing before going to bleach/fix rack as you don't want to cause any contamination.
  • If there is chemical buildup on the gears and at the other end, (the bleach/fix can have a bad build up), then soak in warm water and gently rub with a nail brush. Be careful at the end opposite to the gears, there is a spring around the plastic shaft holder. Best if you gently release this sprint (it hooks into itself). If the chemical build up is very stubborn to remove, you can pour on some methylated spirits/denatured alcohol and that should dissolve it.
  • To clean the rollers on the rack just rub gently with a wet cloth while the rack is submerged in the water in the basin. The rollers should not have a slimy feeling to them when you run your finger along it.
  • Use warm water to fill dev and bleach/fix tanks and then flush out. If you have any build up on tanks walls/base then use a kitchen scrub to gently clean and then flush again with water till it runs clean. (the type of kitchen scrub is the one for non stick pots. The scrub is sponge backed and is non abrasive).
  • I would recommend you drain & washout machine when not in use and soak the entrance racks in cold water for a few hours and then refit.
  • Regularly check rollers with your finger, for any grit etc as this can cause scratches on prints.
  • If you do need to lubricate any drive parts, then a tiny drop of oil, like WD40 and be sure it is well away from the chemicals.
  • I wouldn't recommend toilet cleaner as it can be very harsh. While it may not affect the plastic parts, it could do harm to rollers etc.
Like all maintenance, a little, often, can be the way to go.
I hope this helps.
 

btaylor

Subscriber
Joined
Dec 28, 2010
Messages
2,214
Location
Los Angeles
Format
Large Format
I wouldn't recommend toilet cleaner as it can be very harsh. While it may not affect the plastic parts, it could do harm to rollers etc.
Like all maintenance, a little, often, can be the way to go.
Aha- noted, this could be an issue, I don't know for sure. The rollers were removed during my cleaning operation.
 

mshchem

Subscriber
Joined
Nov 26, 2007
Messages
14,151
Location
Iowa City, Iowa USA
Format
Medium Format
It's amazing how well good hot water works. No harsh chemicals, the Clayton stuff is what I would use. RT processors are great but I wouldn't leave chemistry in them overnight.
 

Nitrous

Member
Joined
Oct 16, 2015
Messages
12
Format
35mm
If you do some Google searches you’ll find that toilet bowl cleaner will effectively dissolve some pretty nasty R4 residue. I got a Durst Printo
in a darkroom deal- the chemistry had been allowed to just evaporate in the machine. It was frozen solid. I disassembled, soaked and scrubbed and got it all clean and running again with the toilet cleaner which did not attack the plastic.

Just to clarify... when you talk about toilet cleaner, what type are you talking about? There are both acid AND alkali based cleaners. If there are any aluminum parts in there... alkali is bad news...
 
Joined
Dec 28, 2021
Messages
52
Location
California
Format
Medium Format
I was curious if anyone is familiar with taking apart the machine? I’m experiencing an issue with my CP31 & it will require me to open it up & take a look inside.

It’s been making a crunching sound every few minutes - but started out every 20-30min…so it’s getting worse.

all of the gears on each rack seem to be meshing well with the ones on the driveshaft & it sounds like it’s coming from the right side corner nearby the power switch (right where the driveshaft enters into the plastic covering).

i attempted to open the machine by removing some screws but was stopped when I was met by a bunch of electrical wires.

i ended up learning that i was taking out the wrong screws to open it up the way I actually need to, to be able to look at the area i’m guessing is the problem.
I found the maintenance manual online, but nowhere does it tell you how to disassemble the machine to get to specific areas within it - it only shows the diagram where each part is located.

any help would be greatly appreciated.
 

George Nova Scotia

Subscriber
Joined
Mar 17, 2010
Messages
983
Location
Milford, Nova Scotia
Format
Multi Format
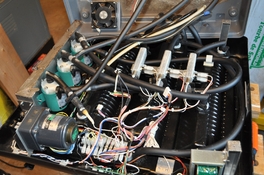
It's been a while since I took mine apart. If I recall just some screws on the bottom and maybe disconnecting the circuit boards first. tip it up from the front and it looks like this. Not much in the way of moving parts inside (maybe the fan). I'd take a good look of all the springs on the end of the rollers.
Manuals here: http://www.silveruser.ca/index_files/Manuals.htm
 

Attachments

  • CP31 inside.JPG
    CP31 inside.JPG
    445.6 KB · Views: 109
Last edited:
Joined
Dec 28, 2021
Messages
52
Location
California
Format
Medium Format
It's been a while since I took mine apart. If I recall just some screws on the bottom and maybe disconnecting the circuit boards first. tip it up from the front and it looks like this. Not much in the way of moving parts inside (maybe the fan). I'd take a good look of all the springs on the end of the rollers.
Manuals here: http://www.silveruser.ca/index_files/Manuals.htm
Hey George thanks for the reply with the photo,
really appreciate it. Is that the same way you would get into the area to access the driveshaft?
 

George Nova Scotia

Subscriber
Joined
Mar 17, 2010
Messages
983
Location
Milford, Nova Scotia
Format
Multi Format
Hey George thanks for the reply with the photo,
really appreciate it. Is that the same way you would get into the area to access the driveshaft?

It's been a long time since I've looked. I believe the gray motor in the bottom left is the drive motor. The green ones are the pumps. The rectangular blocks are the heaters. I don't remember looking too much at the drive train. The problems I had delt with a hose out place and some of the springs on the ends of the rollers. If you look through parts manual on page 14 parts 17 23 18 form the gear chain from the motor to the drive shaft. Like I said it's been a few years take look. I'm kinda busy for a few days a move is in my future, time pack things up.
 
Joined
Dec 28, 2021
Messages
52
Location
California
Format
Medium Format
It's been a long time since I've looked. I believe the gray motor in the bottom left is the drive motor. The green ones are the pumps. The rectangular blocks are the heaters. I don't remember looking too much at the drive train. The problems I had delt with a hose out place and some of the springs on the ends of the rollers. If you look through parts manual on page 14 parts 17 23 18 form the gear chain from the motor to the drive shaft. Like I said it's been a few years take look. I'm kinda busy for a few days a move is in my future, time pack things up.

Sounds good i’ll open it up & take a look around. I guess my last question for now is - I know this machine is not supposed to be turned on without liquid in the baths allowing fluid to flow through the system, as continuous airflow can harm it…if i need to power it on once it’s opened up to see how the driveshaft/tension chain are operating, what’s the safest way to go about it?
 

George Nova Scotia

Subscriber
Joined
Mar 17, 2010
Messages
983
Location
Milford, Nova Scotia
Format
Multi Format
Very briefly. You are right the pumps will not like running dry. Very brief turn ons should be safe. if they are completely dry, best to add a bit of water so they are least wet. Let your ears be a guide, if they are noisy shut it off. I believe you may have to disconnect the electronics to open it so you will have reconnect them somehow to run it. Like I said it's been a long time and memory is foggy. I wish I could help more but right now I have to start packing things up and get ready to move house.
 
Joined
Dec 28, 2021
Messages
52
Location
California
Format
Medium Format
Quick thought. Does it still make the noise with all the racks removed? You can still run it with them out and just water in the "tanks".

I wish I could attach videos here but they’re too large. i ran it without the racks as i was cleaning it after a session (tanks filled with water) & the noise is reduced down to a faint clicking sound, about the same cadence/time frame as the loud *clank* sounds. my guess is that the tension chain or something with the driveshaft isn’t happy without any weight applied & when the racks are set in, it is putting pressure on whatever is wrong & amplifying the noise/faulty mechanics…if that makes sense
 

George Nova Scotia

Subscriber
Joined
Mar 17, 2010
Messages
983
Location
Milford, Nova Scotia
Format
Multi Format
Do you have the wash/dry unit connected? If I recall there is a flexible connection there that might make a noise if alignment is poor. It should be fairly quite without the racks. Take a close look at the drive shaft mounts as well. that nylon is getting real old and may have cracked. I'd just use some water as a lube and see if it changes things. But the drive chain would certainly be a suspect, hopefully just a build up of crap on the chain or gears.
 
Joined
Dec 28, 2021
Messages
52
Location
California
Format
Medium Format
Do you have the wash/dry unit connected? If I recall there is a flexible connection there that might make a noise if alignment is poor. It should be fairly quite without the racks. Take a close look at the drive shaft mounts as well. that nylon is getting real old and may have cracked. I'd just use some water as a lube and see if it changes things. But the drive chain would certainly be a suspect, hopefully just a build up of crap on the chain or gears.

No W/D or Replenishment units attached - just the CP-31 main body. I can literally hear the clicking coming from inside the area where the exposed driveshaft enters the hole that goes inside of the plastic covering (right nearby the power switch sharing that same 90° corner).

so yea i agree, it’s something directly related to the driveshaft itself (nylon, rubber, plastic components) or maybe it’s the tension chain needing to be adjusted or lubed, etc.

my plan is to open it up, clean & lube the drive chain & also inspect the other elements around it.

appreciate your help George, thanks.
 

fumitoma

Subscriber
Joined
Aug 29, 2021
Messages
9
Location
u.s
Format
Analog
No W/D or Replenishment units attached - just the CP-31 main body. I can literally hear the clicking coming from inside the area where the exposed driveshaft enters the hole that goes inside of the plastic covering (right nearby the power switch sharing that same 90° corner).

so yea i agree, it’s something directly related to the driveshaft itself (nylon, rubber, plastic components) or maybe it’s the tension chain needing to be adjusted or lubed, etc.

my plan is to open it up, clean & lube the drive chain & also inspect the other elements around it.

appreciate your help George, thanks.
did you ever solve the clicking issue?
 
Photrio.com contains affiliate links to products. We may receive a commission for purchases made through these links.
To read our full affiliate disclosure statement please click Here.

PHOTRIO PARTNERS EQUALLY FUNDING OUR COMMUNITY:


Ilford ADOX Freestyle Photographic Stearman Press Weldon Color Lab Blue Moon Camera & Machine
Top Bottom