TLR Bonanza - Ricoh Diacord/Rolleiflex Baby/Rolleiflex 2.8F screen ID and repair Q's

Protest.

A
Protest.

  • 3
  • 2
  • 95
Window

A
Window

  • 3
  • 0
  • 58
_DSC3444B.JPG

D
_DSC3444B.JPG

  • 0
  • 1
  • 85
20250405_094841.jpg

D
20250405_094841.jpg

  • 4
  • 0
  • 99

Recent Classifieds

Forum statistics

Threads
197,200
Messages
2,755,497
Members
99,423
Latest member
Sykopics
Recent bookmarks
0

hospadar

Member
Joined
Jun 24, 2024
Messages
43
Location
Michigan, USA
Format
35mm
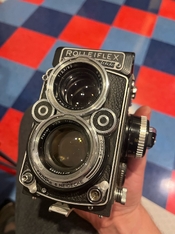
Got EXTREMELY lucky on marketplace yesterday and picked up a gorgeous rolleiflex 2.8f w/ case, AND a ricoh diacord AND a rolleiflex baby for $300 all together (WOW SO EXCITED). I really was not at all looking for a rolleiflex because good god are they expensive but when you see a deal like that...! I have a Yashica 24 that I CLA'd a while back which I LOVE but the self timer had been mangled by a previous owner and had to be removed to get the shutter going again. I'm a heavy self timer user (and the cable release + autoknips works but is awkward and unreliable) so I've been keeping my eyes open for something else with a self-timer but really did not expect to land on this luxury masterpiece.

Ricoh looks good but shutter blades are glued together, will CLA it when I get a chance - prognosis seems good. I've already done a the Yashica 24 and a couple other japanese leaf shutters so feeling confident about that. I found a couple guides but if anyone has any overhaul documentation that they particularly like I'd love to see it.

Baby is the worst-off of the lot, all the leatherette has fallen off the body, glass looks good but top corner of the nameplate looks like it got dropped on something and the shutter is totally jammed up. Can't set the speed dial to any fast speeds, and shutter doesn't open and close (kinda stuck open, sometimes closes partway). Since the leatherette is already gone I suppose I'll pop the cover off and have a look but I think I'll end up selling for parts.

Rolleiflex 2.8 is basically perfect though. I think it's a pre-1965 model with only 12exp counter, Meter works and seems accurate. Shutter speeds sound OK (slow speeds sound a lil cranky but still not _way_ off). Focus and film transport all look good. Only problem is no self timer! With the shutter cocked, you can pull down the self timer lever as if to cock it (which has what seems to me to have an appropriate ratchetey feeling), but then when the shutter is released the self-timer lever snaps back into position with no actual self-timer delay.
WhatsApp Image 2025-03-17 at 21.49.07.jpeg

~~real questions:~~

I pulled down the 2.8f repair guide from learncamerarepair and seems like I can get the delay mechanism out for cleaning without to much trouble (front cover off, open up the shutter). Has anyone worked on one of theser before? Anything high-risk I need to be especially worried about? It seems like some gummed-up old part is probably the culprit but if anyone has had a similar experience I'd love to hear about it.

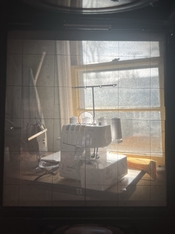
Next question is: what focusing screen is this? It's got a grid and a little split focuser in the center. Is this the stock screen or a replacement?
signal-2025-03-18-101950_002.jpeg
 

Dan Daniel

Subscriber
Joined
Jul 4, 2009
Messages
2,829
Location
upstate New York
Format
Medium Format
The screen looks like an original Rollei. Look at the edges for the F&H mark.

Try exercising the self timer. The snap-back isn't unusual. Best to not remove the lens shroud to get to the timer mechanism. You need to get everything lined up properly for reassembly or the meter won't work, dials can jam, etc. If you do remove it- flash collar needs to come off, and maybe shutter button collar (varies). Key numbers- 1/500, f/22. And differential gear assembly tab set vertical.
 

BMbikerider

Member
Joined
Jul 24, 2012
Messages
2,902
Location
UK
Format
35mm
I had never come across a Ricoh Diacord before but a dealer in classic cameras in UK has a nice looking one which the sellers words is virtually unmarked and the only thing wrong is the built in meter is non functioning. I wish I had seen it before I went out and bought a Yashica 124g with a working meter for quite a bit more money, The selenium meter on the Ricoh doesn't work but that doesn't bother me, because for med format I use a separate meter. The Yashica, don't get me is also virtually unmarked, and comes with an equally unmarked case and hood. I would have actually prefer ed the Ricoh
 

BAC1967

Subscriber
Joined
Oct 30, 2014
Messages
1,411
Location
Bothell, WA
Format
Medium Format
I had never come across a Ricoh Diacord before but a dealer in classic cameras in UK has a nice looking one which the sellers words is virtually unmarked and the only thing wrong is the built in meter is non functioning. I wish I had seen it before I went out and bought a Yashica 124g with a working meter for quite a bit more money, The selenium meter on the Ricoh doesn't work but that doesn't bother me, because for med format I use a separate meter. The Yashica, don't get me is also virtually unmarked, and comes with an equally unmarked case and hood. I would have actually prefer ed the Ricoh

The Ricoh Diacord is a really nice camera. I have a few Rolleiflex 3.5 and Rolleicord, the Ricoh is every bit as sharp. the meter does still work on mine but I usually use a different meter.
 

blee1996

Subscriber
Joined
Jul 25, 2008
Messages
1,075
Location
SF Bay Area, California
Format
Multi Format
If I were you, I will definitely NOT DIY repair the Rolleiflex 2.8. It is a high value camera, and its minor issues will not impact daily use. I will just use it, enjoy it, and live with the very minor issues. Besides I cannot remember the last time I used self timer on a manual camera.

The old saying with old cameras is "better have a 95% working camera than an 100% non-working camera". 😄

You can still have the fun of DIY repair with the Ricoh Discord.
 

Tel

Subscriber
Joined
May 9, 2011
Messages
924
Location
New Jersey
Format
Multi Format
I’ve successfully restored two Rollei Babies and can say it was a marathon and extremely frustrating. The advance/cocking/frame counting mechanism is extremely sensitive: if any part of it is even slightly off, the whole thing will fail to work. (And don’t forget that you can only fire the shutter when the VF is open!) The lenses on these are probably the best on any of the 127 TLRs but the mechanics are a nightmare to fix and (to my taste) kind of clumsy to use. Get that big 2.8f working and enjoy it!
 

OAPOli

Member
Joined
Sep 26, 2022
Messages
619
Location
Toronto
Format
Medium Format
I have a 3.5F and it's a bit tricky to work with. The front panel comes off via four screws under the leatherette plus the flash connector retaining ring. Putting it back is the difficult part: you need to align the self-timer/flash synch arm, the aperture and shutter linkages and the differential gear which couples to the exposure selectors and DOF/meter gear racks. It needs to be at 1/500 f/22 for the racks to be in the correct position.

Once it's off you gain access to the front of the shutter where the self timer is located.
 
OP
OP
hospadar

hospadar

Member
Joined
Jun 24, 2024
Messages
43
Location
Michigan, USA
Format
35mm
Update on the repairs:

Opened up the 2.8F for CLA. I think the self timer problems are not merely sticky lube (although further investigation is needed). The little steel teeth that (should) engage gear #406 (making a nice ratchety sound) appear to be bent upwards (who knows how that happened) and not engaging. Also spring #420 seems to not quite fully return the lever which pivots around #401 (like it got stretched a bit too far) - lever seems to engage with the pallet fork to enable/disable the whole escapement.

Before disassembly I was able to cock the timer with a ratchety sound. There are two teeth that engage the cutouts on #406, one of mine seems to _almost_ engage, the other is completely bent out of place. Whether or not the first one can actually grab onto the gear seems to have to do with the exact angle of the lever with the elongated hole coming off of 406 (which is pulled by a pin to arm the self-tiemr). My guess is that when arming the timer, the angle is just so that the first tooth can just barely engage, but once the shutter is fired the arrangement changes ever so slightly and the arm just snaps back instead of pushing against #406

Probably will attempt to disassemble the timer escapement and bend the teeth back to see if I can get them engaging again. Worst case scenario seems like I end up with a non-functional self timer which is exactly where I started. With the price of parts bodies being through the roof I think that's my only realistic hope of getting this working (maaaybe if I could find a different camera with a same-sized compur MXV or a large-format compur mxv of the appropriate size I could hoist the self timer from that but that seems unlikely).


1742829055528.png
 
OP
OP
hospadar

hospadar

Member
Joined
Jun 24, 2024
Messages
43
Location
Michigan, USA
Format
35mm
Would be curious if anyone has any tips or thoughts about bending the ratchet tabs back in place. I assume they are some kind of hard spring steel and am worried they're just going to snap off when I bend them back. I recall reading some article somewhere about someone repairing the ratchetey bit on a yashica TLR self timer and maybe they heated the metal (but of course I did not bookmark it and cannot for the life of me locate it now).
 

Dan Daniel

Subscriber
Joined
Jul 4, 2009
Messages
2,829
Location
upstate New York
Format
Medium Format
Photos of the self-timer?

I wouldn't doubt if an externally mounted self-timer mechanism on many Rolleis is the same as your internal unit. Photo with a ruler?
 
OP
OP
hospadar

hospadar

Member
Joined
Jun 24, 2024
Messages
43
Location
Michigan, USA
Format
35mm
Did a little poking around on ebay and didn't see any obviously listed replacement parts. Do see some synchro-compur MXV's that I might be able to pull parts from (that look like they're intended for mounting large format lenses) I imagine the only real way I'd know if a replacement part was going to fit would be to buy it and pull it apart.


2025-03-24 12.48.19.jpg
 
OP
OP
hospadar

hospadar

Member
Joined
Jun 24, 2024
Messages
43
Location
Michigan, USA
Format
35mm
Ah! Found that article - similar issue in a yashica 124 described in this CLA guide: https://learncamerarepair.com/product.php?product=1697

Probably a previous user set the self timer and it got forced back. Going to just give those pawls a bend and see what happens!

For reference, the article refers to a similarly broken (but different) self timer in a copal shutter, the pawls are deformed, presumably by a user attempting to force an armed self-timer back to the unarmed position. He doesn't heat the pawls, one snaps but the other is OK, he _does_ use some heat to fix the bent self-timer setting lever (not relevant in my case)
 
Last edited:

OAPOli

Member
Joined
Sep 26, 2022
Messages
619
Location
Toronto
Format
Medium Format
The self-timer assembly looks identical to the one in a #00 shutter. You could salvage the part from a spare 00 or 0 synchro-compur. The one in the no.1 compur is completely different.
 
OP
OP
hospadar

hospadar

Member
Joined
Jun 24, 2024
Messages
43
Location
Michigan, USA
Format
35mm
The self-timer assembly looks identical to the one in a #00 shutter. You could salvage the part from a spare 00 or 0 synchro-compur. The one in the no.1 compur is completely different.

Very helpful, thanks! Will probably go that route if emergency pawl surgery doesn't work. An old shutter is HELLA cheaper than an old rolleiflex for parts!
 
OP
OP
hospadar

hospadar

Member
Joined
Jun 24, 2024
Messages
43
Location
Michigan, USA
Format
35mm
Pawl surgery seems to have been successful! I'm not extremely confident it'll continue working but it's there for now.

I opened up the self-timer escapement to get #406 out. The pawls and the little arm the cocks the self-timer are actually inseperable. There's a ring that's press-fit onto the gear which holds the pawls in place (annoying, maybe could have removed with heat? did not want to try, worried I might never get it back together). I was able to bend the pawls back down by wedging the end of a pick up against the center shaft under the pawl leaf then carefully bending the ends back down with tiny pliers.

Shutter speeds seem pretty decent - 1 to 1/15 are basically right on, but 1/30 - 1/500 are slow (less than a stop, (1/30 - 1/125 taking 120% time it should take, 1/250 about 160%, 1/500 about 200%). Is there any way for me to adjust the fast speeds up a bit without speeding up the slow speeds too much? The escapement is positioned pretty much as far as it will go towards the outside of the case (outside == faster, inside == slower). I can move it out a bit more but then I seem to have problems with 1/15 - it goes way too fast (like 1/250) as if the delay is not kicking in at all.

I think those speeds are really just fine and certainly easy to compensate for but if there's a straightforward way to juice em a little I'll do it.
 
OP
OP
hospadar

hospadar

Member
Joined
Jun 24, 2024
Messages
43
Location
Michigan, USA
Format
35mm
I'm using a photodiode hooked up to my laptop's headset port stopped down to f/22, tests seem very repeatable and comparable to what I can measure at the slower speeds with high-speed phone video and sound recordings of the shutter.

I decided to just button it up and not worry about it - the slow speeds are dead on, 1/15th is actually slightly fast, It seems like bending that pin to slow down 1/15 would probably also slow down the faster speeds which are already slightly slow so I suspect I'm probably at a pretty good happy medium. Drive cam is clear on the high speeds, #341 is pushed all the way by the speed cam (I did bend the pin on #341 inwards a a little - I think the escapement was probably set closer to the center before, with the current positioning pretty far out I couldn't actually get the speed cam to go all the way to 1/500 because the pin on #341 was bent too far out).

1742914922132.png
 

OAPOli

Member
Joined
Sep 26, 2022
Messages
619
Location
Toronto
Format
Medium Format
At higher speeds the opening/closing times are comparable to the opened time. When the lens is stopped down the efficiency is the lowest. Times are ~2x at 1/500, ~1.5x at 1/250, etc...

To get the shutter to optimal condition, it should be taken apart to clean the blade operating ring, clean the blades, lube the bearing surfaces, etc. Sometimes the main spring needs to be replaced. Unfortunately, the 2.8f shutter is a bit inaccessible. The lens standard has to be removed (which may mess the parallelism), and the focus side panel has to be removed to unhook the DOF and meter gear racks.
 
OP
OP
hospadar

hospadar

Member
Joined
Jun 24, 2024
Messages
43
Location
Michigan, USA
Format
35mm
At higher speeds the opening/closing times are comparable to the opened time. When the lens is stopped down the efficiency is the lowest. Times are ~2x at 1/500, ~1.5x at 1/250, etc...

To get the shutter to optimal condition, it should be taken apart to clean the blade operating ring, clean the blades, lube the bearing surfaces, etc. Sometimes the main spring needs to be replaced. Unfortunately, the 2.8f shutter is a bit inaccessible. The lens standard has to be removed (which may mess the parallelism), and the focus side panel has to be removed to unhook the DOF and meter gear racks.

Eeee yeah that was my impression from the repair manual and I think I will not be messing with that.

EDIT: just for reference, also found this which looks a lot like my timings (so yeah, seems fine) - https://rangefinderforum.com/threads/synchro-compur-shutter-speed-adjustment.162022/

Another unrelated wondering is about getting the focusing hood off - I'd like to dust inside the upper chamber and also check the mirror to see if it could benefit from replacement. Manual sez push down on the little tabs on either side and slide the hood off the back - my hood seems very stuck in place regardless of what I'm doing with the tabs. Am I missing something or is it just stuck?
 
Last edited:

OAPOli

Member
Joined
Sep 26, 2022
Messages
619
Location
Toronto
Format
Medium Format
The little tabs fit into rectangular notches in the viewing hood to lock it horizontally. There is a pin on the rear middle of the hood that fits in a hole on the body to lock the hood vertically. Not sure what is going on with yours.
 

Dan Daniel

Subscriber
Joined
Jul 4, 2009
Messages
2,829
Location
upstate New York
Format
Medium Format
Another unrelated wondering is about getting the focusing hood off - I'd like to dust inside the upper chamber and also check the mirror to see if it could benefit from replacement. Manual sez push down on the little tabs on either side and slide the hood off the back - my hood seems very stuck in place regardless of what I'm doing with the tabs. Am I missing something or is it just stuck?

In case you haven't caught this part- the tabs stay on the camera. They do not come off with the hood. Push tabs down and slide main hood body back. Do not push tabs down and pull tabs back.
 
OP
OP
hospadar

hospadar

Member
Joined
Jun 24, 2024
Messages
43
Location
Michigan, USA
Format
35mm
Mystery, still stuck, i also just noticed that the whole hood and rail assembly seems a little loose, has some wobble. The lower part the tabs are attached too, the nameplate, etc all kinda wiggle around together. I’m wondering if maybe one or more of the screws that hold that on to the body have come loose and are now jammed between the hood and the rail assembly?

I can’t tell from the repair manual if there’s any other way to access that so maybe i just need to live with it? Seems like I’d have to get the hood off to tighten those. I suppose at least they won’t fall all the way out?
 

Dan Daniel

Subscriber
Joined
Jul 4, 2009
Messages
2,829
Location
upstate New York
Format
Medium Format
Try very light touch. Don't press down on hood. Gently pull back. Gently pull up and back. Drip a little naphtha along joint between body and hood. Slide thin plastic into this joint. The four screws holding the hood lower frame in place are on this joint surface.
 
OP
OP
hospadar

hospadar

Member
Joined
Jun 24, 2024
Messages
43
Location
Michigan, USA
Format
35mm
Got it!

Screws were indeed loose, and I did use some naptha. I think the main problem was corrosion on the rear locator post. I slipped a feeler gauge between the hood and the rail over the screw locations. I realized immediately after I got it off that probably lifting the hood up while sliding back would pull the whole assembly up and off of the screws (I was pushing mostly back but probably a little down). My guess is that it was just the corrosion sticking it in place and the little back-and-forth wiggling was all it really needed to loosen that up. probably some very gently wedging of a guitar pick or one of those plastic cellphone repair tool wedges near the rear locator pin would have loosened it up too. I didn't realize that it's just the pin and the tab on the front really holding it place, not rails along the edge.

Mirror looks good, just a lil dusty - will very carefully wipe with alcohol.

Is there any safe way to clean the screen? I usually just do my best with a rocket blower because I'm afraid to mess them up.

SO excited to have this guy fully operational! really appreciating the help ☺️
 
Last edited:
Photrio.com contains affiliate links to products. We may receive a commission for purchases made through these links.
To read our full affiliate disclosure statement please click Here.

PHOTRIO PARTNERS EQUALLY FUNDING OUR COMMUNITY:


Ilford ADOX Freestyle Photographic Stearman Press Weldon Color Lab Blue Moon Camera & Machine
Top Bottom