Yashica 635 Aperture Blades Assembly

Forum statistics

Threads
197,375
Messages
2,758,080
Members
99,473
Latest member
Jerry C
Recent bookmarks
0

FilmShooterX

Member
Joined
Apr 5, 2024
Messages
16
Location
UK
Format
Medium Format
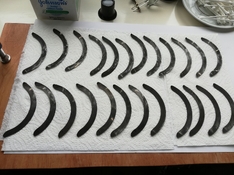
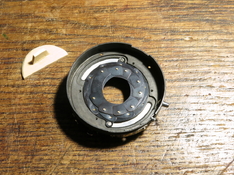
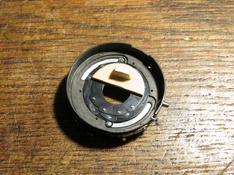
I have a Yashica 635 TLR. The aperture blades were stuck together and the setting dial unable to move. I was able to remove the shutter from the camera. I cleaned the shutter blades as well as the aperture blades. Now the problem. I finds the aperture blades impossible to be assembled. I can get 6 of the blades on the control ring easily. However, to insert the last 4, you have to lift the other blades to insert them under. I have tried for a couple of days without success. Has anyone done this before? If you have done this before can you share how it is done?

IMG_20250401_084408_small.jpg
 

monopix

Member
Joined
Dec 10, 2009
Messages
146
Location
Lincolnshire, UK.
Format
Hybrid
Yes I've done it several times. No I can't show you as I don't have any pictures. But put something in the middle to fill the hole so you can rest the blades on it then you can assemble them in a closed position which is easier. A tip for the future - don't dismantle them. Put the whole assembly in an ultrasonic cleaner.
 
Joined
Jan 28, 2023
Messages
933
Location
Wilammette Valley, Oregon
Format
35mm RF
Whenever possible, it’s preferable to assemble the aperture blades on the mechanism plate (black plate, left in your photo) and then carefully position the case over top, rather than assembling them in the case.
I place the plate on a rubber stopper (through the center hole) to assemble the aperture, raising it above the work surface.
 

film4Me

Subscriber
Joined
Feb 22, 2025
Messages
98
Location
Australia
Format
Medium Format
A desperate last resort method is to lightly grease the blades and stick them together in their correct sequence, then after assembly, thoroughly wash the unit with lighter fluid working the blades in and out while they're in the bath. It'll need to be done 2-3 times, changing the fluid after the first wash. I've done this successfully with a 10 blade aperture, and it's still going strong after some years of use and checking it's operation now and then.
 

dxqcanada

Member
Joined
Jun 9, 2011
Messages
330
Location
Ontario, Canada
Format
Multi Format
As others have mentioned ... something in the middle to keep the blades open ... and Apply lots of Isopropyl Alcohol (I would not suggest grease) to all surfaces, as the cohesion of the liquid keeps the blades in position.
This takes practice and lots and lots of patience.
 

Steve906

Subscriber
Joined
Mar 2, 2015
Messages
93
Location
Leicester England
Format
Multi Format
Yes I've done thousands (not this particular one) Its just as you say, slide them under one by one into the closest hole first. I wouldn't suggest any other method - just patience and practice. Ensuring all the blades are flat helps. Maybe find a way to clamp the assembly in position on the bench so two hands are free, one to apply a little pressure downwards on the pin end of the one your lifting to keep it in the hole.

24 leaf Dallmeyers are fun :sad:
 

Attachments

  • I24ld.jpg
    I24ld.jpg
    963.1 KB · Views: 15
Last edited:
Joined
Jan 31, 2020
Messages
1,262
Location
Germany
Format
Multi Format
I've successfully held shutter blades together with a magnet. Maybe that works here, too? It should not be too strong and/or you must place something between it and the leaves to be able to separate them more easily. An electromagnet that can be turned off when done would be even better.
I've also tried using scotch tape, I don't recommend it. It sticks too well to freshly cleaned metal. Maybe good electrical tape is better.
 

Nicholas Lindan

Advertiser
Advertiser
Joined
Sep 2, 2006
Messages
4,211
Location
Cleveland, Ohio
Format
Multi Format
...I've also tried using scotch tape, I don't recommend it. It sticks too well to freshly cleaned metal...
The adhesive strip from a post-it note or 3M removable Scotch Tape?

I have found the key is not to drink too much coffee. Being mildly drunk might help.
 

MattKing

Moderator
Moderator
Joined
Apr 24, 2005
Messages
51,859
Location
Delta, BC Canada
Format
Medium Format

SalveSlog

Subscriber
Joined
Sep 29, 2013
Messages
267
Location
Southern Norway
Format
Medium Format
Problem arise when around half of the blades are in place - when you have to enter the rest of the blades under previous blades. I made a device (from wood) to hold the blades in place while the last ones are entered.
Here is from my first experience with aperture blade mounting. On a Welta Weltax' Tempor shutter.
 

Attachments

  • diaphragma-1.jpg
    diaphragma-1.jpg
    433.9 KB · Views: 19
  • diaphragma-2.jpg
    diaphragma-2.jpg
    433.4 KB · Views: 15
OP
OP
FilmShooterX

FilmShooterX

Member
Joined
Apr 5, 2024
Messages
16
Location
UK
Format
Medium Format
Problem arise when around half of the blades are in place - when you have to enter the rest of the blades under previous blades. I made a device (from wood) to hold the blades in place while the last ones are entered.
Here is from my first experience with aperture blade mounting. On a Welta Weltax' Tempor shutter.

Thank you. I have shelved this repair for the moment. I was thinking something similar. I will give this another go.
 
Photrio.com contains affiliate links to products. We may receive a commission for purchases made through these links.
To read our full affiliate disclosure statement please click Here.

PHOTRIO PARTNERS EQUALLY FUNDING OUR COMMUNITY:


Ilford ADOX Freestyle Photographic Stearman Press Weldon Color Lab Blue Moon Camera & Machine
Top Bottom