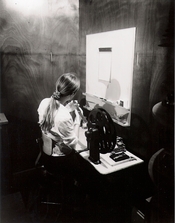
If you had taken a picture of me operating this in or about 1978, it would have looked like this:
View attachment 333275
You can't tell this from the photo, but the lower half of the back of the machine is inset into the wall. On the other side of the wall are the machine's doors into the darkroom.
One got down on to the floor and loaded the lens mechanism suited for the task at hand from down below, through those doors. That could be done in subdued room light. Everything else was done in darkness.
Those doors also gave access to the roll paper which fed from the roll that came from the supplier and was loaded on the feed side of the transport mechanism.
After proceeding through the paper holder in the exposure position, the paper continued to the take-up roll spool on the other side. The machine advanced the paper automatically after each exposure. After all the prints were made, the roll would be cut on the exposed print side and the take-up roll spool was transferred to the roll feeder at the darkroom end of on our Kreonite paper processor. After the leading edge came out of the dryer on the Kreonite - in room light outside the darkroom - we attached it to a roll take-up spool.
The continuous roll of processed prints was then cut manually and paired with the film.
For the proofing, the uncut strips fed from one side to the other through the head mechanism. Each frame was positioned manually. In proof test mode, the auto-exposure system read each negative individually and then exposed an angled central strip of the image on to the paper. That proof test mode was actually set at the beginning at the same time as the lens mechanism was set, from that side of the machine.
The proof test strips were developed, cut, and then matched up with the films. I would then evaluate each strip and write the necessary density and colour corrections on the strips.
When it came time to do the final prints - either proofs or re-prints - the proof test mode was reset to full print mode. The films/negatives then were fed and positioned manually again, and the evaluated density and colour corrections would be set for each negative, the machine would again read the auto-exposure system results, but would add the manual corrections and expose the final result.
Everything thereafter was similar to the workflow with the test strips, except with much more paper used

.
I could probably do all this still - with the possible exception of getting up and down to and from the floor that much!


 .
.


