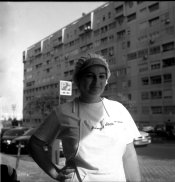
The dark areas along the upper left edge of the frame are likely caused by air bubbles that mass together to form a “suds” or “foam”. The foam, being mostly air bubbles, floats on top of the developer close to the upper edge of the film as it rests in the tank.
If the foam gets deep enough, it displaces the developer. Then the foam insulates the film from the developer in these areas. They lack development, so the finished negative lacks density in these areas. When rendered as a positive image, these areas are dark and lack detail.
The cure is to make sure that there is sufficient developer in the tank to completely cover the top edge of the film and to reduce the vigor of the agitation so that little or no developer-displacing foam (air bubbles) is generated.
I recommend the following agitation recipe for elimination of development problems:
Keep the axis of the tank vertical at all times during agitation. Grasp the tank in both hands and move it in a circular path in a horizontal plane of, say, 250 mm to 300 mm in diameter. Orbit quickly one rotation anticlockwise and stop abruptly. The solution will continue to rotate inside the tank. Wait one second and repeat in the clockwise direction, and so forth. The action will give proper agitation of the developer inside the tank and keep it mixed uniformly as development proceeds.
At the end of the agitation cycle, knock the bottom of the tank about 6 – 8 times against your work surface (countertop or tabletop). This is to dislodge any possible air bubbles from the film so that they will float to the surface of the developer. This orbit-and-stop agitation usually generates very few, if any, bubbles. In contrast, inversion agitation generates many bubbles, which can interfere with correct film development.
The agitation I’ve described is a variation of a method known as “Figure-8 Agitation”. Both of these work well to produce negatives of uniform density and free from air-bubble defects (foam and individual-bubble areas known as “air bells”).


