Build a shutter tester for Focal Plane shutters - Cheap, Easy & it Works

Lost in Space

A
Lost in Space

  • 0
  • 0
  • 35
Fruits on Fuji

A
Fruits on Fuji

  • 4
  • 1
  • 82
High Street

A
High Street

  • 5
  • 1
  • 134
Titmouse F4s

A
Titmouse F4s

  • 4
  • 0
  • 112

Recent Classifieds

Forum statistics

Threads
197,383
Messages
2,758,053
Members
99,485
Latest member
ishika10
Recent bookmarks
1

Spachal

Member
Joined
Dec 3, 2024
Messages
18
Location
Czech Republic
Format
Medium Format
Hello, that's great, I'll see if I can upload the mentioned script to the ESP32 I'm using with the 'activated license' in the IDE, or maybe it would be simpler to use one of the older ESP8266.
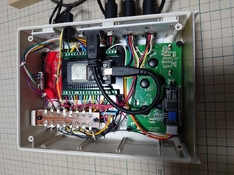
I have a few of and use them for testing. For now, it's probably not necessary to add functions to the main program, setting the laser beam position should be sufficient just by visual inspection, but I'll see what the reality will be when assembling the solution I'd like to implement. The adjustment I need is primarily mechanical; software can't handle that :]

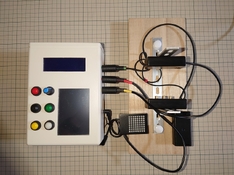
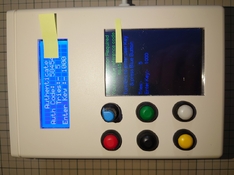
My courier is supposed to deliver better metal buttons from AE today (https://vi.aliexpress.com/item/1005006794868960.html), so I can probably start 3D printing the first prototype.
 

koraks

Moderator
Moderator
Joined
Nov 29, 2018
Messages
20,542
Location
Europe
Format
Multi Format
or maybe it would be simpler to use one of the older ESP8266.

Overall, the ESP32 is fairly similar to the 8266 in terms of programming (especially from an Arduino point of view), with the main difference being the expanded capabilities of the ESP32 series (there are many members in this family). For this particular application, I expect either to be very generously qualified.
 

Spachal

Member
Joined
Dec 3, 2024
Messages
18
Location
Czech Republic
Format
Medium Format
Hi, I've never used ESP8266 with Arduino IDE. In my case, there was no reason for that. For home automation, I used ESPEasy firmware - it's a really great piece of art for this usage :]
But you are right, in this case, it doesn't matter. ESP8266 has only one CPU (which is also used for wireless communication), while ESP32 has 2 CPUs (and BT support) and it's much more powerful.

@Niglyn: with a bit of spare time, I've used AI to generate some name suggestions for a tester:
- VintageShutter
- LaserShutter Pro
- Photon Chrono
- ShutterMatrix
- LumaChron
- RetroShutterLab
- ShutterScope
- ShutterSense
- ESP ShutterMaster
- RetroSpeed Tester
- ShutterBeam ESP
- PhotoTach
- PhotonPrecision
- ShutterVizor
- ShutterLab
- ChronoShutter
- ShutterSync Pro
- OptiShutter

We could come up with a workable title using these words, right? Have a joyful mind and a pleasant weekend, everyone! :]
 
Joined
Jul 11, 2024
Messages
11
Location
Australia
Format
Medium Format
Hello! Just thought I'd ask if i could get a key DM'd as well as i don't have permission to send messages yet :smile:
 
OP
OP

Niglyn

Member
Joined
Feb 26, 2022
Messages
402
Location
Surrey, UK
Format
Analog
Hello! Just thought I'd ask if i could get a key DM'd as well as i don't have permission to send messages yet :smile:

Normally there is a restriction for new subs before they can DM, to stop spamming.
Not sure if it is number of posts, time subbed or both.

Easy workaround is to post here, as you have done & I can DM you, which then allows messaging between us, without a 30 day wait.

Often, for genuine subs, Koraks will beat me to it & open up messaging between us.
 
OP
OP

Niglyn

Member
Joined
Feb 26, 2022
Messages
402
Location
Surrey, UK
Format
Analog
@Niglyn: with a bit of spare time, I've used AI to generate some name suggestions for a tester:
- VintageShutter
- LaserShutter Pro
- Photon Chrono
- ShutterMatrix
- LumaChron
- RetroShutterLab
- ShutterScope
- ShutterSense
- ESP ShutterMaster
- RetroSpeed Tester
- ShutterBeam ESP
- PhotoTach
- PhotonPrecision
- ShutterVizor
- ShutterLab
- ChronoShutter
- ShutterSync Pro
- OptiShutter

We could come up with a workable title using these words, right? Have a joyful mind and a pleasant weekend, everyone! :]

@Spachal Hi,
Thanks for your thoughts & list of ideas.
LaserShutterPro & RetroShutterLab look good, although the latter is a bit close to another fully-built tester.

I have just called it The Shutter Tester for now.

I have recently been playing with CAD & designed a bezel to go around the TFT screen, covering the join between the screen & box lid.

Have also started making a template, with markings for bolt, TFT and button positions, to make marking out and cutting the top of the project box easier.

Alas I have no 3d printer so have no way of knowing if they work :surprised:)
 

MattKing

Moderator
Moderator
Joined
Apr 24, 2005
Messages
51,872
Location
Delta, BC Canada
Format
Medium Format
Often, for genuine subs, Koraks will beat me to it & open up messaging between us.

Not just @koraks :smile:
If you want to have the restriction removed before you reach the 20 post threshold, make the request in a post and then Report that post, with your request repeated in the Report.
All the moderators then will have the ability to consider your request.
Sometimes we say no, or ask further questions of you (outside the public threads), but we have the ability to manually remove the restriction.
 

Spachal

Member
Joined
Dec 3, 2024
Messages
18
Location
Czech Republic
Format
Medium Format
@Niglyn: You're welcome, , in post #555, you asked for name suggestions, so I tried to create a prompt for various AI. How you ultimately name your tester is up to you.

Learning to model in 3D in a CAD application is a bit of a challenge, but it's generally useful in life. I wish you good luck and, most importantly, patience! If you export an STL file, I can print it for free and either take photos and test it, or send it to the UK.
 

Pijalu

Member
Joined
Feb 4, 2025
Messages
3
Location
Belgium
Format
35mm
Yellow everyone !

Thanks a lot @Niglyn for making this happen !
found out fixing old camera is fun and I really have a couple cameras that need shutter love :smile:
=> You are my hero !

I still need to position the lasers but so far the main assembly is done and after a bit fighting (had to boot windows to flash) , it seems to boot/work even if I am usually pretty bad at HW ...

Obligatory photos (I'll post more when done)
WhatsApp Image 2025-02-13 at 22.16.52.jpeg
WhatsApp Image 2025-02-13 at 22.20.40.jpeg


Yeah - I don't need a key... I may have poked around/reverse engineered a bit and keygen'ed my way in... but it's for my own guilty pleasure ^_^
 
OP
OP

Niglyn

Member
Joined
Feb 26, 2022
Messages
402
Location
Surrey, UK
Format
Analog
Yeah - I don't need a key... I may have poked around/reverse engineered a bit and keygen'ed my way in... but it's for my own guilty pleasure ^_^

Haha, you will be sorry.
I was inspired by sky TV in the 90s, whose decrypt cards would regularly be hacked and then sold at a lower price than Sky.
They were then sold with a guarantee that they would work for a year.

Sky then issued new cards and the pirates soon cracked these, or so they thought.

Then a few months later, Sky got their revenge as hidden in the new cards, was their ECM, which locked all of the Sky boxes & they could never be used again :surprised:)
 

Pijalu

Member
Joined
Feb 4, 2025
Messages
3
Location
Belgium
Format
35mm
Haha, you will be sorry.
Tempting as that would be a fun one to unbrick.

But don't worry, plan is not for me to steal you or your work... It's was just :ho, I never built such thing... Followed by Hohoho, I never reverse engineered a esp32 firmware...

Fun fact: In the 90s, I was seriously on the dark side... until I moved into open source

All in all, thank you for your work 🙏
 

hulk

Subscriber
Joined
Feb 10, 2025
Messages
2
Location
JAPAN
Format
35mm
Hi,Niglyn
Thanks for posting your project!
I followed your post and build the system as per your information, only the passcode is missing, you can send it to me?
 

Attachments

  • DSC_3522.jpg
    DSC_3522.jpg
    280.8 KB · Views: 42
  • DSC_3528.jpg
    DSC_3528.jpg
    221.5 KB · Views: 46
  • DSC_3537.jpg
    DSC_3537.jpg
    150.9 KB · Views: 50

Pijalu

Member
Joined
Feb 4, 2025
Messages
3
Location
Belgium
Format
35mm
Hi,Niglyn
Thanks for posting your project!
I followed your post and build the system as per your information, only the passcode is missing, you can send it to me
Nice build !
Nota:You should provide your reference code so @Niglyn can send you the auth code 😄
 
OP
OP

Niglyn

Member
Joined
Feb 26, 2022
Messages
402
Location
Surrey, UK
Format
Analog
Hi,Niglyn
Thanks for posting your project!
I followed your post and build the system as per your information, only the passcode is missing, you can send it to me?

Hi, code sent.

Looks like you went for the full monty! Don't think anyone has done that yet.

I like your case & they way you have done the power bus bar.

Please let us know how you get on with it.
 

MattKing

Moderator
Moderator
Joined
Apr 24, 2005
Messages
51,872
Location
Delta, BC Canada
Format
Medium Format
Looks like you went for the full monty! Don't think anyone has done that yet.

Just a bit of caution here:
If someone doesn't recognize that reference, they might be confused if their research leads them to the Movie of the same name:whistling:
 
OP
OP

Niglyn

Member
Joined
Feb 26, 2022
Messages
402
Location
Surrey, UK
Format
Analog
3d print files are available.

First is a template to fit on the project box lid. It has the cut-out size for the TFT screen and the drill holes for TFT mounting bolts & button positions.

Second is a bezel, to cover the gap between the project box cut-out and the TFT screen.

Big caveat here, I have only drawn them. They have never been printed or tried for accuracy.

If somebody with 3d print skills could look at them & print them, to see if they will work, that would be appreciated.

Ideally they would need a new project box to try the template print.

When I get a 3d printer (might be some time) I will print them myself & send to anyone who wants them
 

alinCiortea

Member
Joined
Jan 1, 2008
Messages
74
Location
Romania
Format
Multi Format
Hey, Niglyn!

I'm about to start working on my second tester (it will be a slight upgrade of my first one, so film gate sensor only because it fits my needs better - unless you'd tell me that the measurements are not as precise as the laser one!)

I have a question... is there any way to include an USB port and make the tester export the measurements on an USB stick? For the time being I take photos of the readings with my phone (attaching the tester to my laptop is a bit of a hassle)
 
OP
OP

Niglyn

Member
Joined
Feb 26, 2022
Messages
402
Location
Surrey, UK
Format
Analog
Hey, Niglyn!

I'm about to start working on my second tester (it will be a slight upgrade of my first one, so film gate sensor only because it fits my needs better - unless you'd tell me that the measurements are not as precise as the laser one!)

I have a question... is there any way to include an USB port and make the tester export the measurements on an USB stick? For the time being I take photos of the readings with my phone (attaching the tester to my laptop is a bit of a hassle)

Alas the ESP will not connect to a USB stick.

It would be possible to output to a SD card.
 
OP
OP

Niglyn

Member
Joined
Feb 26, 2022
Messages
402
Location
Surrey, UK
Format
Analog
Hi, here is a piccy of the bezel. It is designed to fit over the gap between the project-box cut-out and the TFT screen, to give a neater appearance.

3d print (stl) file of this & a cutting template for hole & buttons are on the github page.

I have no idea if it will fit as I do not have a 3d printer to test it.


Project_box_bezel_4_inch v4.jpg
 

Spachal

Member
Joined
Dec 3, 2024
Messages
18
Location
Czech Republic
Format
Medium Format
Hi Niglyn,
If no one gets to it faster, I'll print the part for you next week and try it on the LCD to see if it fits properly.
I might be able to add the part to an ongoing print, but I can't guarantee that, the printer is running almost non-stop right now.
Do you want to use any special material for the print, or is any material fine for testing?

BTW, please add a link to Github to the 1st post or your signature, thanks! :]
 
OP
OP

Niglyn

Member
Joined
Feb 26, 2022
Messages
402
Location
Surrey, UK
Format
Analog
Hi Niglyn,
If no one gets to it faster, I'll print the part for you next week and try it on the LCD to see if it fits properly.
I might be able to add the part to an ongoing print, but I can't guarantee that, the printer is running almost non-stop right now.
Do you want to use any special material for the print, or is any material fine for testing?

BTW, please add a link to Github to the 1st post or your signature, thanks! :]

Hi, thanks would be great if you could print it & see if it fits.

I used the diagram on the seller's site which gives most of the dimensions. I had to measure a few myself.

I know nothing about 3d printing, so please change or adjust as you think fit. I did not add a bevel to the edges as was not sure if it would print ok.
Happy for any and all suggestions as to size/thickness, materials etc.


alinCiortea

Member
Joined
Jan 1, 2008
Messages
74
Location
Romania
Format
Multi Format
Alas the ESP will not connect to a USB stick.

It would be possible to output to a SD card.

That would also be great, although a quick search on aliexpress didn't give me any mountable sd card reader modules..
 
Photrio.com contains affiliate links to products. We may receive a commission for purchases made through these links.
To read our full affiliate disclosure statement please click Here.

PHOTRIO PARTNERS EQUALLY FUNDING OUR COMMUNITY:


Ilford ADOX Freestyle Photographic Stearman Press Weldon Color Lab Blue Moon Camera & Machine
Top Bottom