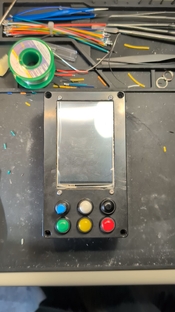
Build a shutter tester for Focal Plane shutters - Cheap, Easy & it Works

Table Rock and the Chimneys

A
Table Rock and the Chimneys

  • 3
  • 0
  • 84
Jizo

D
Jizo

  • 3
  • 1
  • 71
Top Floor Fun

A
Top Floor Fun

  • 0
  • 0
  • 62
Sparrow

A
Sparrow

  • 3
  • 0
  • 80
Another Saturday.

A
Another Saturday.

  • 3
  • 0
  • 134

Recent Classifieds

Forum statistics

Threads
197,402
Messages
2,758,429
Members
99,486
Latest member
TheFanster
Recent bookmarks
0
OP
OP

Niglyn

Member
Joined
Feb 26, 2022
Messages
402
Location
Surrey, UK
Format
Analog
Thinking about it, it may be easier just to send the data from The Shutter Tester via wi-fi to Google Sheets.

This will save having to manually transfer the SD card and copy data.
 

Spachal

Member
Joined
Dec 3, 2024
Messages
18
Location
Czech Republic
Format
Medium Format
IMHO there is SD card slot placed on touch LCD :]
However, the ESP32 S2&S3 lines can also handle USB OTG, so data read/write is possible. However, you need to solve the problem of powering the board in some other way.
 

koraks

Moderator
Moderator
Joined
Nov 29, 2018
Messages
20,567
Location
Europe
Format
Multi Format
However, the ESP32 S2&S3 lines can also handle USB OTG

This would make the project rely specifically on USB-OTG-enabled versions of the ESP32. There are still plenty of boards around with a 'vanilla' ESP32 and the more modern boards are often based on the -C3 version which only has partial USB support and no OTG AFAIK. Besides, it would also rely on the board actually breaking out the appropriate GPIO's to the USB connector, which is likely not always the case since many boards use a separate UART bridge even if the ESP32-platform used doesn't require it. In those cases the user would have to bodge a connection to USB, and this doesn't work reliably with a flying wire/breadboard approach; in fact, USB trace routing is somewhat critical with an eye to reflections.

A more sensible route IMO would be to introduce a mode that makes the device dump measurement data through serial so that anyone can use e.g. Termite to read the output and paste it into Excel etc. This is also technically simpler to implement in code and more robust towards future platforms.
 

Spachal

Member
Joined
Dec 3, 2024
Messages
18
Location
Czech Republic
Format
Medium Format
I have to admit that from a practical point of view, I have no experience with storing data on an SD card or USB mass storage in the case of ESP. With ESP8266 or ESP32, I have always solved everything using MQTT and storing data in InfluxDB. I only reacted to the technical solution if it was needed :]

And I agree that for the purposes of this project, connecting the ESP to a terminal on a PC and copying the necessary data is really the easiest way. And any further processing in Excel or another analytical tool (I have Minitab available, for example, which is already a very overkill tool)
 
OP
OP

Niglyn

Member
Joined
Feb 26, 2022
Messages
402
Location
Surrey, UK
Format
Analog
Hi all,
Sending data via wi-fi to google sheets is neat, however it is such a faff to setup. Also user has to input wif-fi details & API keys etc into the shutter tester, which adds more complexity.

My Weather clock gets users to input their wi-fi, location etc & works well, but does not have all the google faff to contend with.

Simple approach seems to use the USB card reader already on the TFT screen and put the data on there in csv format.

A slot will need to be cut in the project box for access & a tab glued onto the SD card for easier insertion & extraction.
No reason a separate SD module could not be used instead, if it makes access easier.

Dumping data to the serial port would be easy enough, however the idea was for The Shutter Tester not to be connected to a PC.

I will have a tinker.
 
OP
OP

Niglyn

Member
Joined
Feb 26, 2022
Messages
402
Location
Surrey, UK
Format
Analog
What format should the data dump take?
Spitting out the data in one long csv will require processing to make it readable

The alternate would be to format the data so it populates a spreadsheet looking similar to the PC screen.
 
OP
OP

Niglyn

Member
Joined
Feb 26, 2022
Messages
402
Location
Surrey, UK
Format
Analog
Hi, I have added data logging to The Shutter Tester :surprised:)
Outputs as a csv.txt file to a SD card.

Seven parameters are recorded. I can add more (or remove) but thought this gives everything required.
Please let me know if anything needs adding/removing

Can also add the diagnostics (shutter capping, flash sync etc)

Will also add the averages, logging to a different file.

Hardware is easy, either solder some header pins (I used a JST socket) to the four holes at the bottom of the TFT screen
(or solder wires directly to them) to use the on-bard SD card slot, or buy a cheap SD module.
SD card must be 32GB maximum and formatted as FAT32


These are then wired to the breakout board as:-

CLK (SLK) Blue 18
SDI (MOSI) Green 23
SDO (MISO) Yellow 19
SCS (CS) White 17


Opened in google sheets - (Excel was being a pain)
Capture.JPG
 

Spachal

Member
Joined
Dec 3, 2024
Messages
18
Location
Czech Republic
Format
Medium Format
This week was extremely busy, but I managed to quickly print four 3D models from Git at the beginning of the week. The printing was just for testing, with relatively high speed and below-average quality, using ASA material. It was just an experiment to see if the dimensions would fit. I won't use these prints myself, as I have a slightly different solution in preparation, but I promised the prints, so here are the photos.

The frame is dimensionally correct, the LCD panel fits well into the cutout (including the protective film), and although I didn't drill the holes to the screw size, according to the print, this also looks fine. The boards with the laser module placements are also relatively correct, perhaps I would add 0.1mm to the diameter of the hole for the laser, but that could also be due to the fast printing.


MVIMG_20250226_081608.jpg

basic frame with LCD cutout


MVIMG_20250226_081628.jpg

with cover frame


MVIMG_20250226_081714.jpg


MVIMG_20250226_081748.jpg


MVIMG_20250226_082415.jpg

plates for lasers

MVIMG_20250226_082555.jpg


IMG_20250226_082628.jpg
 
OP
OP

Niglyn

Member
Joined
Feb 26, 2022
Messages
402
Location
Surrey, UK
Format
Analog
Thanks for printing them.

The basic frame is only meant to be a template, to mark out the top of the project box.

The bezel or frame looks to be wrong. Is maybe just upside down?

It should attach using the same holes through the TFT, however, the top holes are two high, as shown in the photo.
 

Spachal

Member
Joined
Dec 3, 2024
Messages
18
Location
Czech Republic
Format
Medium Format
Hi Niglyn, it's possible. I didn't examine it in detail, I just printed it at your request and quickly took photos with my mobile phone. If a lower print speed and higher print quality are set, the prints will look significantly better.
If you want, send me your address and I'll send you these 3D printed parts to the UK, I won't use them anyway.
 
OP
OP

Niglyn

Member
Joined
Feb 26, 2022
Messages
402
Location
Surrey, UK
Format
Analog
If you want, send me your address and I'll send you these 3D printed parts to the UK, I won't use them anyway.

Hi, thanks for printing them & thanks for the offer to send them, but I don't think its worth the cost of postage.

If there is somebody more local to yourself, they may like them to try the template.
 
OP
OP

Niglyn

Member
Joined
Feb 26, 2022
Messages
402
Location
Surrey, UK
Format
Analog
Hi, below is a screenshot of the updated manual, which now includes data logging.

Firmware will be 4.0.0.8 will soon be uploaded to Github, with updated documents.


After playing around with ble over wi-fi to google sheets & general faffing, I thought it easier and far more straight forward to log directly to the SD card and USB port.

SD is an appended csv file, with each new test being appended to the last.
Data streaming via the US port outputs the same data in csv format after each test, to be captured by Excel, CoolTerm or any other data-grabbing software.
It only outputs the basic stuff & running average, I dont think we need standard deviations or guessing the closest shutter speed (although I am quite proud of that bit of coding)

As always, happy for suggestions & comment.

Capture.JPG
 

Spachal

Member
Joined
Dec 3, 2024
Messages
18
Location
Czech Republic
Format
Medium Format
Hi, thanks for printing them & thanks for the offer to send them, but I don't think its worth the cost of postage.

If there is somebody more local to yourself, they may like them to try the template.

Hi, it's up to you, for me, the postage is the price of a beer :]
And thanks for the project update, I'll try writing to the SD card out of curiosity, but manipulating the SD card will be more complicated for me than copying the values from the console.
 

Synthon

Member
Joined
Nov 2, 2024
Messages
15
Location
Aachen, Germany
Format
Pinhole
Hi @Niglyn
i finally got around to build this project, after some health issues that threw me off track.
No i ran into multiple problems, i had some old code saved but don't get it to work.
Trying to run it via Firmware Update now on Arduino v2.0.0.3 but i need a passkey.
I still don't have enough posts for a PM, can you send a passkey to me? Auth Code is 157

Have to get this done by thursday evening and i am close to giving up, tried on my Arduino Mega, Nano and even on ESP32 but i don't have the encoder that is needed in the latest version... Now the firmware update worked on my Uno at least, i am almost done :sad:((
If you could help me, i need only a few more snippets for my video project for school and show it running. You will be credited an i will send the video to you... i spent a lot of time on it.

Edit: I might just as well give up for now, though... I can't seem to get any sensor readings. Tried stuff, but in the sensor utility it already says "Laser Seen" even when nothing is connected on any board. Guess effed up and won't make it in time. I do get readings when just disconnecting and reconnecting the sonsors, lol
 
Last edited:
OP
OP

Niglyn

Member
Joined
Feb 26, 2022
Messages
402
Location
Surrey, UK
Format
Analog
Hi @Niglyn
i finally got around to build this project, after some health issues that threw me off track.
No i ran into multiple problems, i had some old code saved but don't get it to work.
Trying to run it via Firmware Update now on Arduino v2.0.0.3 but i need a passkey.
I still don't have enough posts for a PM, can you send a passkey to me? Auth Code is 157

Have to get this done by thursday evening and i am close to giving up, tried on my Arduino Mega, Nano and even on ESP32 but i don't have the encoder that is needed in the latest version... Now the firmware update worked on my Uno at least, i am almost done :sad:((
If you could help me, i need only a few more snippets for my video project for school and show it running. You will be credited an i will send the video to you... i spent a lot of time on it.

Edit: I might just as well give up for now, though... I can't seem to get any sensor readings. Tried stuff, but in the sensor utility it already says "Laser Seen" even when nothing is connected on any board. Guess effed up and won't make it in time. I do get readings when just disconnecting and reconnecting the sonsors, lol

Hi, Don't give up.

Let us take it one step at a time to get you up & running.
The sensor output switches between 5V or 0V when the sensor changes state (via a 10k current limiting resister) so having nothing connected, the pin will be at 0V and show 'seen'. It might jump about a bit as it is floating and not directly pulled to 0V.

Will send you a DM now, which will then allow you to DM back.
 
Last edited:

MattKing

Moderator
Moderator
Joined
Apr 24, 2005
Messages
51,885
Location
Delta, BC Canada
Format
Medium Format
I still don't have enough posts for a PM, can you send a passkey to me?

@Synthon ,
After noticing this, we have turned on your access manually.
You will see a message in your Inbox.
 

Synthon

Member
Joined
Nov 2, 2024
Messages
15
Location
Aachen, Germany
Format
Pinhole
@MattKing: Thanks very much for the access!
an
@Niglyn: Thanks for the PM(s) i will keep you updated and bring a sweet video for this thread as soon as i get it working.

Seems i got some faulty Sensors, 7,19€ for a bundle of 5 Sensors and 5 Lasers, wasn't worth it.. Better buy the ones from the parts.pdf provided in github!
 

tiasmaaa

Member
Joined
Mar 12, 2025
Messages
13
Location
Switzerland
Format
35mm
hey, i just ordered, I hope, all the items I need on AliExpress. Actually first time working on electronics like this, but I'm really curious.
I'll start trying build this things as soon as I received the orders. I'll post here!

Thank you for this amazing work
 
OP
OP

Niglyn

Member
Joined
Feb 26, 2022
Messages
402
Location
Surrey, UK
Format
Analog
hey, i just ordered, I hope, all the items I need on AliExpress. Actually first time working on electronics like this, but I'm really curious.
I'll start trying build this things as soon as I received the orders. I'll post here!

Thank you for this amazing work

Hi, welcome :surprised:)

It can sometimes be a surprise what turns up from AliExpress. They now use a central warehouse, similar to Amazon, so wrong parts do sometimes get sent. I have always got a refund without issue, just annoying.

Many people have built The Shutter Tester so there is plenty of help and support available in this thread.
Please do not be afraid to ask anything or further explanation if something is not clear in the documentation.
You can also Direct Message me. (If you are new to Photrio and need to DM me, let me know here, as new users are restricted in initiating a DM contact)

In the old days, to build something like The Shutter Tester, one would have needed lots of logic and timer chips, big circuit boards & power supplies. Now, much hardware can just be replaced with computer code.

If you want to explore Arduino & ESP32 further, there are lots of good tutorials on youtube, taking the viewer from beginner to code master :surprised:)

Adruino tutorials should work with the ESP32, just need to select a different board when uploading the code.

The Arduino is good for small tasks and is very cheap. ESP32 is much faster and far more versatile.

Here is a good set of tutoirlas taking you from beginner to code master :surprised:)
 

tiasmaaa

Member
Joined
Mar 12, 2025
Messages
13
Location
Switzerland
Format
35mm
heyy, I just finished building the box! I need to build the sensor/laser, light meter and all the external part to the box.
but I think I will already try to install the driver, flashing and these things.
I want to be sure that I can do that before doing and connecting the laser sensor modules. But I think its okey.

And I will also need a pass or something like that at a moment in the installation ?

First time in my life doing electronics and things like that but I'm really having a lot of fun right now. Thanks for all the ressources !
 

Attachments

  • PXL_20250326_143857924_exported_0.jpg
    PXL_20250326_143857924_exported_0.jpg
    766.8 KB · Views: 22
  • PXL_20250326_143857924_exported_16030.jpg
    PXL_20250326_143857924_exported_16030.jpg
    1.1 MB · Views: 20
OP
OP

Niglyn

Member
Joined
Feb 26, 2022
Messages
402
Location
Surrey, UK
Format
Analog
heyy, I just finished building the box! I need to build the sensor/laser, light meter and all the external part to the box.
but I think I will already try to install the driver, flashing and these things.
I want to be sure that I can do that before doing and connecting the laser sensor modules. But I think its okey.

And I will also need a pass or something like that at a moment in the installation ?

First time in my life doing electronics and things like that but I'm really having a lot of fun right now. Thanks for all the ressources !

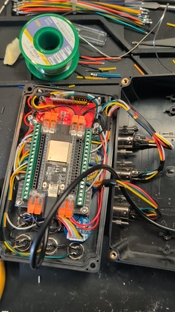
Hi, looking good so far :surprised:)Looks to be identical to mine inside :surprised:)
Glad you are finding it interesting and fun to do.

From here, you can learn Arduino (I recently posted a link to a beginner course)
and start building your own projects.
Look at my github, I have made a weather-clock, modern film developing timer etc.


Would be great if you could do a mini-blog & post here.
How easy you found it to build, any problems you encountered or things that were not clear etc.
Thanks.

Yes, all you need connected is the TFT and encoder.
Then you can flash the firmware.
When the firmware is flashed & re-boot it, the screen will give instructions to test the encoder
(this is to ensure the encoder is working, as it is required to enter a code).
The screen then will display an authorisation code.
Send the code to me via DM and I will send the pass-key back.

This should be detailed in the user guide.

Let me know how you get on :surprised:)
 
OP
OP

Niglyn

Member
Joined
Feb 26, 2022
Messages
402
Location
Surrey, UK
Format
Analog
First time in my life doing electronics and things like that but I'm really having a lot of fun right now. Thanks for all the ressources !

Hi, just a tip, throw that lead-free solder away and buy some proper lead/tin solder.

It can be difficult to ensure it is actually lead/tin. Sometimes it states 60/40 (which is the percentage of lead to tin)
and does not actually state it contains lead.

On Aliecxpress, I have seen the same solder listed as both 'lead-free' and 'lead-solder' so be careful.
I bought mine via Amazon, whist more expensive, I was able to confirm it was proper lead-solder before purchase.


You will find soldering with lead solder far easier, it melts at a lower temperature and gives a nicer shiny joint, which is not as brittle as this horrible lead-free stuff.
 

tiasmaaa

Member
Joined
Mar 12, 2025
Messages
13
Location
Switzerland
Format
35mm
Thanks for the quick response ! yep ill write a bigger post with more details when i have completely finished the project.
and yes, because it was first time doing electronics like this i just followed what you did, so yes i tried to manage the cables as you did, looking at the picture.

And thank you for the solder lead free tip, ill try to find a proper lead/tin !

Now ill start trying flashing it and doing those things. I saw you private message, ill send you the authorisation code when i have it.
 
Photrio.com contains affiliate links to products. We may receive a commission for purchases made through these links.
To read our full affiliate disclosure statement please click Here.

PHOTRIO PARTNERS EQUALLY FUNDING OUR COMMUNITY:


Ilford ADOX Freestyle Photographic Stearman Press Weldon Color Lab Blue Moon Camera & Machine
Top Bottom