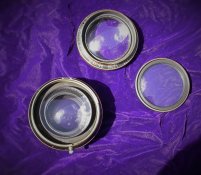
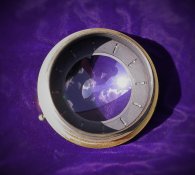
Cooke Series VI Portrait Lens Disassembly and Cleaning.

Dog Opposites

A
Dog Opposites

  • 0
  • 1
  • 40
Acrobatics in the Vondelpark

A
Acrobatics in the Vondelpark

  • 5
  • 2
  • 103
Finn Slough Fishing Net

A
Finn Slough Fishing Net

  • 1
  • 0
  • 72
Dried roses

A
Dried roses

  • 10
  • 7
  • 144
Hot Rod

A
Hot Rod

  • 4
  • 0
  • 95

Recent Classifieds

Forum statistics

Threads
197,459
Messages
2,759,389
Members
99,509
Latest member
Tiarchi
Recent bookmarks
0

Old-N-Feeble

Member
Joined
Feb 22, 2012
Messages
6,809
Location
South Texas
Format
Multi Format
HELP: Cooke Series VI Portrait Lens Disassembly and Cleaning

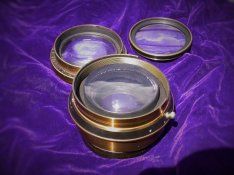
I recently acquired a 13" Cooke Series VI Portrait lens in overall very nice condition. The glass is perfect and the aperture is in good shape. However, I need to disassemble it to clean the aperture assembly because it's a bit gummy. I can easily remove the front and rear lens cells but can't see how to break it down further. Does anyone have some helpful tips?

BTW, what's this lens worth these days in perfect working order with flawless glass? Ebay prices are all over the place but even those in unknown mechanical condition with somewhat damaged glass are fetching $400-500 and others (not selling) are listed at $2000-4000... my guess is those are a bit optimistic.:wink:
 
Last edited by a moderator:
OP
OP

Old-N-Feeble

Member
Joined
Feb 22, 2012
Messages
6,809
Location
South Texas
Format
Multi Format
Anyone?
 
OP
OP

Old-N-Feeble

Member
Joined
Feb 22, 2012
Messages
6,809
Location
South Texas
Format
Multi Format
Thank you. I would have posted pics if I thought it would help but I don't think anyone can see the details necessary to evaluate proper procedure. I think this is a situation in which specific knowledge is needed. I'll post some photos anyway though.
 

shutterfinger

Member
Joined
Feb 25, 2013
Messages
5,033
Location
San Jose, Ca.
Format
4x5 Format
I recently unstuck the aperture on a Series IIa 6 1/4 inch Cooke. It is a triplet in barrel. The front and rear lens cells unscrewed from the main barrel but I could not find a way to remove the cell at the rear of the aperture. I flushed it with CRC QD Electronic Contact Cleaner, Dead Link Removed available at hardware and auto parts stores, then dusted the aperture blades with extra fine powdered graphite rubbing it in with a cotton swab (gently) and making sure to to coat the pivot pins, shook out the excess and once all the loose powder was gone cleaned the inside of the glass with my breath and a heavy weight microfiber lens cleaning cloth. The aperture worked and the lens looked like the day it came off the assembly line ready for shipment.

A Lens Collectors Vade Mecum list the version you have, its for 5x7 format, but not the diagram for it. If its made like the one I serviced the center element is bonded or pined into the barrel and requires special tools to remove.
 
OP
OP

Old-N-Feeble

Member
Joined
Feb 22, 2012
Messages
6,809
Location
South Texas
Format
Multi Format
Yeah, I can't see how to remove the center cell in mine either. I don't want to damage the bonding cement (if present) nor the paint. If I could easily remove the center cell then cleaning would be easy. I don't know about the Vade Mecum but this is made for 8x10". I realize 13" FL is wide for 8x10' portraits but maybe it was intended for full-length.
 
Last edited by a moderator:
OP
OP

Old-N-Feeble

Member
Joined
Feb 22, 2012
Messages
6,809
Location
South Texas
Format
Multi Format
Here are some pics...

DSCN8682.JPG DSCN8683.JPG DSCN8687.JPG
 
OP
OP

Old-N-Feeble

Member
Joined
Feb 22, 2012
Messages
6,809
Location
South Texas
Format
Multi Format
BTW, I know this is a long-shot, but does anyone have the lever that's missing from my front cell?
 
OP
OP

Old-N-Feeble

Member
Joined
Feb 22, 2012
Messages
6,809
Location
South Texas
Format
Multi Format
13 inch focus for 9 x 7 inch in 1931.

Same design as the IIa I worked on but the IIa does not have variable soft focus.

Center element appears bonded in place.

Yeah, that seems right. I might have to VERY CAREFULLY and SLOWLY use a solvent at the lowest edges of the aperture mechanism and drain carefully. I just worry about the glass and cement on that center glass.

NAPHTHA??
 
OP
OP

Old-N-Feeble

Member
Joined
Feb 22, 2012
Messages
6,809
Location
South Texas
Format
Multi Format
Thanks, shutterfinger, and sorry for the delayed response. I'll order a can of that cleaner.
 
OP
OP

Old-N-Feeble

Member
Joined
Feb 22, 2012
Messages
6,809
Location
South Texas
Format
Multi Format
I tried the CRC QD electronics cleaner. It exposed what appeared to be old lube on the blades that migrated to the edges which slid together causing the dissolved (thinned) old lube to collect there. I couldn't remove the old lube from the inside of the blades so since this cleaner isn't supposed to hurt paint or glue I finally just flushed the inside through the aperture hole. This removed all the old lube and the aperture was very smooth and easy to turn for a few minutes after fully drying. However, after a few minutes it became very difficult to turn. I thought maybe there was some residual old lube so I flushed it again. This didn't help.

Should I lube the aperture mechanism? If so then with what?
 

shutterfinger

Member
Joined
Feb 25, 2013
Messages
5,033
Location
San Jose, Ca.
Format
4x5 Format
If it frees up when wet and goes hard to operate when dry it still has dried crud in it. Aperture mechanisms are suppose to be dry, no oil or grease. You may have to put some cleaner in a container, set the aperture in the container, cap it and let it sit for a few hours to overnight. When you are certain that all the gunk is out of the aperture mechanism apply a dry lubricant such as extra fine powdered graphite to the pivot points and the blades.
 

BrianShaw

Member
Joined
Nov 30, 2005
Messages
16,338
Location
La-la-land
Format
Multi Format
I think the lesson here is that the next step is not a different way to use the solvent, but a complete dis-assembly so the solvent can properly clean the parts.
 
OP
OP

Old-N-Feeble

Member
Joined
Feb 22, 2012
Messages
6,809
Location
South Texas
Format
Multi Format
If it frees up when wet and goes hard to operate when dry it still has dried crud in it. Aperture mechanisms are suppose to be dry, no oil or grease. You may have to put some cleaner in a container, set the aperture in the container, cap it and let it sit for a few hours to overnight. When you are certain that all the gunk is out of the aperture mechanism apply a dry lubricant such as extra fine powdered graphite to the pivot points and the blades.

I know this is usually true but with this particular lens I was unsure. I'll keep cleaning.
 
OP
OP

Old-N-Feeble

Member
Joined
Feb 22, 2012
Messages
6,809
Location
South Texas
Format
Multi Format
I think the lesson here is that the next step is not a different way to use the solvent, but a complete dis-assembly so the solvent can properly clean the parts.

Thank you and I agree but I can't see how to completely disassemble this lens.
 

shutterfinger

Member
Joined
Feb 25, 2013
Messages
5,033
Location
San Jose, Ca.
Format
4x5 Format
Many lubricants become more stubborn to remove with age and heat. Sit a camera on a shelf that gets 2 to 6 hours of sunlight a day and in 15 years it will be 3 to 4 times as hard to clean up as one that was not in the sunlight for the same time frame on a shelf.

The older and backed the grease or oil residue, the longer it takes it to dissolve and flush out. It will release from the surface it is on rather quickly but reattach itself as it dries out.

If you cannot rub it off when wet with solvent then soak it off.

P.S. This is an instance that an ultra sonic cleaner would be the ticket to a quick clean.
 
OP
OP

Old-N-Feeble

Member
Joined
Feb 22, 2012
Messages
6,809
Location
South Texas
Format
Multi Format
The last time I used the solvent I sprayed until the blades were more than covered and worked the aperture open to closed 20-30 times before dumping the fluid and repeating. I can't really soak because the aperture guides at the front leak the fluid out. Maybe if I soak the whole thing in a small bowl? However, I worry what this will do the the paint, glue and glass. I feel some grit somewhere in the aperture mechanism as I work it and flushing isn't removing it. Also, when dry the blades bow one direction as the aperture is closed... not a good thing. I don't have an ultrasonic cleaner.

EDIT: Or maybe the "grit" I'm feeling is just parts of the dry mechanism itself rubbing too hard against each other because the blades are causing excessive resistance?
 
Last edited by a moderator:
OP
OP

Old-N-Feeble

Member
Joined
Feb 22, 2012
Messages
6,809
Location
South Texas
Format
Multi Format
I'm going to let it sit tonight. I'm a bit frustrated with it and am afraid I'll break the silly thing.
 
OP
OP

Old-N-Feeble

Member
Joined
Feb 22, 2012
Messages
6,809
Location
South Texas
Format
Multi Format
Okay, thanks. I have a tube of powdered graphite here somewhere but I have no idea where it is. I'll order another one. :smile:
 
OP
OP

Old-N-Feeble

Member
Joined
Feb 22, 2012
Messages
6,809
Location
South Texas
Format
Multi Format
Just to be certain the problem wasn't residual goo on the aperture blades I tried thorough flushing with working of the mechanism another half dozen times. There was no improvement. So I tried the extra fine graphite and it works perfectly now... smooth as silk. I'll periodically work the aperture open/closed plus tapping of the barrel to break away any loose/excess graphite and blowing out any loose graphite. Even very cursory removal of excess graphite seems to keep what remains within the mechanics and on the blades. After just a quick blow-out of the excess the graphite seems to be staying only where it needs to be... not on the lens elements. I won't know for certain for a few days of tinkering but the problem seems to be solved.

BTW, I've tried graphite before on other apertures but it didn't work this well. However, I can't remember if it was the "extra fine" variety.
 

Colin D

Member
Joined
Feb 9, 2012
Messages
79
Location
Melbourne, A
Format
Multi Format
I recently unstuck the aperture on a Series IIa 6 1/4 inch Cooke. It is a triplet in barrel. The front and rear lens cells unscrewed from the main barrel but I could not find a way to remove the cell at the rear of the aperture. I flushed it with CRC QD Electronic Contact Cleaner, Dead Link Removed available at hardware and auto parts stores, then dusted the aperture blades with extra fine powdered graphite rubbing it in with a cotton swab (gently) and making sure to to coat the pivot pins, shook out the excess and once all the loose powder was gone cleaned the inside of the glass with my breath and a heavy weight microfiber lens cleaning cloth. The aperture worked and the lens looked like the day it came off the assembly line ready for shipment.

A Lens Collectors Vade Mecum list the version you have, its for 5x7 format, but not the diagram for it. If its made like the one I serviced the center element is bonded or pined into the barrel and requires special tools to remove.
I've just stumbled across this thread. I have the exact same problem with the exact same series IIa lens you mention above. I'm interested to know if you had to disassemble the lens/aperture to fix the problem, or did you just soak it in solvent to remove the gunk and use graphite powder on the blades?

The front and rear cells have been removed leaving just the seized aperture to deal with. The iris blades are not damaged and don't appear to be stuck together although I can't tell for sure because it is stuck wide open. The two tiny screws can be easily undone, but I haven't gone that far yet.

Many thanks

Colin d
 

shutterfinger

Member
Joined
Feb 25, 2013
Messages
5,033
Location
San Jose, Ca.
Format
4x5 Format
The two tiny screws can be easily undone, but I haven't gone that far yet.
I'm not familiar with those.
I would not recommend disassembling the aperture unless nothing else works. I've had some shutter apertures apart and they're a PITA to reassemble especially if they have 11 or more blades.
Apertures have two plates, a fixed one usually permanently attached or a machined part of the barrel, and a moveable plate that is operated by the aperture ring via a pin or special screw. The blades are arc shaped, have a pin in each end, and the ends are usually different but look similar. The movable ring has a lubricant between it and the barrel from the factory that dries out and micro fine particles of brass or bronze from the pins wearing and dust collects in the lubricant aiding the sluggishness. A stuck aperture has dried lubricant or corrosion causing it to stick. Flush or soak it in solvent until it moves. Never force an aperture, blades can buckle and break.
90% Isopropyl Alcohol is a good solvent to soak in. The contact cleaner recommended in post 5 uses a combination of Alcohol and Naphtha.
 
Photrio.com contains affiliate links to products. We may receive a commission for purchases made through these links.
To read our full affiliate disclosure statement please click Here.

PHOTRIO PARTNERS EQUALLY FUNDING OUR COMMUNITY:


Ilford ADOX Freestyle Photographic Stearman Press Weldon Color Lab Blue Moon Camera & Machine
Top Bottom