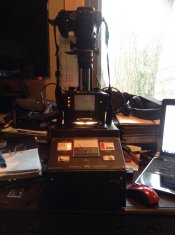
D7000 with 40mm micro 2.8 for 35mm film scanning

Dog Opposites

A
Dog Opposites

  • 0
  • 0
  • 5
Acrobatics in the Vondelpark

A
Acrobatics in the Vondelpark

  • 5
  • 0
  • 63
Finn Slough Fishing Net

A
Finn Slough Fishing Net

  • 1
  • 0
  • 49
Dried roses

A
Dried roses

  • 10
  • 7
  • 119
Hot Rod

A
Hot Rod

  • 4
  • 0
  • 86

Recent Classifieds

Forum statistics

Threads
197,457
Messages
2,759,273
Members
99,508
Latest member
Darkrudiger
Recent bookmarks
0

ericdan

Member
Joined
Feb 28, 2014
Messages
1,359
Location
Tokyo
Format
35mm RF
Hi,

I'm considering buying a DSLR and a macro lens to scan 35mm film.
I am familiar with Nikon DSLRs and thought the D7000 is great value these days.

The setup I am thinking about is:
  • Small Dead Link Removed
  • Macro lens

I am considering the 40mm micro because it'll focus the closest, meaning it'll be less big of a setup all together.
I am planning on taping the film to the light table with masking tape and use a long lens hood to rest the camera on the film.

Does anybody have experience with a similar setup? Or any suggestions for a different camera/lens setup?

Thanks!
 

Hatchetman

Member
Joined
May 27, 2011
Messages
1,554
Location
Chicago, IL
Format
Multi Format
I have tinkered with this and found it to be a big PITA and results were not significantly different from my cheap ($200) flatbed scanner. I had a full frame digital camera, excellent Takumar macro lens, bellows extension, and slide copying attachement. Used it once.
 

L Gebhardt

Member
Joined
Jun 27, 2003
Messages
2,363
Location
NH
Format
Large Format
I've written up my experience with the D800E and scanning black and white film. The short answer is I found I could get results better than a ccd film scanner, and almost as good as a drum scanner.

I think you will be frustrated with taping film to a light table and trying to keep the camera aligned. Alignment is the biggest issue I found. Resting on the lens hood may work, but I doubt it will be optimal, either in terms of alignment or the required magnification.
 
OP
OP
ericdan

ericdan

Member
Joined
Feb 28, 2014
Messages
1,359
Location
Tokyo
Format
35mm RF
Larry, thanks for the link to your blog. That was really informative.
I found Nikon's slide copying adapter here in Tokyo (Nikon ES-1). That fits perfectly on Nikon's 40mm f/2.8 macro lens.
It's not 1:1, but it works like a charm. The only thing I have to now figure out is how to scan negatives film strips using this.
slide's are fine because I can pop them in one by one. With film strips I have to think of something that will let me slide it through.
 

A Y

Member
Joined
Jul 16, 2013
Messages
4
Format
Med. Format RF
I use the ES-1 with a used Nikon FH-2 filmstrip holder I got off eBay, and a Sony NEX-5N, a Canon 50/3.5 macro, and a bunch of old Nikon extension tubes so I can get all 16 megapixels of the Sony on the negative. The holder doesn't keep the film completely flat, but it's OK.

I use the Sony because I had it already, along with a Canon FD adapter, which is why I picked the Canon lens. The Nikon extension tubes I picked because they have 52mm threads, so I can put them between the ES-1 and the front of the lens because the Sony's APS-C sensor requires a bit more working distance than the ES-1 can give you.

The ES-1 has variable length, but it's a bit fiddly, so you have to handle it carefully between shots so it doesn't shift.

If I'm being very picky, or when I scan my MF negatives, I tape the negatives, emulsion side up (so the captured negative has its markings in reverse), to the textured side of some ANR glass I got from a local framing shop. I use Scotch Magic tape, and it doesn't seem to leave any residue. The glass pane lies on a light table on a copy stand whose geared column makes it easier to get the right focus and magnification. I attach an old computer monitor to the HDMI output of the Sony to get its live view output on a bigger screen, so I don't have to squint to ensure focus.

The other great thing about a copy stand is that I can make contact sheets by putting the ANR glass on top of the negatives in their PrintFile archival sleeves on the light table, and photograph the whole thing. It's not great quality, especially since the light table has falloff, but it's a good reference for deciding which negs to enlarge, so to speak.

The main problem I have right now is trying to replicate the richness of slide film. It's really tough to get something that looks like slides on a light table under a loupe. I'll probably have to do HDR to get it along perhaps with a brighter light source.

You can see some of my film scans here: Film - a set on Flickr. The EXIF and comments should say which ones were scanned with the 5N. A few (some of the C-41 negatives) were scanned on a Noritsu by my local lab.

Good luck, and feel free to ask more questions.
 
OP
OP
ericdan

ericdan

Member
Joined
Feb 28, 2014
Messages
1,359
Location
Tokyo
Format
35mm RF
AY, thanks that was very informative.

May I ask you a few more details about your workflow?
Do you shoot these scans in raw or jpeg?
Do you have profiles from IT8 targets or do you use custom white balance to get the colors right?
What kind of sharpening do you apply after importing to your computer?

Thanks!
 

A Y

Member
Joined
Jul 16, 2013
Messages
4
Format
Med. Format RF
Sure thing ... I'm going to type a really long answer, but the gist of it is that the answers to your questions depend on the ultimate destination of your photo: print or screen, and what size.

I shoot RAW. You need as much adjustment latitude as possible for the inversion of negatives, color correction of C-41, and digging into the shadows of slide film. Also if you need to do tonal adjustments, you'll want that latitude, too. I don't think any of my examples have any local tonal adjustments.

I don't calibrate against a target. I do adjust the white balance for the color temperature of my light table for slides. For C-41, I just go into the curves adjustment and directly manipulate the individual color curves, so I don't white balance those. I've had only moderate success doing my own C-41 conversion, so it's still a work in progress: the blue channel is especially low and tends to be noisy. For B&W, I don't need to WB --- I just pull the saturation control all the way down to -100.

What kind of film are you going to be scanning? I can probably offer a couple of extra tips and tricks for B&W and C-41.

Right now, I use the default Lightroom sharpening for my camera when doing RAW conversion. Input sharpening (which is what this is) should be determined by the antialiasing filter of your camera's sensor, because it's used to compensate for the softening caused by the camera sensor's AA filter. For cameras like the D800E and Olympus OM-D E-M1, which have no antialiasing filter, no input sharpening should be needed. The 5N has a moderately weak AA, from what I've read, so it shouldn't require much sharpening.

For output sharpening, that depends on your output medium. Print will require a different level of sharpening than a screen display, and for print, it depends on the kind of paper you're using, too. It also depends on the amount of fine detail and the look of the photo you're after. For example, a photo with big expanses of color with very little detail doesn't really need much sharpening and can enlarge a lot more easily, but a wide shot of a forest with lots of little details may need more sharpening and be more challenging to print at larger sizes.

I think for web-viewing sizes (basically 1500 pixels on the short side or smaller on Flickr or Facebook), it doesn't really matter.

I tend to err on the less is more side --- use as little sharpening as you can get away with. One of the pictures I had printed recently as a 12x18 was scanned on the Noritsu, which tends to oversharpen everything. I thought that printing it on matte paper with a slightly fibrous texture would basically cancel out the sharpening. Wow, was I wrong! Viewed from less than a foot away (I know, not realistic!), the print had all sorts of weird color artifacts from the sharpening. B&W in this respect is a bit more forgiving, and I've had printed some really nice B&Ws at 18x18 that are really beautiful with minimal grain and other artifacts. But pixel quality is really, really important for print --- another reason to shoot in RAW. Resolution is not.
 

L Gebhardt

Member
Joined
Jun 27, 2003
Messages
2,363
Location
NH
Format
Large Format
Shoot in raw. It will give you the most capability to manipulate the image with curves and white balance without posterization.

I now use an old color head as the light source. This lets me adjust the light to get color negative film balance correctly. The advantage of this is you can bring all three channels into the same exposure, which cuts down on the post processing work you need to do and improves the noise, especially in the blue channel. It also lets you make maximum use of the dynamic range of the camera.

For slide film and black and white I found daylight and flash worked equally well. With slide film I have good luck with using auto white balance. It seems to work as well on properly exposed slides as it does on a real scene. I do not use IT8 targets, but I have a general disdain for them in general (formed after many years of trying to get good and consistent results).

I don't sharpen with set values. It will depend on the film and the image.
 
OP
OP
ericdan

ericdan

Member
Joined
Feb 28, 2014
Messages
1,359
Location
Tokyo
Format
35mm RF
Thanks a lot for all your tips guys!

I borrowed by friend's D7000 and I'm using it with the 40mm f2.8 macro and a light table at the moment.
I think the D7000 has an AA filter and I'll need some sharpening. I'm thinking of getting a used D5300, which doesn't have the AA filter and it's 24MP, so I should get some better resolution, too.

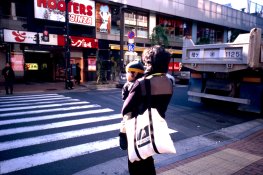
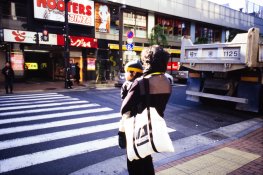
I just tried scanning two pro via 400x photos. One with custom white balance based on the light table and one with an IT8 calibrated profile.
I think I like the custom white balance better.

For slide film I mainly shoot Provia400X, once in a while velvia50 and provia100F
For negative I usually stick to Portra400 and Ektar100
B&W, I've only tried HP5+ and Delta3200.

For the time being I am just scanning for web viewing, I am not sure yet about printing.
Negative and positive prints are readily available here in Tokyo. I might just try that.

Thanks again!
custom white balance
20140326_ericdan_5901-Edit.jpg
IT8 target calibrated
20140326_ericdan_5902.jpg
 

A Y

Member
Joined
Jul 16, 2013
Messages
4
Format
Med. Format RF
Thanks Larry. I look wistfully at the dichroic enlarger heads on eBay once in a while.

Eric, you're welcome. The Provia scan looks pretty good, but the white tote bag appears to be blown out. Was that on the slide, or is it a scanning artifact? I often have trouble getting the right highlight level without either losing the shadow detail or blowing out the highlights to bring up the shadows, hence the thinking about HDR. Dedicated film scanners do a multi-pass multi-exposure scan to get to their rated Dmax, which probably means HDR for DSLR scans.
 

L Gebhardt

Member
Joined
Jun 27, 2003
Messages
2,363
Location
NH
Format
Large Format
The blown out tote bag is the sort of issue I seem to encounter when trying to use an IT8 target (you can see more detail in the custom white balanced shot). I've always assumed it's been either my scanner software or technique, but I've seen similar results from many different workflows. I eventually decided it wasn't worth the effort to get scanner profiles working.
 

Highlandpete

Member
Joined
Mar 26, 2014
Messages
13
Location
Highland, NY
I use a Bowens Illumitran to digitize 35mm slides and negatives

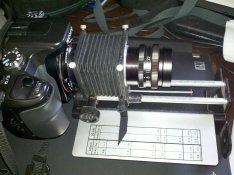
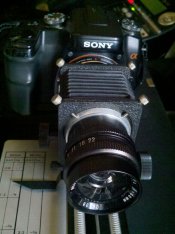
I digitize 35mm slides and negatives with a Bowens Illumitran. I already had a Minolta MD body mount for the Illumitran, so I purchased a Sony Alpha to Minolta MD adapter. This allowed me to attach my Alpha body to the Illumitran bellows. As far as lenses go I can use any enlarging lens that I want as long as it fits the Illumitran lens holder. For 35mm copying I have been using a Bogen 60mm or a Rodenstock 60mm. Both are recommended copy lenses for the Illumitran. I also have an attachment for copying up to 4x5 negatives with the Illumitran. I haven't tried copying 4x5 yet. Here's a pic of my Alpha body attached to the Illumitran bellows assembly. The bellows assembly is removable so I sometimes use it as a a macro setup.

bellows1.jpg Bowens2.jpg 13510944325_b24a0c7a24_o.jpg DSC09721copy.jpg
 
Last edited by a moderator:
Photrio.com contains affiliate links to products. We may receive a commission for purchases made through these links.
To read our full affiliate disclosure statement please click Here.

PHOTRIO PARTNERS EQUALLY FUNDING OUR COMMUNITY:


Ilford ADOX Freestyle Photographic Stearman Press Weldon Color Lab Blue Moon Camera & Machine
Top Bottom