DIY 31 Megapixel Enlarger

Untitled

A
Untitled

  • 0
  • 0
  • 24
Jerome Leaves

H
Jerome Leaves

  • 1
  • 0
  • 50
Jerome

H
Jerome

  • 1
  • 0
  • 46
Sedona Tree

H
Sedona Tree

  • 1
  • 0
  • 50
Sedona

H
Sedona

  • 0
  • 0
  • 46

Recent Classifieds

Forum statistics

Threads
197,426
Messages
2,758,832
Members
99,494
Latest member
hyking1983
Recent bookmarks
2

koraks

Moderator
Moderator
Joined
Nov 29, 2018
Messages
20,596
Location
Europe
Format
Multi Format
how to take it apart

Conveniently, the one in this thread comes as a transparent unit to begin with! It certainly piques my interest also for UV processes, although it'll also work for regular b&w (as demonstrated above) and color (with 3 consecutive exposures).
 
OP
OP

avandesande

Subscriber
Joined
Sep 7, 2002
Messages
1,339
Location
Albuquerque, NM
Format
Med Format Digital
Any particular specs on the business PC you can recommend?


In the thick of some research, so hope you don't mind the extra questions. Seems I'm going to have to buy before I try. Did your thinkpad t540p have a nvidia or just a standard intel graphics card?

The thinkpad has nvidia card, with thinkpads the 'p' after the model number designates high quality graphics. You can easily google specs of old laptops. The business pc is a optiplex 7020 https://www.ebay.com/itm/254678901873
I picked it because it has several slots for full size cards.
 
OP
OP

avandesande

Subscriber
Joined
Sep 7, 2002
Messages
1,339
Location
Albuquerque, NM
Format
Med Format Digital
This is the current configuration of the enlarger, except that it has been moved into a dedicated darkroom.
 

Attachments

  • enlarger.jpg
    enlarger.jpg
    233.8 KB · Views: 266

smng

Member
Joined
Dec 4, 2022
Messages
6
Location
Amsterdam
Format
Medium Format
Bit of an update. I've hooked my 4K mono LCD up to a mini PC (Intel i3-6100T) and it seems to be working. Now to the darkroom. Thank you again for the tips Aaron!
 
OP
OP

avandesande

Subscriber
Joined
Sep 7, 2002
Messages
1,339
Location
Albuquerque, NM
Format
Med Format Digital
I was expecting this to happen, and it has. A 12K printer is announced.

 
OP
OP

avandesande

Subscriber
Joined
Sep 7, 2002
Messages
1,339
Location
Albuquerque, NM
Format
Med Format Digital
Some software updates,
Added a new screen for exposure corrections.

The first issue and most pressing is a artifact of the lcd screen manufacture. It is actually two grids sandwiched together between glass. There are no noticeable issues except if you have a clear sky in the middle a thin extremely faint bar is visible across the screen. The adjustment adds the correct level of grayscale to negate the issue. It's good thing that I added the 10/12 bit support because the adjustment is only 1/2 level of lcd grayscale, without it there would be the same bar except lighter instead of darker. The error correction removes it completely.

The second is a calculation that compensates for exposure falloff. I've started messing around with 8x20 panoramic prints (hat tip to Michael Smith) which reach all the way to the ends of the LCD and noticed quite a bit of falloff. It adds cos()4th correction, I am still working on a way to calibrate it.


Near future is adding grayscale lut support. It's annoying to have to reapply the contrast curve in photoshop if you want to change paper contrast curves or apply custom curves such a higher contrast version for large prints. Likewise adding the ability to invert. This way you can have a finished grayscale tiff and never need to mess around with it in pshop again.

Longer term would be a 'digital purity' mode that would accept monochrome raw files directly such as from Leica or Pentax and except for a gross levels adjustment to fit the contrast range allow you to print directly without modifying the image file. The pentax and leica 246 would be ideal since the output file fits directly on the lcd without any resize.... digital purity! Of course you can still burn and dodge to your heart's content.
 

Attachments

  • software3.jpg
    software3.jpg
    61 KB · Views: 128
OP
OP

avandesande

Subscriber
Joined
Sep 7, 2002
Messages
1,339
Location
Albuquerque, NM
Format
Med Format Digital
More software updates, added LUT support, invert, contrast adjustment and step wedge insert.
There is nothing worse than having a tray full of lith/developer and having to go back to the photoshop workstation.
The contrast adjustment actually works against the LUT and works proportionally -15% to 15%.
Coming soon I am going to add a log stamp on the bottom with all the enlarger parameters, time etc. also with a chemistry details. The same information will also go to an output file with a notes section.
It will be very tiny will have to get up close to read it.
I've been so busy with software and testing I haven't had much time to publish images of prints but I hope to soon...
 

Attachments

  • software4.jpg
    software4.jpg
    208 KB · Views: 125

mshchem

Subscriber
Joined
Nov 26, 2007
Messages
14,221
Location
Iowa City, Iowa USA
Format
Medium Format
More software updates, added LUT support, invert, contrast adjustment and step wedge insert.
There is nothing worse than having a tray full of lith/developer and having to go back to the photoshop workstation.
The contrast adjustment actually works against the LUT and works proportionally -15% to 15%.
Coming soon I am going to add a log stamp on the bottom with all the enlarger parameters, time etc. also with a chemistry details. The same information will also go to an output file with a notes section.
It will be very tiny will have to get up close to read it.
I've been so busy with software and testing I haven't had much time to publish images of prints but I hope to soon...

This is great. I am not proficient with computer technology, but this sure is tempting. At some point, if there's anyway this could come together as a simple digital monochrome negative, that would be amazing!

If I can dream at some future time, a 4x5" or 6x7 cm glass display that had internal power and a slot for a micro SD card. Wouldn't something like that be cool?

Coming back to earth, a digital glass negative, small enough to fit into an 8x10" (4×5" would be better) enlarger, tethered to a PC etc. Awesome 👌
 
OP
OP

avandesande

Subscriber
Joined
Sep 7, 2002
Messages
1,339
Location
Albuquerque, NM
Format
Med Format Digital
This is great. I am not proficient with computer technology, but this sure is tempting. At some point, if there's anyway this could come together as a simple digital monochrome negative, that would be amazing!

If I can dream at some future time, a 4x5" or 6x7 cm glass display that had internal power and a slot for a micro SD card. Wouldn't something like that be cool?

Coming back to earth, a digital glass negative, small enough to fit into an 8x10" (4×5" would be better) enlarger, tethered to a PC etc. Awesome 👌

The 3d printers that these LCD are designed for are based on tiny linux/raspberry pi computers. I certainly considered it and am familiar with linux, but as windows development is my area of expertise I would be far behind if I had gone that route. What you are dreaming for is certainly possible :smile:
 

koraks

Moderator
Moderator
Joined
Nov 29, 2018
Messages
20,596
Location
Europe
Format
Multi Format
Maybe at some point @nmp can update us on her progress. We've been in touch not too long ago and she showed me something that nearly blew my mind. It's an obvious extension of what's happening in this thread, but I was/am surprised she got this far with it, this quickly, and that it works that well.
 
OP
OP

avandesande

Subscriber
Joined
Sep 7, 2002
Messages
1,339
Location
Albuquerque, NM
Format
Med Format Digital
@avandesande So interesting! I was looking for such displays back then but I wasn't satisfied with the resolution.

Could you link to your purchase directly? It is difficult to find from ebay, only thing I could find was this: https://www.ebay.com/itm/266041872272

The 10.1 screen you can buy anywhere but the trick is the driver board. The one supplier I purchased it from doesn't carry it any more which has me a little worried so I just ordered 2 more. This other supplier I use (this is who I am linking to) has been helpful and helped me to get the right driver settings to make it work. The site is goofy and hard to navigate, if you see the wrong currency it will switch to USD when you check out. The driver board is 58$ if you are seeing wrong currency.
I recommend getting the round cable as well the ribbon is hard to manage.
 

radiant

Member
Joined
Aug 18, 2019
Messages
2,135
Location
Europe
Format
Hybrid
The 10.1 screen you can buy anywhere but the trick is the driver board. The one supplier I purchased it from doesn't carry it any more which has me a little worried so I just ordered 2 more. This other supplier I use (this is who I am linking to) has been helpful and helped me to get the right driver settings to make it work. The site is goofy and hard to navigate, if you see the wrong currency it will switch to USD when you check out. The driver board is 58$ if you are seeing wrong currency.
I recommend getting the round cable as well the ribbon is hard to manage.

Thanks for the information and link.

Do you think this display is correct one: https://www.aliexpress.com/item/1005005898549553.html ?

The "problem" is that I don't have large format enlarger. Maybe I could tweak something out of large format lens (210mm circle) and some plywood.
 
OP
OP

avandesande

Subscriber
Joined
Sep 7, 2002
Messages
1,339
Location
Albuquerque, NM
Format
Med Format Digital
Thanks for the information and link.

Do you think this display is correct one: https://www.aliexpress.com/item/1005005898549553.html ?

The "problem" is that I don't have large format enlarger. Maybe I could tweak something out of large format lens (210mm circle) and some plywood.
If you look at part numbers they are all the same... you can buy domestically on amazon or other stores.

You can buy whole set here but prices are a bit higher.


radiant

Member
Joined
Aug 18, 2019
Messages
2,135
Location
Europe
Format
Hybrid
Thanks for the elegoo-tip, I purchased the panel there and the driver board from aliexpress.

Seems like I put my self into a new project :smile:
 
OP
OP

avandesande

Subscriber
Joined
Sep 7, 2002
Messages
1,339
Location
Albuquerque, NM
Format
Med Format Digital
I got the logging working. Ive attached some pictures of a medalist(expired 1973) lith session. Top to bottom is nothing, 400mg of Kbr, and the last two with 20mg of bz.
The text is 16pixels high and need a magnifying glass to read it.
The logging helps a bunch with this, the prints change drastically when they dry so it is hard to remember which prints were what.
I'm thinking about including a lightweight database that stores the same information from the imprint and the prints could be stored in archival 4x6 picture boxes.
You could search the database and know what boxes to look in to review something you did in the past.

I would like to make it easier to generate luts and have been thinking of a way to do it without photoshop.
This lut wizard or whatever I call it will generate gradients that you photograph with some crop lines, it would be able to read the scanned/cropped image to generate luts.
I've got a bunch of polymax fine art I want to use but need to create luts for. I'm too lazy to do it again in photoshop.
 

Attachments

  • loggingscreenshot.jpg
    loggingscreenshot.jpg
    255.7 KB · Views: 206
  • logstamp.jpg
    logstamp.jpg
    141.7 KB · Views: 209
  • medalistbztest.jpg
    medalistbztest.jpg
    413.1 KB · Views: 212

radiant

Member
Joined
Aug 18, 2019
Messages
2,135
Location
Europe
Format
Hybrid
Great work!

Including the information on print itself is a good idea. And of course calibration strip is good too; you could scan different prints and store also the calibration outcome for each print - to see the variance on prints. I wouldn't bother in automatic calibration .. it is pretty fast to do manually and you only need to do once for each paper+developer.

The LUT conversion is very simple; just scan your print, take average reading from each gradient and you have your LUT. Then modify the pixels in your image accordingly in reverse. It doesn't need photoshop or anything fancy, it is just a recipe how different grayscale values should be shown on the exposuring display.

Linearization for the LUT I use Arduino "map" function - it is the swiss knife for all conversions and such.

long map(long x, long in_min, long in_max, long out_min, long out_max) {
return (x - in_min) * (out_max - out_min) / (in_max - in_min) + out_min;
}


Just replace long with for example float and you have most of the code ready.
 

radiant

Member
Joined
Aug 18, 2019
Messages
2,135
Location
Europe
Format
Hybrid
I have now the Elegoo display, Aliexpress HDMI-driver-card and Radeon RX 6400 but I cannot get the display to work. I'm running Ubuntu 20.04 with newest drivers installed.

The error I'm getting is "[drm:drm_add_edid_modes [drm]] *ERROR* Unknown HDMI VIC: 0" each time I plug the USB power on for the board.

I tried four different HDMI cables - I'm not sure if any of those were 2.1 - that might cause problem.

Any ideas @avandesande ? What tricks you needed to do for the driver settings etc?
 
OP
OP

avandesande

Subscriber
Joined
Sep 7, 2002
Messages
1,339
Location
Albuquerque, NM
Format
Med Format Digital
I've attached custom settings, its a screen shot what I figured out for the Radeon. I'm not sure how much help I will be on a linux machine. Even if you get the display working you will still have to map the horizontal pixels into RGB values. I can supply a utility for doing it on Windows but I don't have anything for linux. Apparently there is a way to use a python script to do it in linux but I don't know where to get it or set it up. You could try the NanoDlp forums if you want to go this route.
 

Attachments

  • graphics settings.jpg
    graphics settings.jpg
    264.5 KB · Views: 177
  • nvidiasettings.jpg
    nvidiasettings.jpg
    322.5 KB · Views: 185

radiant

Member
Joined
Aug 18, 2019
Messages
2,135
Location
Europe
Format
Hybrid
I've attached custom settings, its a screen shot what I figured out for the Radeon. I'm not sure how much help I will be on a linux machine. Even if you get the display working you will still have to map the horizontal pixels into RGB values. I can supply a utility for doing it on Windows but I don't have anything for linux. Apparently there is a way to use a python script to do it in linux but I don't know where to get it or set it up. You could try the NanoDlp forums if you want to go this route.

"Map the horizontal pixels into RGB values" -> is this done on driver level? Or do you have written the utility?

I'm in the discussion with SUMAOPAI-seller and he said the display should work on RPi 4 too. Strange, as it shoudln't support HDMI 2.1 or 8K (I believe). This could open up possibility to use RPi as "server" for the display and control it from other interfaces - no need for computer + another display.

I will try with new cable and if that doesn't work, I will switch to Windows 10.
 

radiant

Member
Joined
Aug 18, 2019
Messages
2,135
Location
Europe
Format
Hybrid
Houston, we have a picture!

(removed my ramblings that are old already)
 
Last edited:

radiant

Member
Joined
Aug 18, 2019
Messages
2,135
Location
Europe
Format
Hybrid
I just realized that the needed resolution at Windows is only 2560 x 4320 .. So it probably doesn't need 8K graphics card at all to get it working. That is why it works on Raspberry Pi too.
 

radiant

Member
Joined
Aug 18, 2019
Messages
2,135
Location
Europe
Format
Hybrid
But yes, I've got the display working fine and managed to understand how the grayscale displaying works. Some memos:

- The display is 8-bit grayscale display. It can display 255 different shades of gray, no colors. It is not monochrome in that sense that it can actually draw different shades.
- Yes, the 8K display is running at 2560 x 4320 at the PC. But how in earth that is 8K then?
- The trick is that each RGB pixel is actually three pixels. The HDMI-display board uses this "trick" to "compress" the information. So, if you want to draw just thinnest line possible, then set one of R,G,B values to 255 and others to 0 and do this on each line at same position; then you have the "8K" thinnest line on screen.
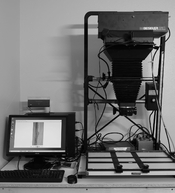
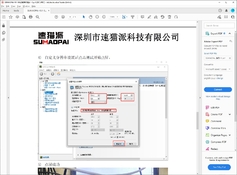
- Raspberry Pi 4 (4GB) should be able to drive the display (as it is not "natively" 8K), SUMAOPAI is just RPi for production testing of the displays.
- SUMAOPAI has been really helpful and responsive. Altough the Aliexpress translation chat is a bit horrible, RGB and compression stuff lost in the translation.
- 12K displays (same form factor) is out, currently at 220 euros.
- 16K is coming out but that is the limit for the DPI and line width.
- 6.8" 9K is coming out, line width 0.018mm. We are getting close to film line resolving!

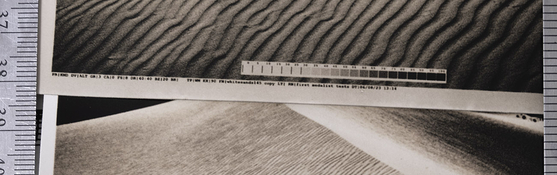
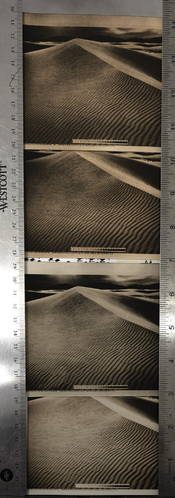
Attached is a very small part of my test image pattern which is meant to be printed B&W. Why there are colors? Read above :wink:


Näyttökuva 2023-8-23 kello 14.52.24.png
 

radiant

Member
Joined
Aug 18, 2019
Messages
2,135
Location
Europe
Format
Hybrid
Meanwhile waiting for the parts I built myself a large format enlarger for this use :smile: Lightbox (WS2812 of course!), display holder board, lens holder board and all adjustable.

Now I have all the pieces to make first test print!
 
Photrio.com contains affiliate links to products. We may receive a commission for purchases made through these links.
To read our full affiliate disclosure statement please click Here.

PHOTRIO PARTNERS EQUALLY FUNDING OUR COMMUNITY:


Ilford ADOX Freestyle Photographic Stearman Press Weldon Color Lab Blue Moon Camera & Machine
Top Bottom