Fuji GS645S Wide60 Shutter disassembly

Untitled

A
Untitled

  • 0
  • 0
  • 18
Jerome Leaves

H
Jerome Leaves

  • 1
  • 0
  • 45
Jerome

H
Jerome

  • 1
  • 0
  • 42
Sedona Tree

H
Sedona Tree

  • 1
  • 0
  • 45
Sedona

H
Sedona

  • 0
  • 0
  • 42

Recent Classifieds

Forum statistics

Threads
197,425
Messages
2,758,818
Members
99,494
Latest member
hyking1983
Recent bookmarks
1

z0r

Member
Joined
Oct 26, 2023
Messages
17
Location
Germany
Format
35mm
Dear all,

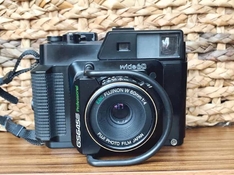
A year ago I got into the possession of a Fuji GS645S Wide60 from the flea market. Has its marks on the body but the glass is in pristine condition, which I had to get it for the price. The focus mechanism was sticky and with the help of the service manual I got it working again. Readjusting infinity and 2m focus and it was done!

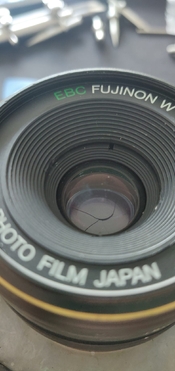
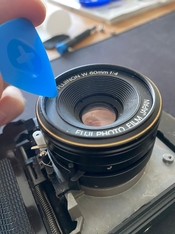
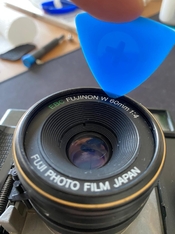
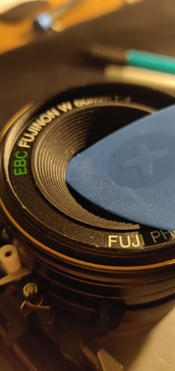
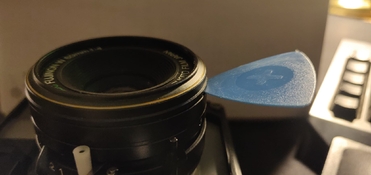
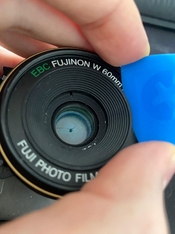
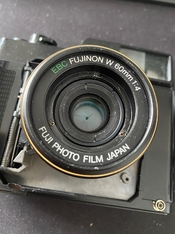
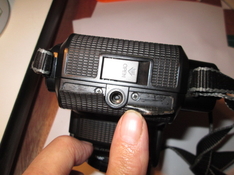
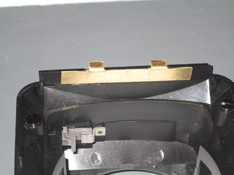
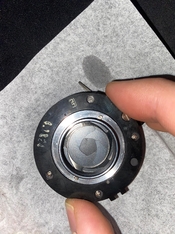
However, a year later the shutter isn't working properly anymore. Actuating the winding lever and pressing the release button results in a click sound in the shutter and the shutter opening 25% and staying like this. This behaviour is independet of the exposure time I set as well as using it with the self-timer. Actuating the leaver again resets the shutter. But this way the camera became inoperable. I noticed that the lens itself and its different layers and rings is very loose. Therefore I assume that some screws got loose and need to be properly tightend and secured with loctite or similar. I completly opend the camera from behind the lens when repairing my first problem. But I never opened it from the front in order to reach the shutter. From the looks I don't quite get how to do that and the service manual is also not telling you how (most likely because the service manual only covers the body, not the lens/shutter). I'm pretty sure you have to unscrew the name ring where "EBC FUJINON W 60mm 1:4" is written on (I attatched a front view of the same camera from Google Pictures for reference). However, because there are no holes or notches in the ring, I cannot use a "lens wrench". Unscrewing by hand is impossible and I don't want to apply to much pressure (obviously).

What am I missing. How can I open the lens in order to reach the shutter mechanism? Do I need a special tool for this?

I'm looking forward to your answers!

Best,
Felix
 

Attachments

  • 1726405504114.jpeg
    1726405504114.jpeg
    52.7 KB · Views: 49

OAPOli

Member
Joined
Sep 26, 2022
Messages
623
Location
Toronto
Format
Medium Format
When the shutter doesn't properly cycle via the release button, does pressing the "T" button actuate the shutter?

I had this issue with the 645W model. I'm not sure how it occurs because the linkage mechanism for cocking and release is very complex. There is a sprung part running on a shaft that handles the release and "T", maybe it is sticky. You would need to remove the front cover to inspect. Behind the little discs on the right side are screws, on the left side they are under the cover (I think). You need to remove the knobs for focus and aperture. Watch out for the braided cable and don't let it loose tension.

But first address the looseness. If the entire shutter + helicoid is loose then tighten the retaining ring from the rear. If the speed and aperture rings are loose the issue is the shutter. The conical cover is glued and needs to be gently pried off. Then three screws to remove filter/name ring and speed setting ring, then remove the front lens. You'll see another retaining ring that holds the shutter speed cam. Maybe this one is loose. It might be reverse threaded but I forgot. Often the speed cam has a bit of old grease under, making the speed selection stiff. If you take it out pay close attention to the aperture linkage.

If you have the GS645S service manual please share it.
 

BobUK

Member
Joined
Oct 13, 2021
Messages
492
Location
England, UK
Format
Medium Format
I would like to open mine from the front as well. Spot of dust in there at the moment.
I tried a rubber disc to try and unscrew the lens name ring, but it will not move with the pressure that I am happy to use. It seems a bit flimsy so am afraid of catastrophic damage.

If some one does have the answer I will be a very happy person.

The only real fault I have experience is the viewfinder moving field of view frame sticking.
The instructions I read involve replacing cork friction pads, but I didn't fancy all that work, never mind trying to find spares. Instead I put a bit more tension on the spring that moves the frame finder and used a tiny spot of watch oil to free movements.
 
OP
OP

z0r

Member
Joined
Oct 26, 2023
Messages
17
Location
Germany
Format
35mm
@OAPOli
Pressing "T" results in the same behaviour as pressing the release button. I already had a look at that stuff when repairing my last issue and can therefore exclude this as the problem source.

The looseness can be indeed observed in the aperture/exposure time rings. Because I had the lens completly detatched from the body, I properly tightend the other screws you mentioned. Wiggling at the focus ring therefore shows no looseness at that level. When you say that "the conical cover" you mean what I called name ring? And also, how to I properly pry this gently off? Thanks for the tip already. I assumed screw underneath it.

I bought the manual "shamefully" from a reprinter from eBay, because I did not find any other source from the internet. Therefore I only have it in printed form. However, I can scan them if you want. This will not increase quality though, as the quality is already mediocre, to say the least.

@BobUK
The sticking viewframe was my inital problem. I assume the moving silver rod to be the issue. I finely grinded that, cleaned it with isopropanol and applied a tiny tiny amount of an appropriate lubricant - with no satisfying result. It turned out that inside the prism the mirror that moves on two rods got stock. It was sufficient to clean these two rods with isopropanol and again apply a tiny tiny amount of an appropriate lubricant. I documented this with pictures for reference. I will submit this later for you.
 

OAPOli

Member
Joined
Sep 26, 2022
Messages
623
Location
Toronto
Format
Medium Format
@OAPOli
Pressing "T" results in the same behaviour as pressing the release button. I already had a look at that stuff when repairing my last issue and can therefore exclude this as the problem source.

I meant to say this is a common symptom; something is wrong in the release mechanism under the main cover.

The conical cover is separate from the name ring. You'll need a thin spatula type tool to pry it out. It's hard to do so without marring the plastic.
 

BobUK

Member
Joined
Oct 13, 2021
Messages
492
Location
England, UK
Format
Medium Format
OAOPIi Oops sorry. I didn't read your first post fully. I just skimmed through it. You answered my question first time round.

I will have a think about making some sort of mini gear puller. Hopefully that may stop me damaging the plastic cone.

Thank you.
 
OP
OP

z0r

Member
Joined
Oct 26, 2023
Messages
17
Location
Germany
Format
35mm
@OAPOli Ohhh, I see! So I try to pry it off gently from the name ring and then unscrew the name ring in order to reach the three screws beneath it?

Edit: Attatched is a close up picture of the front of the lens. I do not seem to see where I have any starting point to pry the cone of. From my point of view, the name ring and the cone are one part. The is a small gap between the front element and the cone and between the edge of the name ring and the barrel of the whole lens. But I cannot enter it at all with a slim plastic edge. Am I missing something?
 

Attachments

  • 1726482508433.jpeg
    1726482508433.jpeg
    137.5 KB · Views: 115
  • 1726482839772.jpeg
    1726482839772.jpeg
    199.8 KB · Views: 118
  • 1726482843451.jpeg
    1726482843451.jpeg
    159.2 KB · Views: 110
Last edited:
OP
OP

z0r

Member
Joined
Oct 26, 2023
Messages
17
Location
Germany
Format
35mm
@OAPOli Thank you for your engagement in my issue! I'm not a a native english speaker so I fear that I misunderstand something or express myself lousy. I attached four pictures where I think a spatula can go at least. I assume now you mean the point shown in the first picture? (I ordered them in likeliness)
 

Attachments

  • 1726567898757.jpeg
    1726567898757.jpeg
    179 KB · Views: 61
  • 1726567888999.jpeg
    1726567888999.jpeg
    164.5 KB · Views: 55
  • 1726567858287.jpeg
    1726567858287.jpeg
    137 KB · Views: 47
  • 1726567838013.jpeg
    1726567838013.jpeg
    104.8 KB · Views: 54
Last edited:
OP
OP

z0r

Member
Joined
Oct 26, 2023
Messages
17
Location
Germany
Format
35mm
Thank you for encouraging me! I accomplished the removal with the plastic clip and removing it as shown in photo 4. I emphasize using something like this plastic clip instead of any metal tool in order to remove it as gently as possible. Beneath it are the three screws, which also are very loose. From here I can work further. Thank you again!

I attached some photos for the purpose of documentation.

Also @OAPOli: Are you still interested in a scan of my printed repair manual?

@BobUK I will deliver a description an photos of the aforementioned fix of the viewfinder in the next week or so.
 

Attachments

  • 1726576057862.jpeg
    1726576057862.jpeg
    134.9 KB · Views: 57
  • 1726576069844.jpeg
    1726576069844.jpeg
    215.5 KB · Views: 58

OAPOli

Member
Joined
Sep 26, 2022
Messages
623
Location
Toronto
Format
Medium Format
Good luck with the repair and please keep us updated on the fix. I don't need the manual but if you publish it here I'm sure the reference would be useful to others.
 

BobUK

Member
Joined
Oct 13, 2021
Messages
492
Location
England, UK
Format
Medium Format
I removed the front cone exactly as you said.
I have a set of plastic car trim tools. Only used them once before. The set includes a load of metal hooks and prodders, not shown.
They only cost me about £6 for the set. They might look big compared to the piece of 35mm film added for sizing, but they worked fine.

Many Thanks.

p.s. if you click on the thumbnail you can see the ends of the tools. For some reason the thumbnail picture cuts down the size of the image.
 

Attachments

  • IMG_4084.JPG
    IMG_4084.JPG
    69.8 KB · Views: 32

BobUK

Member
Joined
Oct 13, 2021
Messages
492
Location
England, UK
Format
Medium Format
z0r I see from the first of your four pictures that you have removed the cover from around the base of the lens, where the lens
cover joins the camera body.

I have unscrewed the two screws on the right of the lens, and removed the buttons screwed to the focus, aperture and speed rings.

How did you remove the lens guard from the left of the lens ?

It looks like part of the textured hand grip needs to be removed to get at screws, but I cannot see the method of removing it to free the lens protection.


Thank you.
 
OP
OP

z0r

Member
Joined
Oct 26, 2023
Messages
17
Location
Germany
Format
35mm
Underneath the textured handgrip are two screws which have to be unscrewed in order to remove the handgrip. After that, you can remove the front cover.
 

BobUK

Member
Joined
Oct 13, 2021
Messages
492
Location
England, UK
Format
Medium Format
Underneath the textured handgrip are two screws which have to be unscrewed in order to remove the handgrip. After that, you can remove the front cover.


Thank you for replying so fast.

Do I peel off the textured rubber to see the screws ?

Thanks.
 
OP
OP

z0r

Member
Joined
Oct 26, 2023
Messages
17
Location
Germany
Format
35mm
Yes, but gently. You may need to reglue this afterwards. I did that with Pliobond.
 

BobUK

Member
Joined
Oct 13, 2021
Messages
492
Location
England, UK
Format
Medium Format
Plucked up the courage and peeled the rubber grip off. I used a blunt butter knife.
Three pictures showing the five screws that have to be unscrewed to get the rubber skin, and the grip off.
The wobbly body part around the base of the lens is due to the two lugs on the left having snapped off, and the two plastic screw tubes on the back of the facing had snapped off.
Humbrol Polystyrene Cement, sold for gluing scale model aircraft etc. , was used on the lugs but the two screw post will nee a lot more attention.
That's a job for this weekend.

I put the pictures up as it is easier for anyone at a later date to understand what is going on.

I am making progress now.
 

Attachments

  • FUJI SCREWS b.JPG
    FUJI SCREWS b.JPG
    118 KB · Views: 64
  • FUJI SCREWS c.JPG
    FUJI SCREWS c.JPG
    105.7 KB · Views: 58
  • FUJI SCREWS.JPG
    FUJI SCREWS.JPG
    113.2 KB · Views: 57

BobUK

Member
Joined
Oct 13, 2021
Messages
492
Location
England, UK
Format
Medium Format
I made a couple of extensions for the broken stumps behind the cover to the right of the lens as viewed from the front.
The plastic was slowly crumbling away. While I was at it I removed the flimsily glued lugs on the left, then replaced them with a bit of filed and folded brass.
I used a lathe for the tubular fittings, but they could be made with care using a hand drill.

Please excuse the mix of dimensions on the diagram. Being of a certain age my head works in Imperial and Metric plus the unusual gauges used in engineering over the years. I just used whatever drill I had that fitted the bill.

The angle of the tubular extensions were eyeballed to shape when filing the slope.


I hope this helps others when trying to sort out the broken plastic fittings behind the nose cover.
 

Attachments

  • IMG_4098.JPG
    IMG_4098.JPG
    78.6 KB · Views: 51
  • IMG_4101.JPG
    IMG_4101.JPG
    88.7 KB · Views: 53
  • IMG_4104.JPG
    IMG_4104.JPG
    81.8 KB · Views: 46
  • IMG_4102.JPG
    IMG_4102.JPG
    86.3 KB · Views: 49
  • IMG_4109.JPG
    IMG_4109.JPG
    85.3 KB · Views: 54

BobUK

Member
Joined
Oct 13, 2021
Messages
492
Location
England, UK
Format
Medium Format
Do not use too much glue on the tubes. You do not want it running down the post and gluing everything permanently.

The glue free brass tube face should be in contact with the chassis when gluing up. Lightly tighten the screw to do this.
You do not want an air gap between the chassis and brass tube face when the glue has set. As when the screw is tightened later it will pull the original post too hard and break it again.
 
OP
OP

z0r

Member
Joined
Oct 26, 2023
Messages
17
Location
Germany
Format
35mm
Hey, sorry for my lousy reply. I'm a bit busy at the moment. Repair Manual scan and viewfinder "service" instruction will follow in mid-end december. Sorry for that, but that takes some time. Wanna do it thoroughly. But it will come in a separate post. I'll inform you here.

I nevertheless have a question to my problem: I did disassemble the whole shutter in order to get to my problem (I consider writing an instruction with pictures here as well because I did not find anything on the internet, so someone will most likely find that useful). It sees that a screw on the back is the problem (see attached picture, 12 o'clock on the ring, its the slotted screw). When I press the release everything runs very slow, mostly halts completly. I assumed oily blades etc., which is why I disassembled it completly and cleaned every blade with isopropyl alcohol. I even removed the guide ring and cleaned that. Reassembled everything: same behaviour. I noticed that when I release the aforementioned screw that suddenly I runs as intended. The screw, however, is now not really tighented, rather loose. This is most likely not intended. A friend of mine suggested that a washer is missing. However, when disassembling I did not find a washer at all. Also, the problem was already before disassembling the shutter at all. Does someone have an idea what I am missing? Just leaving out a screw feels very very wrong.

Looking forward to your answers.

Best
 

Attachments

  • 1729803880180.jpeg
    1729803880180.jpeg
    365.8 KB · Views: 36

OAPOli

Member
Joined
Sep 26, 2022
Messages
623
Location
Toronto
Format
Medium Format
Was the camera dropped at some point? A heavy shock can distort the shutter plate, so that when the rear assembly is attached, there is too much friction. I know this from dropping a camera on a cement floor 👏
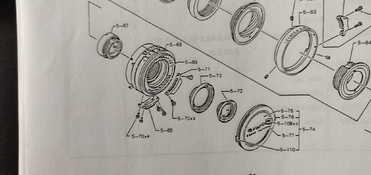
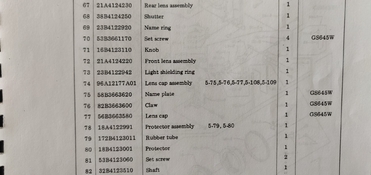
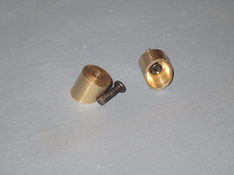
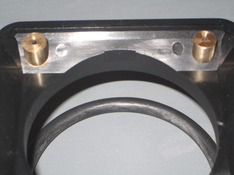
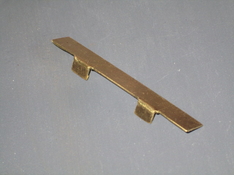
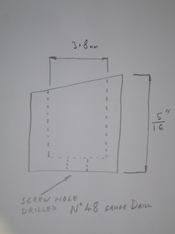
, although in my case I needed to loosen all four screws for the shutter to run (i.e. it's dead). That's my only idea.

There usually aren't washers behind those screws.
 
OP
OP

z0r

Member
Joined
Oct 26, 2023
Messages
17
Location
Germany
Format
35mm
Yikes, cement floor sounds horrible! And four loose screws will always result in the blades getting funky. What a pitty.

But yes, judging by the view of the housing of my camera, there must have been a drop in the past. However, in my case I only have this one screw loose in order to get the shutter running. What would your judgement of the whole case be? Is it "reasonable" to leave that one screw out?
 

OAPOli

Member
Joined
Sep 26, 2022
Messages
623
Location
Toronto
Format
Medium Format
A distorted shutter could imply a tilted optical axis.

I don't know what are the implications of using a shutter with a missing screw. Maybe it's fine.
 
Last edited:

BDW

Member
Joined
Mar 23, 2025
Messages
3
Location
London
Format
Medium Format
Hi, I've just bought a GS645s and have an issue of a slightly hazy lens. Looking at your repair images it would seem that I need to remove the plastic cone in order to unscrew and remove the front lens group. Would you agree? I'm a bit nervouse with this camera as it feels quite fragile.
 
Photrio.com contains affiliate links to products. We may receive a commission for purchases made through these links.
To read our full affiliate disclosure statement please click Here.

PHOTRIO PARTNERS EQUALLY FUNDING OUR COMMUNITY:


Ilford ADOX Freestyle Photographic Stearman Press Weldon Color Lab Blue Moon Camera & Machine
Top Bottom