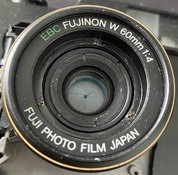
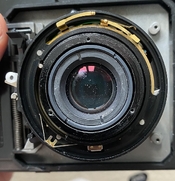
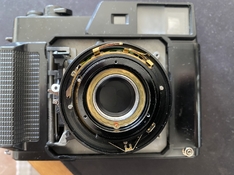
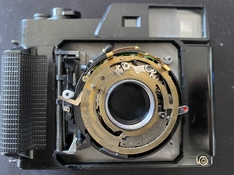
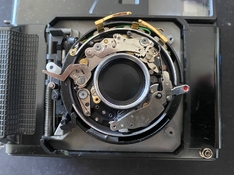
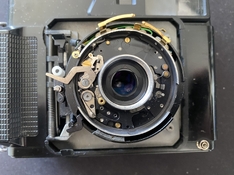
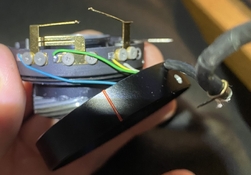
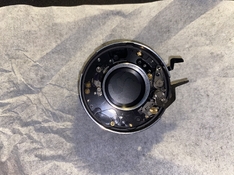
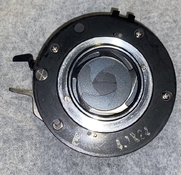
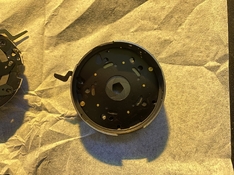
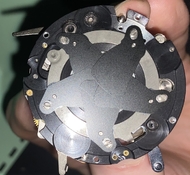
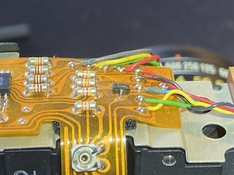
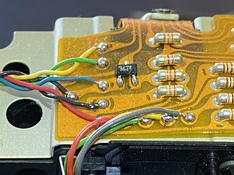
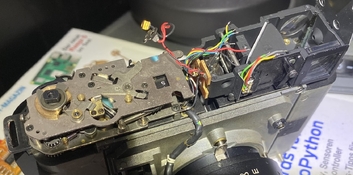
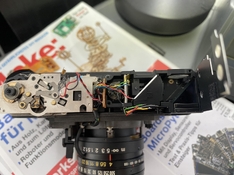
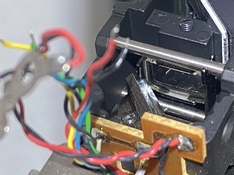
Fuji GS645S Wide60 Shutter disassembly

Jerome Leaves

H
Jerome Leaves

  • 1
  • 0
  • 26
Jerome

H
Jerome

  • 0
  • 0
  • 30
Sedona Tree

H
Sedona Tree

  • 1
  • 0
  • 34
Sedona

H
Sedona

  • 0
  • 0
  • 36
Bell Rock

H
Bell Rock

  • 0
  • 0
  • 36

Recent Classifieds

Forum statistics

Threads
197,420
Messages
2,758,757
Members
99,493
Latest member
Leicaporter
Recent bookmarks
0

BDW

Member
Joined
Mar 23, 2025
Messages
3
Location
London
Format
Medium Format
Thanks! When I come to reassemble, does anyone recommend what glue to use to put the cone back? I ask because my experience with super glue has left a cloud like residue.
 

BobUK

Member
Joined
Oct 13, 2021
Messages
492
Location
England, UK
Format
Medium Format
You may have to clean inside the lens again in the future. So avoid super glues, epoxy resins and anything that could be looked upon as permanent.

I just used three small blobs of shellack glue. There are most probably references to making your own here on PHOTRIO and FADU.

Shellack glue has been used since the early days of camera making. It is easily dissolved in alcohol if the parts require separating at a later date.

To my way of thinking, there are no loads on the lens cone, so no need for a strong bond.
 

BDW

Member
Joined
Mar 23, 2025
Messages
3
Location
London
Format
Medium Format
Thanks so much, I was going to use epoxy but what you said makes so much sense. So glad I joined this forum!
 

OAPOli

Member
Joined
Sep 26, 2022
Messages
621
Location
Toronto
Format
Medium Format
I would use Pliobond. Super Glue types (cyanoacrylates) will spoil optical surfaces and are too strong. Epoxy is also a permanent adhesive.
 
OP
OP

z0r

Member
Joined
Oct 26, 2023
Messages
17
Location
Germany
Format
35mm
Hey @BDW. First of all: Everything you do is at your own risk. If you fell like breaking something I'd not advise you to.

But: Yes, I'd agree. Gently remove the cone with a plastic clip. Then you are at IMG_0457.JPEG and need to disassemble the whole thing until the front lens can be unscrewed. For this you need a lens spanner wrench. Handling a lens spanner wrench can be very fiddly, especially when the lens screw sits very tight. Then the risk of slipping of and breaking something is great. This is the most difficult part here. Unscrew it from the outer screw. You do not want to unscrew by the inner screw and disassemble the lens group. Attatched to this message are all pictures I made when disassembling it (ordered in Disassambling steps up unto the shutter). Maybe this is helpful.

One small hint: When disassembling the front unit, you can lose a ball bearing (see IMG_0458.JPEG, underneath the v-shaped spring). Do not lose that, otherwise the aperture loses its clicking.

EDIT: Somehow the replies since @BDW 's question where not displayed until my reply? Sorry for that. Anyway congrat's!

Also here is a video of the shutter in its sticky state
 

Attachments

  • IMG_0457.JPEG
    IMG_0457.JPEG
    376.8 KB · Views: 20
  • IMG_0458.JPEG
    IMG_0458.JPEG
    318.4 KB · Views: 19
  • IMG_0460.JPEG
    IMG_0460.JPEG
    1.2 MB · Views: 16
  • IMG_0461.JPEG
    IMG_0461.JPEG
    1.3 MB · Views: 19
  • IMG_0463.JPEG
    IMG_0463.JPEG
    1.3 MB · Views: 20
  • IMG_0464.JPEG
    IMG_0464.JPEG
    1.2 MB · Views: 18
  • IMG_0475.JPEG
    IMG_0475.JPEG
    163.9 KB · Views: 17
  • IMG_0476.JPEG
    IMG_0476.JPEG
    1.4 MB · Views: 17
  • IMG_0478.JPEG
    IMG_0478.JPEG
    194 KB · Views: 15
  • IMG_0479.JPEG
    IMG_0479.JPEG
    1.9 MB · Views: 16
  • IMG_0495.JPEG
    IMG_0495.JPEG
    235.7 KB · Views: 19
Last edited:
OP
OP

z0r

Member
Joined
Oct 26, 2023
Messages
17
Location
Germany
Format
35mm
@BobUK To your viewfinder question: If you have already checked everything with the rod coming from the lens to the body, then you need to look into the rangefinder. For this you need to desolder the electronics and remove the top hood. When desoldering the electronics, note that there are two black wires. IMG_0370.JPEG shows which black wire is connected to GND and which to something related to the flash.

Removing the hood reveals the focusing mirror, which is guided on a rod (see IMG_0375.JPEG). In my case, I cleand the rod with IPA and used a tiny tiny amount of lube onto the rod. spread the lubed by moving the mirror back and forth and this did the trick for me. Attatched you finded my pictures of the disassembly as well as a video of the sticky state and the good state.


Attachments

  • IMG_0367.JPEG
    IMG_0367.JPEG
    1 MB · Views: 16
  • IMG_0368.JPEG
    IMG_0368.JPEG
    637.9 KB · Views: 14
  • IMG_0369.JPEG
    IMG_0369.JPEG
    645.7 KB · Views: 16
  • IMG_0370.JPEG
    IMG_0370.JPEG
    230.5 KB · Views: 17
  • IMG_0371.JPEG
    IMG_0371.JPEG
    629.4 KB · Views: 15
  • IMG_0375.JPEG
    IMG_0375.JPEG
    474.6 KB · Views: 13
Photrio.com contains affiliate links to products. We may receive a commission for purchases made through these links.
To read our full affiliate disclosure statement please click Here.

PHOTRIO PARTNERS EQUALLY FUNDING OUR COMMUNITY:


Ilford ADOX Freestyle Photographic Stearman Press Weldon Color Lab Blue Moon Camera & Machine
Top Bottom