Hello and 126 Film Resurrection Project

Another Saturday.

A
Another Saturday.

  • 0
  • 0
  • 11
Lost in Space

A
Lost in Space

  • 6
  • 3
  • 98
Fruits on Fuji

A
Fruits on Fuji

  • 4
  • 1
  • 104
High Street

A
High Street

  • 5
  • 1
  • 153

Recent Classifieds

Forum statistics

Threads
197,387
Messages
2,758,126
Members
99,486
Latest member
Chae
Recent bookmarks
0

Donald Qualls

Subscriber
Joined
Jan 19, 2005
Messages
12,043
Location
North Carolina
Format
Multi Format
Even better, if you can do this for 126, you can support 828 at almost no additional cost. You'll need a second film length and perf spacing (not all 828 cameras need the single perf per frame, but enough do you should support it if you sell 828 -- just build the machine to be adjustable or have two different punch wheels) and of course a second backing paper format, plus spools -- but 828 *might* work with plastic spools (similar to the ones I've seen for 127, with a brass insert to catch the drive key). I've hand cut 120 for 828, but you wind up having to either reverse spool or read the frame track backward, and 16 frames is more than 828 cameras were originally made to take. The spool winds up a little fat...
 
OP
OP

Brockley

Member
Joined
Mar 10, 2020
Messages
10
Location
Blacksburg, VA
Format
Analog
Hey everybody, thought I'd give a little update! I've rethought my goals for this project, and considering all of the input on this thread I think instead of remaking fully complete 126 cartridges and selling them, it would make more sense to make a 3D-printed device that allows the easy conversion of 120 film to 126 film. I haven't made a huge amount of progress, but I thought it would be good to see if anyone has input or suggestions for some hurdles I'm facing.

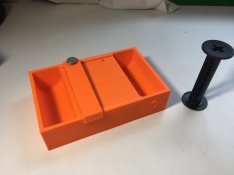
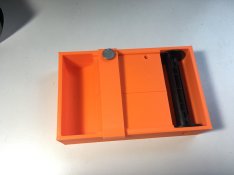
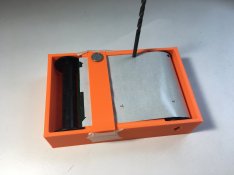
First of all, here is the device at the moment, the goal is to make something that will punch perforations at the correct spacing and then slit the 120 film down to 35mm width.
IMG_2524.JPG IMG_2525.JPG
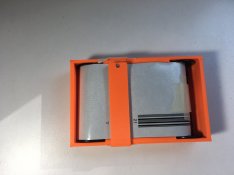
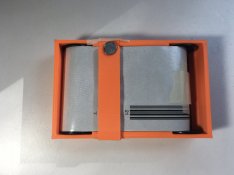
It has a space for a feed and takeup spool.
IMG_2516.JPG IMG_2518.JPG IMG_2519.JPG IMG_2521.JPG
The way it's supposed to work is you would wind until the beginning of the film and then punch the first hole. Then you would continue to wind until a catch slips into the first hole made, preventing you from advancing the roll and providing perfect spacing. (The catch here is simulated by a drill bit). Punching the hole will ideally reset the catch and allow you to keep winding until the next punch is to be made. You do this 20 or 24 times and then you have a roll of 120 film perforated for a 126 cartridge, including backing paper. For slitting the film to the correct width, I'm planning on adding a blade before or after the punch.

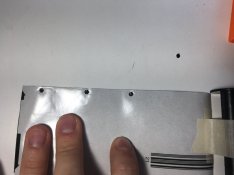
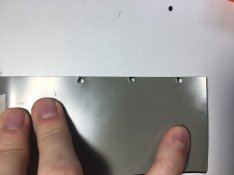
Now here's where the problems begin. The biggest issue right now is how to cleanly punch through the backing paper and film. I have tried a 3D-printed two-prong punch, which surprisingly worked okay for film-only, but didn't work on both the film and backing paper. I then tried a nail which i cut down into a two-prong punch which is the one you see in the pictures, however it sort of mangles the film and doesn't punch cleanly - as you see below.
IMG_2522.JPG IMG_2523.JPG
If anyone has any ideas for how to easily and cleanly punch the holes that would integrate into this 3D-printed device I would love to hear it! I will try to keep updating this more frequently from now on!
 

Donald Qualls

Subscriber
Joined
Jan 19, 2005
Messages
12,043
Location
North Carolina
Format
Multi Format
If you spool all the way through the roll, then start back toward the beginning, the film will easily separate from the backing. I think that would be my approach, and would allow you to use the 3D printed punch (which you noted punches cleanly in film, just not film and backing). The user is going to need to have the film strip separated from the 120 backing anyway, in order to load it into the 126 cartridge along with a correctly marked backing strip -- right?
 
OP
OP

Brockley

Member
Joined
Mar 10, 2020
Messages
10
Location
Blacksburg, VA
Format
Analog
If you spool all the way through the roll, then start back toward the beginning, the film will easily separate from the backing. I think that would be my approach, and would allow you to use the 3D printed punch (which you noted punches cleanly in film, just not film and backing). The user is going to need to have the film strip separated from the 120 backing anyway, in order to load it into the 126 cartridge along with a correctly marked backing strip -- right?

That's a good point! I guess my intention was that the backing paper from the 120 film would become the backing paper for the new 126 roll - it just would not have correct markings. This is because in my experience, its hard to find suitable backing paper for 126 film outside of old 126 backing paper. Now that I think about it though, does it really even make sense to have a backing paper if it's not going to show you the exposure count? Since I have fully modeled and successfully printed 126 cartridges, I'm wondering if maybe I could integrate some sort of new counting mechanism into the cartridge, not reliant on backing paper.
 

Donald Qualls

Subscriber
Joined
Jan 19, 2005
Messages
12,043
Location
North Carolina
Format
Multi Format
I'm wondering if maybe I could integrate some sort of new counting mechanism into the cartridge, not reliant on backing paper.

That sounds complex and prone to having tiny plastic parts break off and float around inside your camera. What I'd probably suggest is to cut your strip from 120 backing, but locate your strip so none of the 120 framing numbers show in the 126 cartridge window, then hand write or stamp the number at the correct spacing to match your perforations.

I'm sure the main reason Kodak originally put numbers (and backing paper at all) in the 126 and 110 cartridges is because it made the cartridge and/or camera so much cheaper (and they were still selling a lot of 120/620, 127, 828, even 116/616 and 122, when 126 came out; backing paper was what they did).
 

rai

Member
Joined
Sep 17, 2007
Messages
81
Format
Multi Format
[QUOTE = "Brockley, publicación: 2302918, miembro: 91621"] Hola a todos, ¡pensé en darles una pequeña actualización! He reconsiderado mis objetivos para este proyecto, y considerando todas las aportaciones en este hilo, creo que en lugar de rehacer 126 cartuchos completamente completos y venderlos, tendría más sentido hacer un dispositivo impreso en 3D que permita la conversión fácil de 120 películas a 126 películas. No he progresado mucho, pero pensé que sería bueno ver si alguien tiene comentarios o sugerencias para algunos de los obstáculos que estoy enfrentando.

Hey everybody, thought I'd give a little update! I've rethought my goals for this project, and considering all of the input on this thread I think instead of remaking fully complete 126 cartridges and selling them, it would make more sense to make a 3D-printed device that allows the easy conversion of 120 film to 126 film. I haven't made a huge amount of progress, but I thought it would be good to see if anyone has input or suggestions for some hurdles I'm facing.

First of all, here is the device at the moment, the goal is to make something that will punch perforations at the correct spacing and then slit the 120 film down to 35mm width.
View attachment 250957 View attachment 250958
It has a space for a feed and takeup spool.
View attachment 250959 View attachment 250960 View attachment 250961 View attachment 250962
The way it's supposed to work is you would wind until the beginning of the film and then punch the first hole. Then you would continue to wind until a catch slips into the first hole made, preventing you from advancing the roll and providing perfect spacing. (The catch here is simulated by a drill bit). Punching the hole will ideally reset the catch and allow you to keep winding until the next punch is to be made. You do this 20 or 24 times and then you have a roll of 120 film perforated for a 126 cartridge, including backing paper. For slitting the film to the correct width, I'm planning on adding a blade before or after the punch.

Now here's where the problems begin. The biggest issue right now is how to cleanly punch through the backing paper and film. I have tried a 3D-printed two-prong punch, which surprisingly worked okay for film-only, but didn't work on both the film and backing paper. I then tried a nail which i cut down into a two-prong punch which is the one you see in the pictures, however it sort of mangles the film and doesn't punch cleanly - as you see below.
View attachment 250963 View attachment 250964
If anyone has any ideas for how to easily and cleanly punch the holes that would integrate into this 3D-printed device I would love to hear it! I will try to keep updating this more frequently from now on!

Greetings, I am in a situation similar to yours. I have discovered hollow paper punch bits that cut film and paper perfectly. The problem is in matching the hole in the paper with the hole in the film after making them and when rolling the film back into the 126 cartridge. Even in daylight it is difficult. This is why the holes in the backing paper are longer, I think. My apologies for my bad english.
 

WD4AON

Member
Joined
May 8, 2020
Messages
43
Location
Florida/NY
Format
Sub 35mm
Brockley,
You've done great work here; I commend you.
Please contact me offline at wd4aon@gmail.com, as I have a number of suggestions and some considerable ideation work on this very subject.
Terry
 
Joined
Jul 6, 2021
Messages
1
Location
New Jersey
Format
35mm
Hello all,

This is my first post here on Photrio, however I have been lurking here for a few years. I'm a senior year industrial design student and have been shooting, developing, and experimenting with film for a little over 2 years. I'm always looking for new photography projects so I've researched and played around with a bunch of different processes and formats, from traditional 35mm to tintypes, pinhole photography, direct positives, camera/lens building and more!

One of my recent ongoing projects involves reviving 126 film for a sort of ultra-small scale production run. I have reloaded old 126 cartridges with 35mm film and am familiar with the Fakmatic but I've never been satisfied with the results or experience of using either. To me, something identical to the original experience of using 126 film is ideal.

My original intention was to have the cartridge be manufactured from molded paper or laser-cut thin cardboard and I ideated in that direction for a while, however the cartridges were never satisfactory in terms of durability, light-tightedness, or ease of manufacture/loading so my current approach is to use a 3D-printed cartridge (this is the same way the Fakmatic is made). I designed the cartridge based on measurements from an original Kodak 126 cartridge with some alterations made to make it easier to 3D print as well as work better with my film/backing paper system.

Which brings me to the film and backing paper! In order to not waste film, my process involves slitting 120 film in half, creating two ~31mm strips of unperforated film. This gives just enough room for the ~28mm tall image created by 126 cameras. Frame registration is done completely with the backing paper. The system works very well, the only issue being the skill/time required to load the cartridge however I'm hoping to automate/semi-automate it soon.

My goal is to provide essentially completely new 126 cartridges, loaded with film, on a small scale for a price that is reasonable. I think it would be cool to offer the original 100 speed color negative film along with other film speeds and black & white. The film will be able to be developed at home on altered Patterson reels or by a company that does dip-and-dunk processing, such as TheDarkroom.

I'm very near the point where I would like to begin testing the cartridges on a larger scale, with as wide a variety of 126 cameras as possible. I'm posting this to gauge interest and see if a few 126 film enthusiasts would like to help me "field test" these 126 cartridges I've developed.

Thank you for taking the time to read this and I would appreciate any advice you can give. I can post pictures/progress if enough people show interest! Apologies if this is not posted in the correct place!
This is great information, thank you! Do you know if this is available in color negative format?


Absolutely correct! I should have been more clear when I talked about frame registration. Traditionally with 126, there is a sprocket hole for every frame in the actual film base and then a slot through the backing paper. I've found that even though my 31mm film doesn't make it all the way to where the registration pin would be, the slot in the backing paper works just as well to engage the film stop. I will definitely have to test how reliable it is but it has been surprisingly effective so far!

Edit: Here are some pictures to give some context--

View attachment 241819
View attachment 241820
Original Kodak cartridge on the left, mine on the right, the white color is only for this prototype.

View attachment 241821
The cartridge in the camera with the back piece removed and custom backing paper in place. You can see the registration holes near the upper edge, they are about twice the size the should be at the moment as that is the only hole punch I have.

View attachment 241823
The backing paper advanced to the point that it has activated the film stop for frame "8".

Additional images of the cartridge in the camera:
View attachment 241825 View attachment 241824

And here is what the negatives look like:
View attachment 241826


Hello! I am interested in tracking your progress of reviving the 126 cartridge format.. Are you in the USA? Have you contacted the Lomography company, who is currently making 110 film, to see if they are adding 126 to their catalog? They may be able to partner with you. Just a thought.
Give us an update on how you are doing. I love the photos you posted showing your prototype and results. Keep us posted. There must be thousands of 126 cameras longing to be back in service again!
Let us know. Anthony
 
OP
OP

Brockley

Member
Joined
Mar 10, 2020
Messages
10
Location
Blacksburg, VA
Format
Analog
Hello! I am interested in tracking your progress of reviving the 126 cartridge format.. Are you in the USA? Have you contacted the Lomography company, who is currently making 110 film, to see if they are adding 126 to their catalog? They may be able to partner with you. Just a thought.
Give us an update on how you are doing. I love the photos you posted showing your prototype and results. Keep us posted. There must be thousands of 126 cameras longing to be back in service again!
Let us know. Anthony

Hey Anthony, crazy coincidence that I’m starting to jump back into this project right as you’ve commented!

Around this time last year, the project fell by the wayside as I was heavily looking for employment in my field after graduation. Since then I’ve got a job, moved, and gotten settled to the point where I think it’s time to take a fresh look at this!

Looking at my year old posts, there’s so many better ideas I have now so I’m hoping to get some traction in the coming weeks!
 
Joined
Aug 8, 2021
Messages
1
Location
Australia
Format
Multi Format
Hey Anthony, crazy coincidence that I’m starting to jump back into this project right as you’ve commented!

Around this time last year, the project fell by the wayside as I was heavily looking for employment in my field after graduation. Since then I’ve got a job, moved, and gotten settled to the point where I think it’s time to take a fresh look at this!

Looking at my year old posts, there’s so many better ideas I have now so I’m hoping to get some traction in the coming weeks!


Brockley,
I hope you are well in these interesting times, I would like to offer the following suggestions with regards to film and backing paper hole punching, Matthew over at dasarodesigns has come up with an elegant punch design for 828 film which could easily be modified for 126 spacing.
I have also used the following for punching the slot into cut down 120 film backing paper. The reason it is a slot and not a hole is that as the film is wound onto the takeup spool the spacing slightly changes as the diameter of paper and film increase. These silver punches are about AUD $15 on ebay, just search for "ID Card Punch" just make sure you get one with the horizontal punch as a lot of them are for a vertical slot. Macodirect sell unperforated ISO 400 35mm film which could be punched and used in a cartridge, B&W only though. I am not sure if it is still available but Ilford used to sell 100 foot rolls of 120 backing paper through their ULF program. Finally you should check out the FCK127 film slitter project.


Regards
Richard

s-l1600.jpg
 
Last edited:
Photrio.com contains affiliate links to products. We may receive a commission for purchases made through these links.
To read our full affiliate disclosure statement please click Here.

PHOTRIO PARTNERS EQUALLY FUNDING OUR COMMUNITY:


Ilford ADOX Freestyle Photographic Stearman Press Weldon Color Lab Blue Moon Camera & Machine
Top Bottom