Is there any way to reduce grain in a negative scan?

Recent Classifieds

Forum statistics

Threads
197,295
Messages
2,757,132
Members
99,452
Latest member
corydon
Recent bookmarks
0
Joined
Jan 31, 2020
Messages
1,261
Location
Germany
Format
Multi Format
When I first started scanning film with my film scanner (a Minolta Dimage Scan Elite F-2900), I was seeing a lot of what I thought was over-prominent grain in my scans. After doing some reading, I think what I was seeing was not, strictly speaking, film grain, but rather grain plus an artifact of the scanning process. Some articles refer to this phenomenon as "grain aliasing" -- which you can use as a search term to learn more about it. By trying out different scan settings in VueScan, and different sharpening settings in Adobe Photoshop and Lightroom, I was able to reduce the effect to a more tolerable level.

However, since I switched from using a film scanner for copying my negatives to using a digital camera, I have been much happier with the appearance of the film grain. For whatever reason, the grain as seen on my camera-scans looks a lot less "gritty" a lot more natural.

EDIT: Here is a link that presents the case for "grain aliasing" -- what it is, and what can be done about it:

Bingo, for an image with low grain, other than starting with a film with low grain, which several posters have mentioned, you need to scan with as high resolution as possible, to avoid grain aliasing or get it as small as possible. The rest is avoiding bad sharpening and what remains can be reduced with noise reducing tools, but this come sat a cost to image quality, and if all previous steps go well and if you can live with the way film images look (otherwise, why shoot film in this day and age?), it shouldn't be necessary.
 

joho

Member
Joined
May 13, 2011
Messages
73
Format
Large Format
I will go into detail - it was to late in to the night - it really needs a good review -.
going to the books be back in a few hours ....
 

joho

Member
Joined
May 13, 2011
Messages
73
Format
Large Format
I am back !!

scanners are for digitalizing only!!!
the great hoax scanners are not for color separations !!!

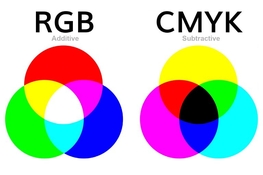
color separations for 4/c process that is the photo mechanical reproduction of images onto the photo-lithographic process. [*] after 1989 ???

[*] THE CHROMAGRAPH // for CMYK to reproduce C=cyan M=magenta Y=yellow K=black
and separates the image onto this 4 key colours.

The very first [*]Chromagraphs were first to be driven with PCs and were initially beta-tested in 1977 for special super large scale poster prints wall art ads…[by dupont].

in this time 1977 colour work for the photo-lithographic process was done with a floor camera.
 

Attachments

  • RGB-vs-CMYK-additive-vs-subtractive-color-models-768x512.jpg
    RGB-vs-CMYK-additive-vs-subtractive-color-models-768x512.jpg
    31.4 KB · Views: 14
  • a00dd426d50f0d35.png
    a00dd426d50f0d35.png
    7.8 KB · Views: 16
Joined
Jan 31, 2020
Messages
1,261
Location
Germany
Format
Multi Format
I am back !!

scanners are for digitalizing only!!!
the great hoax scanners are not for color separations !!!

color separations for 4/c process that is the photo mechanical reproduction of images onto the photo-lithographic process. [*] after 1989 ???

[*] THE CHROMAGRAPH // for CMYK to reproduce C=cyan M=magenta Y=yellow K=black
and separates the image onto this 4 key colours.

The very first [*]Chromagraphs were first to be driven with PCs and were initially beta-tested in 1977 for special super large scale poster prints wall art ads…[by dupont].

in this time 1977 colour work for the photo-lithographic process was done with a floor camera.

Maybe you misunderstood the question. This thread is about digitisation and digital post processing of black and white film.
 

runswithsizzers

Subscriber
Joined
Jan 19, 2019
Messages
1,654
Location
SW Missouri, USA
Format
35mm
Bingo, for an image with low grain, other than starting with a film with low grain, which several posters have mentioned, you need to scan with as high resolution as possible, to avoid grain aliasing or get it as small as possible. The rest is avoiding bad sharpening and what remains can be reduced with noise reducing tools, but this come sat a cost to image quality, and if all previous steps go well and if you can live with the way film images look (otherwise, why shoot film in this day and age?), it shouldn't be necessary.
I think resolution is probably one of the reasons why my camera-scans are much less bothered by grain aliasing, compared to my old film scanner. Minolta says my Dimage Scan Elite film scanner will a scan 35mm film at 2688 x 4032 pixels, or about 10.8MP. And a full frame capture of 35mm film on my digital camera would be about 3264 x 4896, or almost 16MP.

Also, by recording a RAW capture of the film frame with my digital camera, I can be sure I am avoiding any "enhancements" that may be going on in the scanner's software. If your film scanner automatically converts your negatives to positives, and you love the results, then I am happy for you. But if not, then you need to bypass the scanner conversions and take manual control over setting black and white points, contrast, and sharpening. This requires good judgement and competent image processing software.
 

albireo

Member
Joined
Nov 15, 2017
Messages
1,234
Location
Europe
Format
Multi Format
I think resolution is probably one of the reasons why my camera-scans are much less bothered by grain aliasing, compared to my old film scanner. Minolta says my Dimage Scan Elite film scanner will a scan 35mm film at 2688 x 4032 pixels, or about 10.8MP. And a full frame capture of 35mm film on my digital camera would be about 3264 x 4896, or almost 16MP.

Are you pixel shifting?

If not, your DSLR scans are, in fact, 1/3rd the resolution you think they are so just about 5 odd MB of real image data.

This is because the sensor in your digital camera is behind a Bayer (or worse, Xtrans) colour grid and each pixel is filtered by one of the R, B,G colour filters only.

A software interpolation called "demosaicisation" is then performed on your data by the camera or by your chosen raw converter to return a usable image. This introduces significant colour and, to a lesser extent, spatial artefacts which are likely to play a role in the rendering of the grain you're getting and why you think it's "more natural" than on your film scanner.

But @MattKing is right. With a DSLR scanning setup you're illuminating the whole image at once with a diffused light, unlike what happens with your film scanner, and that will play a major role.

On top of that, you're likely using an SLR lens to scan your film, so it's unclear what effect this is having on grain rendition, especially on the image periphery. Do coma and other aberrations play a role? Is the lens you're using optimised for operating at the distance and magnification required for film scanning?

By the way, there is no real scientific evidence 'grain aliasing" exists, it's just another pseudo-scientific theory propagated over the years by a few amateurs whose "articles" have been carted about every time "scanned grain" is mentioned. One of these is the one you linked to before.
 
Last edited:

joho

Member
Joined
May 13, 2011
Messages
73
Format
Large Format
grain elevator said:


Maybe you misunderstood the question .
NO .
digitization and digital post processing of black and white film is only Electrical Noise...
With in this framework we should understand WTF is digital is !!! sorry to sound like this.
 
Joined
Jan 31, 2020
Messages
1,261
Location
Germany
Format
Multi Format
By the way, there is no real scientific evidence 'grain aliasing" exists, it's just another pseudo-scientific theory propagated over the years by a few amateurs whose "articles" have been carted about every time "scanned grain" is mentioned. One of these is the one you linked to before.

Do you deny that a phenomenon I'd roughly describe as an appearance of grain, which however is larger than the actual film grain as one would see it in a higher resolution scan or optical print, exists? Or do you think it shouldn't be called"grain aliasing"?
 

runswithsizzers

Subscriber
Joined
Jan 19, 2019
Messages
1,654
Location
SW Missouri, USA
Format
35mm
Are you pixel shifting?

If not, your DSLR scans are, in fact, 1/3rd the resolution you think they are so just about 5 odd MB of real image data.

This is because the sensor in your digital camera is behind a Bayer (or worse, Xtrans) colour grid and each pixel is filtered by one of R, B,G color filter only.

A software interpolation called "demosaicisation" is then performed on your data by the camera or by your chosen raw converter to return a usable image. This introduces significant colour and, to a lesser extent, spatial artefacts which are likely to play a role in the rendering of the grain you're getting and why you think it's "more natural" than on your film scanner.
Well, I don't really understand much of what I read, so everything I think I know about technology is probably wrong. But this much I do know -- I spent a lot of time trying to prevent and / or fix unpleasant, gritty, and unnatural looking "grain" in the scans from my film scanner -- and that problem went away when I switched to camera scanning. In addition, my camera scans are noticeably sharper than my film scanner results. Really, my camera scans are superior in every observable way except one: I did like the colors I was getting from the film scanner better. But now that I am shooting B&W film exclusively, I don't care about color film. Nor does the OP.

To be clear, when I say the grain on my camera scans looks more natural, I mean it looks more like the grain I see on my darkroom prints. You seem to be suggesting that either I don't know what film grain looks like, or my eyes are somehow deceiving me.
But @MattKing is right. With a DSLR scanning setup you're illuminating the whole image at once with a diffused light, unlike what happens with your film scanner, and that will play a major role.
Not sure what is the significance of diffused light. Yes, my camera-scanned film is illuminated with a diffuse light source. But my Minolta Dimage Scan Elite uses a "cold cathode fluorescent light source" -- isn't that also a diffuse light source? What kind of light source is better than diffuse, and why?

On top of that, you're likely using an SLR lens to scan your film, so it's unclear what effect this is having on grain rendition, especially on the image periphery. Do coma and aberration play a role? Is the lens you're using optimised for operating at the distance and magnification required for film scanning?
Your assumption is not correct. I am using a Rodenstock APO-Rodagon D 75mm f/4.0 lens. If I understand correctly, the "D" stands for "Duplication" and this lens optimised for reproduction/duplication at 1:1. My camera scans are done at a slightly lower maginification than 1:1, so perhaps it is not the perfect lens for my application, but it is better, I think, than the average "SLR lens" (whatever that is).

By the way, there is no real scientific evidence 'grain aliasing" exists, it's just another pseudo-scientific theory propagated over the years by a few amateurs whose "articles" have been carted about every time "scanned grain" is mentioned. One of these is the one you linked to before.
I can't argue with that. I read enough about "grain aliasing" to realize that it is controversial. I usually put the term in quotations marks as a hint to suggest, "this may not mean what you think it does." It is sort of a short-hand term used to loosely apply to the phenomenon of unexpected heavy grain observed on film scans.

I do think there are enough people who are seeing much more prominent grain on their black and white scans than what they expected to see, that it is a real "thing" -- and it seems like there should be some kind of explanation for it. So, if not "grain aliasing" -- then what? I would love to hear your explanation, and I mean that without irony or sarcasm.
 
Last edited:

koraks

Moderator
Moderator
Joined
Nov 29, 2018
Messages
20,457
Location
Europe
Format
Multi Format
I think resolution is probably one of the reasons why my camera-scans are much less bothered by grain aliasing, compared to my old film scanner.

I think it has more to do with the fact that your film scanner (Minolta Elite) uses a collimated light source. Your camera scanning setup in all likelihood uses a diffuse light source (something like a LED panel). That makes a big difference in terms of how the grain will render. See responses of @albireo and @MattKing before.

Not sure what is the significance of diffused light.

Make a print (optical enlargement) with a collimated light source (condenser enlarger or, even more extreme, a point source enlarger) and one with a diffuser enlarger. Note how the grain renders, but also how dust etc. stands out. Similar effects will be recorded when scanning film.

scanners are for digitalizing only!!!
the great hoax scanners are not for color separations !!!

I don't see how this is relevant, sorry. As to your subsquent post ("wtf"): please keep it polite.
This thread isn't about color separations. It's as far as I can see about scanning B&W film and in those scans, reducing the subjective graininess of the digital image. Your posts don't have clear implications for this use case. In case I'm overlooking them, I think you'll need to state those implications a little more clearly.
 

runswithsizzers

Subscriber
Joined
Jan 19, 2019
Messages
1,654
Location
SW Missouri, USA
Format
35mm
Oops!
Looking back over my digitized film results from years gone by, I see the appearance of grain from my Minolta Scan Elite is not as bad as I remembered. What I was remembering as troublesome gritty, clumpy grain was mostly from a special subset of the film which I was scanning at the time -- which was negative film processed as positives by DR5. It is pretty obvious to me now, the gritty look was a result of DR5s positive processing, and not the fault of the film scanner. So I apologize for not fact-checking my memory before leading the discussion off-track.
 

alanrockwood

Member
Joined
Oct 11, 2006
Messages
2,184
Format
Multi Format
Here's a theory that might help. Scan several times with a very slight random shift of film in the film holder each time. Resample each image at 2X. Combine the images. (Combining the image needs to include getting the images registered properly with respect to each other. There are software programs that can do this.) Average the images.

My theory (untested) is that this scheme will help reduce grain aliasing (if grain aliasing actually exists.)
 

Hassasin

Member
Joined
Feb 23, 2023
Messages
1,305
Location
Hassasstan
Format
Multi Format
And why "reduce grain" on film scan ? If anything, wouldn't preserving that grain be THE way to follow the idea of film shooting to start with ? Grain isn't digital noise and if it is too big to your eye, use finer grain film/processing.

In the end, any attempts to fake the look of scanned film image becomes non-film image.
 

koraks

Moderator
Moderator
Joined
Nov 29, 2018
Messages
20,457
Location
Europe
Format
Multi Format
Finally, coming back to the 'scanned grain' aspect: note that it makes a lot of difference how you scan your film. E.g. on my flatbed Epson 4990 I get relatively grain-free scans - but they're also somewhat less crisp and detailed than from e.g. my film-dedicated Minolta Scan Dual IV.

To give an illustration (since I was messing with some scanners & film anyway), take this image:
1739390899503.png

Kodak Double X, developed in Pyrocat HD. Let's say it's a 'medium grain' negative. Not awfully grainy, but a far cry from TMX smoothness. Here's some 100% crops from various scans.
1739390973248.png
Konica Minolta Scan Dual IV, 3200dpi
1739391365413.png
Flextight Precision II, 5760dpi
1739392205600.png
Epson 4990, 4800dpi
All three scans received a small amount of unsharp mask with a low (but non-zero) threshold to emphasize the structure of the scanned grain.

What I think this example illustrates is that in a scanned image, you can't really speak of 'analog grain' anymore. It's always an interaction between the physical ('analog') structure of the image and the scanner & scanning process. Also, the examples show that in all cases, the grain ('as scanned') manifests itself as noise in a digital image.

The nature of the noise is different, even though the physical negative is the same. If you want to reduce this 'apparent graininess', it's a matter of using whatever digital noise filter you can get your mitts on and manipulate its parameters (insofar as possible) to suit the structure of the noise in the image. Where this noise originates is pretty much irrelevant at this point, and a noise filter cannot and doesn't have to differentiate between 'grain' and other types of noise. It's all noise; what matter is not where it came from, but what its signature is.

Your best bet for dealing with noise is to experiment with a tool that has several parameters you can tweak. One (free) example would be G'MIC, which is a plugin suite for GIMP. It contains, among many others, several noise reduction tools (referred to as 'smoothing'). See e.g. here https://www.mora-foto.it/en/tutorials-gimp/noise-reduction-with-gmic.html
 

Attachments

  • 1739391347385.png
    1739391347385.png
    27.7 KB · Views: 14

albireo

Member
Joined
Nov 15, 2017
Messages
1,234
Location
Europe
Format
Multi Format
To give an illustration (since I was messing with some scanners & film anyway), take this image:
View attachment 390916
Kodak Double X, developed in Pyrocat HD. Let's say it's a 'medium grain' negative. Not awfully grainy, but a far cry from TMX smoothness. Here's some 100% crops from various scans.
View attachment 390917 Konica Minolta Scan Dual IV, 3200dpi
View attachment 390921 Flextight Precision II, 5760dpi
View attachment 390922 Epson 4990, 4800dpi
All three scans received a small amount of unsharp mask with a low (but non-zero) threshold to emphasize the structure of the scanned grain.

What I think this example illustrates is that in a scanned image, you can't really speak of 'analog grain' anymore. It's always an interaction between the physical ('analog') structure of the image and the scanner & scanning process. Also, the examples show that in all cases, the grain ('as scanned') manifests itself as noise in a digital image.

The nature of the noise is different, even though the physical negative is the same. If you want to reduce this 'apparent graininess', it's a matter of using whatever digital noise filter you can get your mitts on and manipulate its parameters (insofar as possible) to suit the structure of the noise in the image. Where this noise originates is pretty much irrelevant at this point, and a noise filter cannot and doesn't have to differentiate between 'grain' and other types of noise. It's all noise; what matter is not where it came from, but what its signature is.

Your best bet for dealing with noise is to experiment with a tool that has several parameters you can tweak. One (free) example would be G'MIC, which is a plugin suite for GIMP. It contains, among many others, several noise reduction tools (referred to as 'smoothing'). See e.g. here https://www.mora-foto.it/en/tutorials-gimp/noise-reduction-with-gmic.html

Koraks, thanks for this - but including the Epson in the comparison above is not fair I think - you know very well that these flatbed scanners sit around 1500-2000 real dpi at best - in your sample above you're just seeing up-sampling artefacts. I'm not sure about the Epson 4990 but most Epsons I know of don't have the capability to autofocus on the grain, too (though some models have pretty generous DOF) so I think nothing about that third sample can contribute much to 'how a scanner renders grain'. While the other two do, and I bet would have looked pretty indistinguishable if matched for AF and dpi and with good replication in a blind test.

But I think you're talking about something broader aren't you? You seem to be starting from the point of view of someone used to the rendering of grain in a paper+enlarger setup and are suggesting that what you see when scanning is something different, yes?

If so, that's interesting, but remember that many hybrid shooters don't have - or care about - that strong baseline. Even if it's not 'analog grain' anymore, a scanner operating at its declared resolution, and able to focus on the grain, imparts to the scanned image certain qualities that (some of) us digital shooters are unable to find, or easily replicate, in a fully digital setup (eg DSLR).

That's the draw of analog photography for many of us who scan: decent scanners are a) consistently, b) reproducibly and c) detectably transferring (or imparting?) some characteristic of the negative that many of us are drawn to (not OP, obviously) on to the scanned negative.

Whether these characteristics are 'authentically analog' or faithfully resemble what the grain would have looked like if I had decided instead to print that negative via an enlarger+paper - I suspect, frankly, is of no interest to at least some hybrid shooters.
 
Last edited:

albireo

Member
Joined
Nov 15, 2017
Messages
1,234
Location
Europe
Format
Multi Format
Here's a quick scan of a hand held shot taken with what's believed to be a very grainy film, Fomapan 400, developed in Adox Rodinal 1:50 gently inverted once per minute.

V95HowA.jpg


Here's a 1:1 magnification of the approximate area where I focused a) the lens on my camera (an 85mm Canon f/1.8 prime I think) and where I later placed the focus point of my scanner (a Minolta Scan Elite working at a native resolution of approx 5000 dpi)

WYQt201.jpg


There are certain characteristics to how this image is built and rendered (let's call them 'low-fi') which I find are, reproducibly and deterministically, an outcome of scanning my Foma 400 negatives developed with so and so. I find that 'noise' pattern attractive, in certain settings, and keep wanting more. I am not particularly bothered by whether this 'noise pattern' resembles an 'authentic' analog noise pattern. I kind of like it taken for what it is.

And what I like, too, is that the noise pattern is absolutely a function of film, exposure, and development chosen, and I can tweak the look of that 'digital grain' via choice of consumables and modulation of chemical variables (which I find enjoyable).

Here's what the same scanner gives me when I go for a different film (Fomapan 100) developed in a different developer (D23 stock)

nQ6cXJy.jpg


and a magnified detail

rW6e5y9.jpg


This is for me enjoyable too, in a different kind of way. There is less of that 'not fully analog' Fomapan 400 grain, but the film still shows I find, a certain more subdued grittiness which I find pleasing and -importantly- which I know I will always get when I shoot Foma 100 in the same light, and expose and develop and scan in the same way. I also know I won't get this when I shoot with the only digital camera I have left at home, which is my phone, so I keep looking for this via film+scanning.

So this debate around grain benefits from the 'internal consistency' of some of our scanning setups and stands on its own for some people, and not as an offshoot of 'real analog', however beautiful the real analog grain in a wet lab print is (and I agree it can be beautiful).
 
Last edited:

koraks

Moderator
Moderator
Joined
Nov 29, 2018
Messages
20,457
Location
Europe
Format
Multi Format
But I think you're talking about something broader aren't you?

I meant nothing else, or more, than what I stated in my posts. The focus is also not on issues like resolving power, which scanner is best, how scanning relates to optical enlargement, what the appeal (or not) is of hybrid photography etc. I don't think any of that is what this thread is about.
 

joho

Member
Joined
May 13, 2011
Messages
73
Format
Large Format
As this post enriches the views of scanning B/W negatives it does give an insight , and a good one. I have a opinion that I would print first the neg-classical B/W--- then scan .
this was due to the many parameters of scanners -software [so-on...] the work here has opened a new view on this old subject.
 

alanrockwood

Member
Joined
Oct 11, 2006
Messages
2,184
Format
Multi Format
And why "reduce grain" on film scan ? If anything, wouldn't preserving that grain be THE way to follow the idea of film shooting to start with ? Grain isn't digital noise and if it is too big to your eye, use finer grain film/processing.

In the end, any attempts to fake the look of scanned film image becomes non-film image.

The thing is, a lot of people claim that scanning film emphasizes grain more than the actual amount of grain. In other words, scanned film looks grainier than it should, given the amount of grain on a sample of film.

I don't know if that is true, but enough people have claimed it to be true that one should probably not discard the claim out of hand.
 

Hassasin

Member
Joined
Feb 23, 2023
Messages
1,305
Location
Hassasstan
Format
Multi Format
The thing is, a lot of people claim that scanning film emphasizes grain more than the actual amount of grain. In other words, scanned film looks grainier than it should, given the amount of grain on a sample of film.

I don't know if that is true, but enough people have claimed it to be true that one should probably not discard the claim out of hand.

I suppose I either don't pay attention to this as much or I don't scan enough to have good enough sample. But if true that means scanning adds own noise to grain and film grain is no longer the issue in itself and going with fine grain film/processing will not make a difference in context of question asked.

On another hand, looking at scans I have done I am pretty convinced what I see is film grain. If I were a peeper perhaps I'd see some less random patterns, but that is not the train I'm on.
 

koraks

Moderator
Moderator
Joined
Nov 29, 2018
Messages
20,457
Location
Europe
Format
Multi Format
a lot of people claim that scanning film emphasizes grain more than the actual amount of grain. In other words, scanned film looks grainier than it should

See examples in #39. The answer is 'it depends'.

But if true that means scanning adds own noise to grain

That's not the point. The point is:
1: You can't speak of 'grain' as such in a digital image. It's always, inherently the result of an interaction between the physical image structure (real grain) and the imaging method (in this case scanning).
2: Ultimately, grain as perceived in a digital image is just a form (subset) of noise. Thus, noise-reduction tools apply, regardless if they're "intended" for digital or 'analog' grain. What matters is not where the image noise originates from, but what its characteristics are in terms of (distribution of) spatial frequency, intensity etc.

These seem fairly simple and straightforward observations to me, and the practical implication is also simple & straightforward. There's no need to make things complicated. Just regard grain in scans as any other form of image noise and (a) accept it for what it is or (b) smoothen it out through whichever tool one prefers.
 

snusmumriken

Subscriber
Joined
Jul 22, 2021
Messages
2,328
Location
Salisbury, UK
Format
35mm
There is a lot of knowledge on display in this thread, but I’m wondering how much practical help it is to the OP.

In almost total ignorance, the route I have evolved to minimise grain/noise is to do unsharp masking last, once the image is the size I want it. I switch off sharpening in the scanner, adjust everything else to give a nice histogram, and do all subsequent adjustments in GIMP. When it comes to sharpening, I set ‘amount’ rather high (about 70%), move the ‘radius’ slider well over to the right (the image will be horrible at this point), then decrease ‘radius’ again by degrees until the noise and jaggies are only just noticeable. Then I reduce ‘amount’ again to taste, typically to about 30%.
[All of this involves viewing the image full size (1:1) on the screen, because that’s where it will be viewed. I wouldn’t know how best to view and sharpen very large images that are to be printed: should one judge noise and sharpness 1:1 or in a ‘fit to screen’ size?]

For all I know this is what everyone does, but I’d be interested in comments. Is there any better everyday strategy, without getting over-complicated?
 

Hassasin

Member
Joined
Feb 23, 2023
Messages
1,305
Location
Hassasstan
Format
Multi Format
See examples in #39. The answer is 'it depends'.


That's not the point. The point is:
1: You can't speak of 'grain' as such in a digital image. It's always, inherently the result of an interaction between the physical image structure (real grain) and the imaging method (in this case scanning).
2: Ultimately, grain as perceived in a digital image is just a form (subset) of noise. Thus, noise-reduction tools apply, regardless if they're "intended" for digital or 'analog' grain. What matters is not where the image noise originates from, but what its characteristics are in terms of (distribution of) spatial frequency, intensity etc.

These seem fairly simple and straightforward observations to me, and the practical implication is also simple & straightforward. There's no need to make things complicated. Just regard grain in scans as any other form of image noise and (a) accept it for what it is or (b) smoothen it out through whichever tool one prefers.

I think what I am driving at is that grain that comes from actual analog side of scanned film can show separately enough from digital noise. Peeping may change that assumption but I'm not doing that and I see typical grain in scans the way I see it under a loupe. And I am not using fancy scanners. Best one I have is Minolta Scan Elite II, which is actually a very fine 35 mm scanner in my view, but perhaps not as good as higher speed machines. Or Minolta had it almost right back in its day, then pixel war took over and everything got possibly worse ???

MDSEII.JPG
 

koraks

Moderator
Moderator
Joined
Nov 29, 2018
Messages
20,457
Location
Europe
Format
Multi Format
For all I know this is what everyone does, but I’d be interested in comments. Is there any better everyday strategy, without getting over-complicated?

What you do sounds sensible and is similar to my workflow, but strictly speaking, this doesn't reduce noise ('apparent grain') in the image. It does prevent artefacts introduced in the scanning process and those resulting from resizing an originally large image to a smaller format. I'd call that avoidance of part of the problem, and not reduction.

What I do agree with, is that avoidance in the sense you're practicing it is perfectly adequate/acceptable for my personal purposes, for the most part, although it depends on the scanner I'm using. I find that some degree of noise reduction is sometimes preferable on scans I make with the Flextight, but not so when using e.g. the flatbed scanner. See (again) the examples I posted earlier, which demonstrate how much of an impact choices in scanners have on the phenomenon, and thus, digital workflow decisions will need to keep these into account. Thus, I wouldn't state that one approach would be 'best' for any given situation.

In general, my workflow focuses, like yours, mostly on avoidance of excessive compound artefacts and overlaps with your choices:
(1) Disable any sharpening or detail 'enhancement' options during scanner, insofar as possible.
(2) Apply unsharp-masking only to the final image, after any other editing, in particular downsampling.
(3) Adjust unsharp-mask parameters to the structure of the image. Key parameters are indeed radius, amount and also threshold (which I often leave at 0, but not necessarily always).

Is there any better everyday strategy, without getting over-complicated?
I think it depends on the material you start out with and the end result you want to arrive at. So no, I don't think it's possible to suggest a single type of shoe that will fit any given foot on the planet.

grain that comes from actual analog side of scanned film can show separately enough from digital noise

Look at the examples I posted in #39 and tell me what part of the noise you're seeing is grain, and what part is digitally-originating noise.
Your Minolta scanner is a fine machine, but as I said in #42 this is not about whether a scanner is any good. The fundamental phenomenon that the noise you see in the image is the sum of all aspects of the preceding imaging chain. The statement that you could separate them out is akin to arguing you can mix two colors of paint and then sort them back out while viewing the painting.
 
Photrio.com contains affiliate links to products. We may receive a commission for purchases made through these links.
To read our full affiliate disclosure statement please click Here.

PHOTRIO PARTNERS EQUALLY FUNDING OUR COMMUNITY:


Ilford ADOX Freestyle Photographic Stearman Press Weldon Color Lab Blue Moon Camera & Machine
Top Bottom