AlbertZeroK
Member
I have found some bits of information here and there of the Photo Therm, but thought I would put together an account of my past four days with my new Photo-Therm so others out there will have a good idea of what they are getting into, tricks to get one working and the oddities of these machines.
Where I got it and how?
First, I own a Sidekick 4, not a Super Sidekick. I purchased mine for roughly $900 on ebay after shipping charges. If you are looking for a photo therm, I've seen three on ebay in the last few months, but you must be diligent and check ebay, I'd say, two to three times a day. You can also check out http://footprintsequipment.com/index.html, they have offered to help me find a sidekick, now they are a broker, they will help get you in touch with a sidekick owner, so the process is not simple and will require patients.
I would suggest also offering to pay to have any extras including chemistry shipped, even if the chemistry is slightly expired, it is great to have for testing the machine. I'd also suggest starting with expired or cheap film to get your photo-therm going. Mine came with some new tubing, bottles and E-6 chemistry.
Day of arrival - When I opened the box, I was underwhelmed by the size. It's a pretty small package for what it does. Mine was dirty, so i cleaned mine which caused some issues later on, but I'll get to that. I did immediately open mine up to see what was inside and make sure it was clean. The unit opens after removing two screws on either side.
Hooking it up - I started simple, C-41. I used a 5 Gallon bottle of distilled water for my source water and a 5 gallon bucket for waste water. You'll need 1/4 ID tubing to hook up the phototherm, i hooked up the device on a cart, however, I'm not happy with the setup.
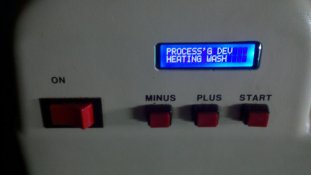
Turning it on - The first thing I noticed was the LCD was funky, the LCD was not displaying full characters, just gibberish. So I turned off the device and cleaned the inside, reseated all the IC chips and connectors and left it sit for the night to dry after I cleaned the unit. The next morning, the LCD was showing some characters, just not aligned correctly. I reseated the Microprocessor, this is not something I would do if you don't have experience with doing it. The processor is a 40 pin IC (68705 actually). I eventually had to reseat the processor twice and finally got the system up and running.
The drums - There are two drums with my unit, a 2 35mm (1 120mm) drum or a 4 35mm (2 120mm) drum. The drums use standard paterson reels. The drums come appart in half and have a core which extends out one side. metal wire clips on either end keep the drum together and they are light tight. I find it annoying to have just two drums as I would prefer to use dry drums when loading film in my dark box, but it hasn't been that big of an issue.
My first run & water all over the floor! - My first run greeted me with a flood. The instruction book is clear, the drain lines MUST go straight down into the container, I did not have this properly routed, so I ended up with the machine spilling out the spill over on the back. There is NO TUBE for the spill over output, so I'm planning on setting my Photo Therm in a container, like a washing machine pan, to catch the run off should it happen again. I'll also be getting some hose clamps for the drain lines. Now there is a drain and a flush. I'll be hooking up the flush output to my home's sewer, the drain, I'll capture and dispose of elsewhere as I have a septic system.
Recapturing bleach - there is a little save button on the back of the phototherm. If it's on, showing red, the bleach will be poured out the recycle port on the back of the device. This is for both c-41 and e-6 bleach, so you may want to turn it on / off for either or.
120 Film - I had no issues with 35mm film, but 120 film got runied. I'm use to putting two rolls of 120 on a spool, but the motion of the phototherm will unreel your film and ruin it. How to fix it? Well, Photo-Therm sells film clips, but the guy at Phototherm told me to get some cheap vinyl blinds and cut them into 2 1/4 inch strips and use those to secure the film in place.
The LCD - I've noticed the LCD is very sensitive to water, don't get it wet, if it gets wet, turn off the device and let it sit overnight, seems to work for me.
Push/Pull Processing - Once you select the process, before you hit start, you can push and hold minus for two seconds, then hit start, then you can use up and down buttons to control developer time.
The control buttons - they are sluggish. Be patient with them.
Support - The guy, Jerry, at Photo-Therm is amazing! He said if I needed anything changed, to just give them a call, they do custom programmed controllers for free for the device. Just send them your old one.
I'm planning on figuring out a better installation for my phototherm. likely on the counter in my dark room. And still have to get more bottles and tubes.
One last thing, the Phototherm SK4 (not the super sidekick) runs on just 1804 bytes of programming. It's amazing what that thing can do!
Where I got it and how?
First, I own a Sidekick 4, not a Super Sidekick. I purchased mine for roughly $900 on ebay after shipping charges. If you are looking for a photo therm, I've seen three on ebay in the last few months, but you must be diligent and check ebay, I'd say, two to three times a day. You can also check out http://footprintsequipment.com/index.html, they have offered to help me find a sidekick, now they are a broker, they will help get you in touch with a sidekick owner, so the process is not simple and will require patients.
I would suggest also offering to pay to have any extras including chemistry shipped, even if the chemistry is slightly expired, it is great to have for testing the machine. I'd also suggest starting with expired or cheap film to get your photo-therm going. Mine came with some new tubing, bottles and E-6 chemistry.
Day of arrival - When I opened the box, I was underwhelmed by the size. It's a pretty small package for what it does. Mine was dirty, so i cleaned mine which caused some issues later on, but I'll get to that. I did immediately open mine up to see what was inside and make sure it was clean. The unit opens after removing two screws on either side.
Hooking it up - I started simple, C-41. I used a 5 Gallon bottle of distilled water for my source water and a 5 gallon bucket for waste water. You'll need 1/4 ID tubing to hook up the phototherm, i hooked up the device on a cart, however, I'm not happy with the setup.
Turning it on - The first thing I noticed was the LCD was funky, the LCD was not displaying full characters, just gibberish. So I turned off the device and cleaned the inside, reseated all the IC chips and connectors and left it sit for the night to dry after I cleaned the unit. The next morning, the LCD was showing some characters, just not aligned correctly. I reseated the Microprocessor, this is not something I would do if you don't have experience with doing it. The processor is a 40 pin IC (68705 actually). I eventually had to reseat the processor twice and finally got the system up and running.
The drums - There are two drums with my unit, a 2 35mm (1 120mm) drum or a 4 35mm (2 120mm) drum. The drums use standard paterson reels. The drums come appart in half and have a core which extends out one side. metal wire clips on either end keep the drum together and they are light tight. I find it annoying to have just two drums as I would prefer to use dry drums when loading film in my dark box, but it hasn't been that big of an issue.
My first run & water all over the floor! - My first run greeted me with a flood. The instruction book is clear, the drain lines MUST go straight down into the container, I did not have this properly routed, so I ended up with the machine spilling out the spill over on the back. There is NO TUBE for the spill over output, so I'm planning on setting my Photo Therm in a container, like a washing machine pan, to catch the run off should it happen again. I'll also be getting some hose clamps for the drain lines. Now there is a drain and a flush. I'll be hooking up the flush output to my home's sewer, the drain, I'll capture and dispose of elsewhere as I have a septic system.
Recapturing bleach - there is a little save button on the back of the phototherm. If it's on, showing red, the bleach will be poured out the recycle port on the back of the device. This is for both c-41 and e-6 bleach, so you may want to turn it on / off for either or.
120 Film - I had no issues with 35mm film, but 120 film got runied. I'm use to putting two rolls of 120 on a spool, but the motion of the phototherm will unreel your film and ruin it. How to fix it? Well, Photo-Therm sells film clips, but the guy at Phototherm told me to get some cheap vinyl blinds and cut them into 2 1/4 inch strips and use those to secure the film in place.
The LCD - I've noticed the LCD is very sensitive to water, don't get it wet, if it gets wet, turn off the device and let it sit overnight, seems to work for me.
Push/Pull Processing - Once you select the process, before you hit start, you can push and hold minus for two seconds, then hit start, then you can use up and down buttons to control developer time.
The control buttons - they are sluggish. Be patient with them.
Support - The guy, Jerry, at Photo-Therm is amazing! He said if I needed anything changed, to just give them a call, they do custom programmed controllers for free for the device. Just send them your old one.
I'm planning on figuring out a better installation for my phototherm. likely on the counter in my dark room. And still have to get more bottles and tubes.
One last thing, the Phototherm SK4 (not the super sidekick) runs on just 1804 bytes of programming. It's amazing what that thing can do!