


- Home
- Forums
- Analog Workflow Forums (100% Analog/Traditional)
- Analog Equipment
- Camera Building, Repairs & Modification
You are using an out of date browser. It may not display this or other websites correctly.
You should upgrade or use an alternative browser.
You should upgrade or use an alternative browser.
Pix of your home-built cams, mods and creations here please (part 2)
-
A
- Thread starter Sean
- Start date


Recent Classifieds
-
For Sale Classic Hasselblad 500 C/M 6x6 all manual Medium Format film camera system
- Started by pdccamerqs
-
For Sale Horseman SW612 w/Rodenstock 45mm f4.5 Apo Grandagon, Ground Glass
- Started by djdister
-
For Sale Canon 28mm f/3.5 LTM plus finder in case
- Started by Steve Goldstein
-
Want to Buy Durst Printo / or any Table Top Processor
- Started by juniejun
-
Want to Buy LF/WTB: Ilex No. 5 Shutter
- Started by Jurgen Estanislao
Forum statistics
Dan Fromm
Member
- Joined
- Mar 23, 2005
- Messages
- 6,794
- Format
- Multi Format
Very clever, and who needs any thing as fancy as a cable release when you can use a tooth pick.
Hmm. I didn't know that one could use a cable release to depress the rewind clutch. Live and learn.
Hmm. I didn't know that one could use a cable release to depress the rewind clutch. Live and learn.
Sorry miss read what it was for, but someone of your talent could possibly rig up a double cable release to do both.
Dan Fromm
Member
- Joined
- Mar 23, 2005
- Messages
- 6,794
- Format
- Multi Format
Sorry miss read what it was for, but someone of your talent could possibly rig up a double cable release to do both.
Why bother?
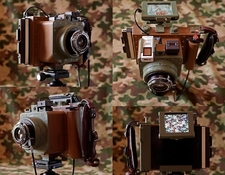
Camera 9x9 (94x94 mm) with Industar-23 4.5/110 lens. An FPV monitor and a miniature camera are used as a viewfinder. The optical design of the lens had to be slightly modified to eliminate vignetting. The front lens is screwed into the lens until it stops, and the rear gluing of two lenses is pushed close to the diaphragm. STL files here:
 drive.google.com
9x9 - Google Drive
drive.google.com
Attachments

Nokton48
Member
- Joined
- Oct 8, 2006
- Messages
- 2,948
- Format
- Multi Format
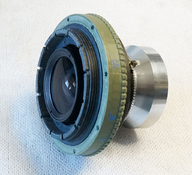
 4x5 Sinar Norma Handy 65mm f8 SA Viv365 C Cell Pack by Nokton48, on Flickr
This is my Sinar Norma Handy, built by me from Parts Box Vintage original Norma Helical Mount for 65mm F8 Chrome Super Angulon Compur. Vivitar 365 with C Cell Pack fully operating. The camera is complete ready to shoot, I have three left in this 4x5 Graphmatic. The 365 has the power I need for handheld 4x5 Wide Angle Tripod. I will embellish with XTC Mini Inflatable Softbox soon. I have six loaded 4x5 Graphmatics with HP5+ and TMax400, as a side by side test.
wiltw
Subscriber
Attaching an Canon EOS mount camera on a Horseman monorail camera...


Nokton48
Member
- Joined
- Oct 8, 2006
- Messages
- 2,948
- Format
- Multi Format
 Sinar Norma 4x5 Handy Super BubbaPack HV Battery Handy Bubble Level by Nokton48, on Flickr
A Friend built me this "Super BubbaPack" high voltage rechargeable Battery, for my Vivitar 365 Flash Units. Recycles LIKE NOW, no delay. This fires automatic exposure thyristor out to SEVENTY FEET, good for any situation, really. Shown on my homemade Sinar Norma Handy. My latest embellishment on the Handy, is a modern Sinar Handy Bubble Level/Mirror Unit, attached atop the Mamiya 7 43mm Viewfinder. Useful for "Hail Mary" shots, not looking through the viewfinder. Initial test shooting coming up soon.
Nokton48
Member
- Joined
- Oct 8, 2006
- Messages
- 2,948
- Format
- Multi Format
 SONY DSC by Nokton48, on Flickr
Here is Automatic Makiflex #3 with Plaubel 150mm F4.5 Auto Iris Xenar. "Super Bubbapack" new high voltage Power Pack for Vivitar 365, a fairly powerful flash. Plaubel marketed this camera as useable for reportage, the flash sync is 1/15, so not really for flash outside. Interior ambient light should not record, the 365 is automatic out to 75 feet depending. Embellished the Super Bubbapack, adding a Domke Super Gripper Strap, cut the bottom piece off with Japanese fine cutting saw, added some Gaffer Tape to neaten it up. Finally, a rubber pad on bottom of pack, so everything sits down nicely on a flat surface, it's important to be able to set this down without it tipping over! 9x9cm B&W images will be taken on 9x12cm and 4x5" film. Great rig for high fidelity low light reportage.
Here's a video showing the EL/M modification shown in post #489. I implemented a better pawl and a toggle pin to avoid overwinding.
 Hasselblad EL/M modification by Olivier, on Flickr
Hasselblad EL/M modification by Olivier, on FlickrUpgraded an old Zorki-4 film camera. I installed a universal viewfinder based on an FPV monitor, a mini camera and a lens with variable focal lengths, which allows the use of lenses with focal lengths from 24 mm to 85 mm. The distance is measured by the TFmini plus infrared sensor up to 12 meters. The illuminance is measured by the BH1750 sensor up to 14.7 EV. Sensor readings are displayed on the e-ink display. Everything is assembled on the basis of Arduino Nano.
Attachments
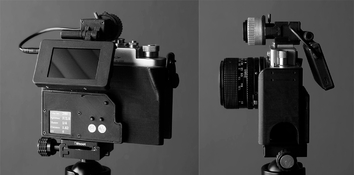
Working on a multi-format Hasselblad set-up. Removable 22x55mm format mask on the body behind the auxiliary shutter. Back has coupling gear to body removed and hook for the no.1 frame disabled, plus half-frame marks on the counter. Winding is manual and quite quick on this A24 back, so I missed a couple frames. There is a strange horizontal light leak.

dirkfletcher
Subscriber
Hey everyone, I'm not sharing a camera this time but I've decided to sell off my SWC body sans lens. I just posted it in the form but this is the group that would be most interested in it: https://www.photrio.com/forum/threads/selling-off-my-superwide-body-only.207497/
Otis
Member
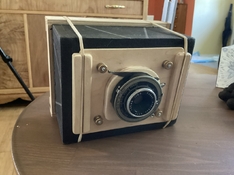
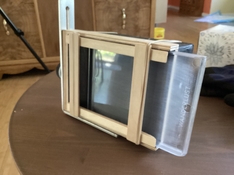
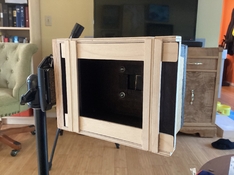
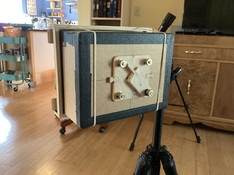
Here is an ultra lightweight 4X4 (96mm x 96mm) that uses 4x5 holders.
First front, then back. Hobby plywood, black foam core, and black masking tape.
The lens is a 100mm f8.8, 3 element from a Kodak Tourist that will *just* cover the frame.
Focusing is front element from infinity to 3.5 ft. by scale.
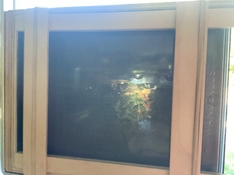
Third image is as good as my ipad would show of the image on the ground glass. When I tried to get closer the ipad just wouldn’t focus at all.
First front, then back. Hobby plywood, black foam core, and black masking tape.
The lens is a 100mm f8.8, 3 element from a Kodak Tourist that will *just* cover the frame.
Focusing is front element from infinity to 3.5 ft. by scale.
Third image is as good as my ipad would show of the image on the ground glass. When I tried to get closer the ipad just wouldn’t focus at all.
Attachments
Last edited:
Otis
Member
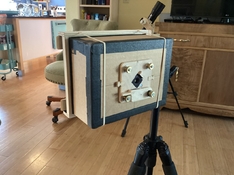
Another hobby plywood & corrugated paper contraption. This one using 4x5 holders and it is a pinhole camera. Focal length is 60mm, pinhole diameter is .3mm.
Image #1 shutter closed, #2 shutter open, #3 film holder spring back
Image #1 shutter closed, #2 shutter open, #3 film holder spring back
Attachments
Nokton48
Member
- Joined
- Oct 8, 2006
- Messages
- 2,948
- Format
- Multi Format
 Sinar Norma Handy Test 65mm F8 No 1 by Nokton48, on Flickr
 Sinar Norma Handy Test 65mm F8 No 2 by Nokton48, on Flickr
 Sinar Norma Handy Test 65mm F8 No 3 by Nokton48, on Flickr
 Sinar Norma Handy Test 65mm F8 No 4 by Nokton48, on Flickr
Sinar Norma Handy 4x5 Test Ilford HP5+ 65mm F8 Super Angulon at Fll. Kingwood Gardens Mansfield Ohio, waiting for the Solar Eclipse to occur. HANDHELD camera focused hyperfocally. The cosine effect causes corners to be darker, could be improved with my 65mm F8 Schneider Center Filter. Silver image 8x10 print Omega DII 180mm Rodagon laser aligned, Arista #2 RC paper processed in Dektol 1:2. Print copied with Sony Nex 7 30mm Nex Macro Lens.
blee1996
Subscriber
Just did a quick Proof of Concept for poor man's Hasselblad XPan: using a Holga 135 Pan body and Schneider Super Angulon 65/8 lens. I still need to figure out a focus helicoid - right now it is hyperfocal at f/16 between 6ft and infinity. The diameter of the back lens group is a tad wider than 42mm so not possible to fit into a M42 helicoid, while M65 helicoid is just too big and too long (cannot reach infinity). What are your recommended donor lens for hacking a focus helicoid?
 Holga 135 Pan Prototype - poor man's Hasselblad XPan by Zheng, on Flickr
Holga 135 Pan Prototype - poor man's Hasselblad XPan by Zheng, on Flickr

You can print a helicoid on a 3D printer.Just did a quick Proof of Concept for poor man's Hasselblad XPan: using a Holga 135 Pan body and Schneider Super Angulon 65/8 lens. I still need to figure out a focus helicoid - right now it is hyperfocal at f/16 between 6ft and infinity. The diameter of the back lens group is a tad wider than 42mm so not possible to fit into a M42 helicoid, while M65 helicoid is just too big and too long (cannot reach infinity). What are your recommended donor lens for hacking a focus helicoid?
Attachments
There are some short M52-M52 helicoids. You can then stack a no.0-M42 and a M42-M52 adapter for the shutter. I'm not aware of a M52 flange mount but you could use a M65 male to M52 female adapter and drill some mounting holes.
I've hacked many helicoids from donor lenses. Those are harder to adapt but they are of better quality than the generic helicoids. They generally have a slower pitch so check the range of movement beforehand.
I've hacked many helicoids from donor lenses. Those are harder to adapt but they are of better quality than the generic helicoids. They generally have a slower pitch so check the range of movement beforehand.
Chuck1
Member
A 65mm 6.8 might be good, much smaller...
blee1996
Subscriber
Thanks for all the suggestions. I might try the M52 route, even though it is a bit more costly.
Kino
Subscriber
Designed and 3D printed a 4.75 inch to 5.25 inch adapter board for my 5x7 Agfa view camera. Now I can shoot with my Zone VI 4x5 lenses on the Agfa camera with those lenses that cover up to 5x7.
Still need to glue on the board retainers, but that shouldn't take too long.


Still need to glue on the board retainers, but that shouldn't take too long.
Donald Qualls
Subscriber
Designed and 3D printed a 4.75 inch to 5.25 inch adapter board for my 5x7 Agfa view camera.
See, stuff like this is what 3D printers are FOR.
Jordant
Member
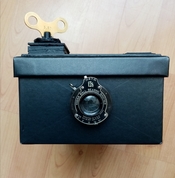
Last year I decided to build a medium format camera from scratch (apart from a lens). I had a No1 kodak Junior with worn out bellows but the lens was still good and the shutter working fine. So I starting designing the camera around the lens, starting with a small cardboard storage box as the main body. I then attached the lens to the body and knowing the focal length built the internals, making sure the image was sharp by using a piece of tracing paper held against the temporary film plane. Once I had a good image from let's say 6ft to infinity I could start working on the film transport. This was the hardest part, with four main objectives.
1. To transport film around the camera smoothly but with just enough tension to keep the film from unravelling from the spools.
2. To make sure the film remains scratch free at the film plane/pressure plate.
3. Keep the film flat against the plane and avoid light from fogging adjacent frames.
4. Work out frame spacing (sacrificial roll)
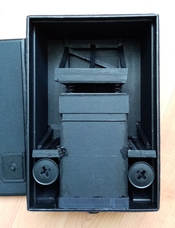
The film plane section was made from thick card with velvet ribbon glued to film contact points. The pressure plate was also thick card with springs attached to a buffer stop looking design which was constructed of small lengths of spruce and painted.
I made a wooden frame with a small slot for each side which ensured the spools remained steady, kept the film aligned and with some velvet added, allowed the film to pass through the slot without injury. The bottom of the spools were sat onto thick card with a dowel protruding. The loose spool was held by a dowel at the top and the take up side I used a clock winding key with a small metal pin at the end to lock it in for winding. The key can be lifted to disengage from the spool and allow the box lid to be removed. Making sure the key could wind on and not allow any light through the hole was tricky. I ended up making a light trap with two bits of plastic cut into a circle with black velvet glued to each. As the key is pushed down to engage with the spool, these two bits of velvet make contact and no light can get in. Some reinforcing of the box was made with thick card.
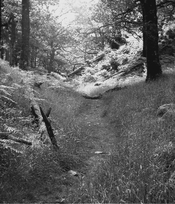
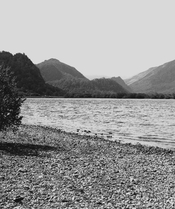
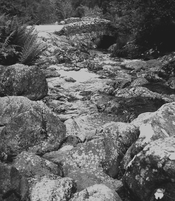
I was happy to find that camera worked great first time. The film does get slightly crinkled along the top edge at the beginning but not enough to damage the negative. Attached are some photos of the camera and basic scans (a little contrasty).
A fun little project made at the dining room table using a cardboard box, thick card, small lengths of spruce, black velvet ribbon, glue, a hacksaw and a WW1 era kodak lens.
1. To transport film around the camera smoothly but with just enough tension to keep the film from unravelling from the spools.
2. To make sure the film remains scratch free at the film plane/pressure plate.
3. Keep the film flat against the plane and avoid light from fogging adjacent frames.
4. Work out frame spacing (sacrificial roll)
The film plane section was made from thick card with velvet ribbon glued to film contact points. The pressure plate was also thick card with springs attached to a buffer stop looking design which was constructed of small lengths of spruce and painted.
I made a wooden frame with a small slot for each side which ensured the spools remained steady, kept the film aligned and with some velvet added, allowed the film to pass through the slot without injury. The bottom of the spools were sat onto thick card with a dowel protruding. The loose spool was held by a dowel at the top and the take up side I used a clock winding key with a small metal pin at the end to lock it in for winding. The key can be lifted to disengage from the spool and allow the box lid to be removed. Making sure the key could wind on and not allow any light through the hole was tricky. I ended up making a light trap with two bits of plastic cut into a circle with black velvet glued to each. As the key is pushed down to engage with the spool, these two bits of velvet make contact and no light can get in. Some reinforcing of the box was made with thick card.
I was happy to find that camera worked great first time. The film does get slightly crinkled along the top edge at the beginning but not enough to damage the negative. Attached are some photos of the camera and basic scans (a little contrasty).
A fun little project made at the dining room table using a cardboard box, thick card, small lengths of spruce, black velvet ribbon, glue, a hacksaw and a WW1 era kodak lens.
Attachments
Last edited:
Nokton48
Member
- Joined
- Oct 8, 2006
- Messages
- 2,948
- Format
- Multi Format
 SONY DSC by Nokton48, on Flickr
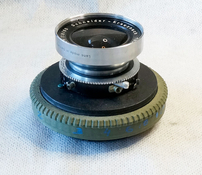
This 210mm F4.5 N-51 lens arrived yesterday $75 from Serbia. New in box never used, with working flange, I used shim washers inside the Plaubel Tubus. to adjust for perfect infinity focus wide open. The lens is a sleeper (some say a DUD), but I do like it a lot. A Tessar optical design, a lot like my Schneider Xenars in the "look through", a bit less contrasty though to my eye. Quite sharp and pleasant bokeh. I look forward to shooting with this one. Shown on my Plaubel Auto Makiflex #1, I also redid some of the light trapping front and back on this camera, it's all ready to go again.
| Photrio.com contains affiliate links to products. We may receive a commission for purchases made through these links. To read our full affiliate disclosure statement please click Here. |
PHOTRIO PARTNERS EQUALLY FUNDING OUR COMMUNITY:  |