Reveni Labs Camera Tester: New perspectives for professional and private camera repairers

Protest.

A
Protest.

  • 6
  • 3
  • 165
Window

A
Window

  • 5
  • 0
  • 88
_DSC3444B.JPG

D
_DSC3444B.JPG

  • 0
  • 1
  • 104

Forum statistics

Threads
197,214
Messages
2,755,692
Members
99,424
Latest member
prk60091
Recent bookmarks
0
OP
OP
Andreas Thaler

Andreas Thaler

Subscriber
Joined
Nov 19, 2017
Messages
4,209
Location
Vienna/Austria
Format
35mm
Minolta X-500 put to the test

9.jpg


The camera stands on a pedestal that can be moved.

The sensor is mounted behind it and is aligned with the film window.


10.jpg


Two guide bars fix the film window horizontally.


11.jpg


The Reveni Labs Camera Tester offers a variety of measurement methods that can be selected via push buttons and the backlit LCD in the form of a menu.

Here I have called up the curtain shutter mode.

The front bayonet cap and the back door of the X-500 are removed.

The user manual provides detailed information:


Excursus: Focal plane shutter in a nutshell

With the focal plane shutter, which can run horizontally or vertically, two shutter blinds or shutter curtains work together.

The first blind opens the shutter to expose the film, the second closes it.

Once a certain shutter speed is reached, the second blind starts while the first is still running. A slit forms between the two blinds through which the film is exposed.

The shorter the shutter speed, the narrower the slit.

It is therefore important that both blinds move across the film window at the same speed, otherwise the exposure result will no longer be correct since the exposure is uneven.

This timing can be measured with the Reveni Labs Camera Tester.


12.jpg


Shutter speeds can be displayed in milliseconds or as fractions.

I am familiar with the latter, so I choose this setting.


13.jpg


I set the shutter on the X-500 to 1 second and release it.

Since it is stabilized by the guide bars on the film window, it does not slip.


14.jpg


The measured shutter speed is output for each diagonally arranged sensor.

This allows any deviation in the speed of both curtains and the resulting uneven exposure to be detected.

Everything is just right here.


15.jpg


16.jpg


1/15 second.

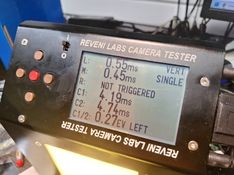
Here you can see a slight deviation in the speed of the two shutter curtains. But this is not noticeable with EV +/-0.


17.jpg


18.jpg


1/125 second

This is still very close to the target. A deviation of EV 0.07 will not be noticeable in practice.


20.jpg


21.jpg


And 1/1000 second

This is where it gets interesting, the exposure should already be noticeably different on the film.

The question now is whether you want to adjust your camera or whether it is enough to know about the deviation.

Since I only expose color negative film with a large exposure latitude and work in a hybrid way (scan and Photoshop), I see no reason to investigate this deviation. This should be irrelevant for my practice.

But to continue learning about repairs, the next stop would be the service manual for the X-500. It describes how the shutter can be adjusted, mechanically and electronically.

That will be one of my next projects.


Conclusion

I am very satisfied for today; I have managed to get started on a new topic effortlessly.

Working with the Reveni Labs Camera Tester is fun, it is easy to use and the device gives a high-quality impression. It is also light and small.

Measuring SLRs that do not work correctly without a back door, e.g. the Nikon F3 and the Canon T90, will be exciting. I will find ways to outsmart the cameras here.

But perhaps the Reveni Labs Camera Tester has something to offer for that too; I am only at the beginning of my journey of discovery 🙃


+++

All information provided without guarantee and use at your own risk.
 
Last edited:

ic-racer

Member
Joined
Feb 25, 2007
Messages
16,469
Location
USA
Format
Multi Format
"VAR: 0.75 EV LEFT"

I think the first thing I'd do there is to flip the sensor or the camera to make sure the EV errror reads to the other side. Just to make sure the holes in the sensor housing are properly aligned with the photodiodes inside.
 
OP
OP
Andreas Thaler

Andreas Thaler

Subscriber
Joined
Nov 19, 2017
Messages
4,209
Location
Vienna/Austria
Format
35mm
"VAR: 0.75 EV LEFT"

I think the first thing I'd do there is to flip the sensor or the camera to make sure the EV errror reads to the other side. Just to make sure the holes in the sensor housing are properly aligned with the photodiodes inside.

I tested my Nikon FM3A (however vertical shutter) and the values were nice and even. So I'm ruling out a problem with the sensor.

But it was only day 1 of the games 😁

I will check this, thanks.
 
Last edited:

Alex Varas

Subscriber
Joined
Mar 24, 2018
Messages
787
Location
Bilbao
Format
Medium Format
So if I understand correctly the screen above…
Top left quadrant shows curtains speed, but inside which one is the opening curtain and which on is the closing curtain? First column shows opening curtain speed at beginning of its travel and lower number the speed at end of travel? Same with second column with the closing curtain…
 
OP
OP
Andreas Thaler

Andreas Thaler

Subscriber
Joined
Nov 19, 2017
Messages
4,209
Location
Vienna/Austria
Format
35mm
So if I understand correctly the screen above…
Top left quadrant shows curtains speed, but inside which one is the opening curtain and which on is the closing curtain? First column shows opening curtain speed at beginning of its travel and lower number the speed at end of travel? Same with second column with the closing curtain…

Unfortunately, I can't answer that question, as I only started looking into the topic yesterday. But of course I'll keep learning 😌
 
OP
OP
Andreas Thaler

Andreas Thaler

Subscriber
Joined
Nov 19, 2017
Messages
4,209
Location
Vienna/Austria
Format
35mm
C.jpg


I'll continue with my Canon F-1n as a representative of the horizontally running focal plane shutters.

I will attach the sensor in two positions as recommended by @ic-racer to verify measured exposure deviations, i.e. whether the cause lies in the camera shutter or the sensor.
 
OP
OP
Andreas Thaler

Andreas Thaler

Subscriber
Joined
Nov 19, 2017
Messages
4,209
Location
Vienna/Austria
Format
35mm
I tested the sensor at 1/1000 s in both possible positions with this result:

BB.jpg


CC.jpg


After consulting Matt, developer of the Reveni Labs Tester, he said the results were OK and the problem was with the camera.

The sensor does not recognize the position on the camera, so the EV deviation in the display shifts from right to left.


DD.jpg


Normal position of the sensor with the three sensors for shutter measurement.


EE.jpg


Sensor rotated 180 degrees to the left.


I really enjoy exploring the tester; its functions give me a thorough understanding of the camera shutter.

I would particularly like to highlight Matt's excellent service. All of my questions are answered promptly and in detail.

Here you speak directly to the boss and not to a call center.

That's exactly the approach I like 🙂
 
Last edited:
OP
OP
Andreas Thaler

Andreas Thaler

Subscriber
Joined
Nov 19, 2017
Messages
4,209
Location
Vienna/Austria
Format
35mm
Measuring SLRs that do not work correctly without a back door, e.g. the Nikon F3 and the Canon T90, will be exciting. I will find ways to outsmart the cameras here.

But perhaps the Reveni Labs Camera Tester has something to offer for that too; I am only at the beginning of my journey of discovery 🙃

The Reveni Labs Tester can also be used in this case:


X.jpg


Y.jpg


ic-racer

Member
Joined
Feb 25, 2007
Messages
16,469
Location
USA
Format
Multi Format
Curious that for a vertical shutter, it appears the middle measuring point is not in the vertical half-way point of shutter travel.
 
OP
OP
Andreas Thaler

Andreas Thaler

Subscriber
Joined
Nov 19, 2017
Messages
4,209
Location
Vienna/Austria
Format
35mm
Today was an intensive day with the device, I got a lot of information from Matt. And I only tried out a small part of the functions.

I now know enough to be able to use the tester for my purposes and will integrate it into the next repair projects.

I am fascinated.

This is not only a measuring device, but also a wonderful toy for big kids like me 🙃
 
OP
OP
Andreas Thaler

Andreas Thaler

Subscriber
Joined
Nov 19, 2017
Messages
4,209
Location
Vienna/Austria
Format
35mm
Aperture test

Another very useful function is Aperture test.

Here you can determine the actual value of an aperture set on the lens.

Based on this value, the difference to another aperture value can be measured.

This can be used to determine whether a lens has correctly closed its aperture.

I tried this with an nFD 50/1.4 on the Canon F-1n:


2.jpg


Here I set the aperture to f = 5.6 on the lens.

The measured value matches.


3.jpg


Then I reduced the aperture to the next smaller value f = 8.

This is not formed quite correctly with the measured f = 7.7

The difference f = -0.93 is displayed.


This function is useful for general lens checks.

But also when the aperture blades are oily to determine whether the aperture is still closing correctly or if it needs cleaning.

And of course when assembling a lens to check the aperture function.


1.jpg


OP
OP
Andreas Thaler

Andreas Thaler

Subscriber
Joined
Nov 19, 2017
Messages
4,209
Location
Vienna/Austria
Format
35mm
Light Meter mode

This mode provides a selectable EV value that is output via the light desk on the Reveni Labs Camera Tester.

This can be used to calibrate external exposure meters and those in cameras.

I imagine that with the Minolta X cameras, each EV value corresponds to a certain voltage value in the circuit of the exposure metering system.

This voltage value should be measurable with a multimeter and adjustable via a trim potentiometer.

1.jpg


B.jpg


This will interfere with the camera's factory settings. I'll experiment with it.

See also:

4.jpg


Post in thread 'Minolta X-700 electronics: A closer look'
https://www.photrio.com/forum/threads/minolta-x-700-electronics-a-closer-look.203131/post-2745189
 
Last edited:
OP
OP
Andreas Thaler

Andreas Thaler

Subscriber
Joined
Nov 19, 2017
Messages
4,209
Location
Vienna/Austria
Format
35mm
Curtain Exposure mode

The last mode I would like to introduce for users of focal plane shutters is the Curtain Exposure mode. This can be used to test the automatic exposure of a camera.

Here I measure on a Minolta XD7 whether the combination of the set ASA number, preselected aperture and shutter speed set by the camera results in a correct exposure (aperture priority).


A.jpg


Entering Curtain Exposure mode in the menu.

A Minolta MD 50/1.4 with an aperture set to f = 5.6 is attached to the XD7. Mode: aperture priority (A).


B1.jpg


After the camera has been released.

I'm interested in the third value from the top left, the deviation in EV values.

Everything is ok, the aperture priority on this XD7 is fine.


C1.jpg


After displaying the results, the exposure curve is displayed. This is based on the raw data that the numerical results were calculated from. This is to help ensure a good reading was taken because the exposure curve will appear irregular if the sensor was misaligned or there is a major mechanical issue with the shutter.


D1.jpg


E1.jpg
 
OP
OP
Andreas Thaler

Andreas Thaler

Subscriber
Joined
Nov 19, 2017
Messages
4,209
Location
Vienna/Austria
Format
35mm
For leaf shutter users, there are other comprehensive measurement and test methods that I won't introduce here because I don't have anything for them in the cupboard 😌

Matt has just released a new firmware version. The update via PC or Mac is easy:


In summary

I am very happy with the device and will be using it in my repair projects.

I was able to get up to speed quickly without any prior knowledge and learned a lot about focal plane shutters and how they work. This broadened my professional horizons both theoretically and practically.

How I manage to adjust a shutter of an SLR with the tester it will be a separate report.

Of course, this post is my own initiative, additional information came from Matt, Reveni Labs, otherwise there is no connection.


+++

All information provided without guarantee and use at your own risk.
 

Reveni-matt

Member
Joined
Jul 24, 2024
Messages
46
Location
Canada
Format
35mm
Got it, thank you, Andreas.

Hi Alex,

Actually Andreas has it slightly incorrect, and it's my fault for not making it clearer. I've attached an updated image from my user manual which shows the updated screens as well.

The opening and closing velocities are arranged in a way to represent the physical location on the shutter itself. Top half open/close are in the top and bottom half are in the bottom. For horizontal, left is left and right is right.

These velocities are not instantaneous at the start or finish, they are the average from top to middle / middle to bottom / left to middle / middle to right or however it goes. It seems most shutters are under more deceleration force at the end than acceleration at the start, as they all go slower in the first half than the second half.

When all three sensors are triggered, C1 and C2 are calculated from the times for the left sensor and the right sensor. If only two are triggered, you'll end up with the C1 and C2 being based on the left-middle or middle-right time.
 

Attachments

  • Screenshot 2024-07-24 122544.png
    Screenshot 2024-07-24 122544.png
    1.7 MB · Views: 29
  • 2024-07-24 11.27.37 (Custom).jpg
    2024-07-24 11.27.37 (Custom).jpg
    1.1 MB · Views: 33

Alex Varas

Subscriber
Joined
Mar 24, 2018
Messages
787
Location
Bilbao
Format
Medium Format
Hi Alex,

Actually Andreas has it slightly incorrect, and it's my fault for not making it clearer. I've attached an updated image from my user manual which shows the updated screens as well.

The opening and closing velocities are arranged in a way to represent the physical location on the shutter itself. Top half open/close are in the top and bottom half are in the bottom. For horizontal, left is left and right is right.

These velocities are not instantaneous at the start or finish, they are the average from top to middle / middle to bottom / left to middle / middle to right or however it goes. It seems most shutters are under more deceleration force at the end than acceleration at the start, as they all go slower in the first half than the second half.

When all three sensors are triggered, C1 and C2 are calculated from the times for the left sensor and the right sensor. If only two are triggered, you'll end up with the C1 and C2 being based on the left-middle or middle-right time.

Welcome and thank you for your explanation, Matt.

If I understand correctly then… using your sample in vertical shutters blue line is first curtain and red is second curtain. In horizontal shutters yellow is first curtain and green second curtain.
Is this correct?
 

Reveni-matt

Member
Joined
Jul 24, 2024
Messages
46
Location
Canada
Format
35mm
Welcome and thank you for your explanation, Matt.

If I understand correctly then… using your sample in vertical shutters blue line is first curtain and red is second curtain. In horizontal shutters yellow is first curtain and green second curtain.
Is this correct?

No, that's not correct.

Red box: first number - opening curtain top half, second number - closing curtain top half
blue box: first number - opening curtain bottom half, second number - closing curtain bottom half

yellow box: top number - opening curtain left side, bottom number - closing curtain left side
green box: top number - opening curtain right side, bottom number - closing curtain right side

If the boxes from horizontal were on the vertical image and vice versa, that would be correct. Feel free to think of it that way if you'd like, it's a sensible way to see it.
 
Photrio.com contains affiliate links to products. We may receive a commission for purchases made through these links.
To read our full affiliate disclosure statement please click Here.

PHOTRIO PARTNERS EQUALLY FUNDING OUR COMMUNITY:


Ilford ADOX Freestyle Photographic Stearman Press Weldon Color Lab Blue Moon Camera & Machine
Top Bottom