Showcase for Your HCWP's

Protest.

A
Protest.

  • 6
  • 3
  • 161
Window

A
Window

  • 5
  • 0
  • 86
_DSC3444B.JPG

D
_DSC3444B.JPG

  • 0
  • 1
  • 103

Forum statistics

Threads
197,211
Messages
2,755,641
Members
99,424
Latest member
prk60091
Recent bookmarks
0

nmp

Member
Joined
Jan 20, 2005
Messages
1,992
Location
Maryland USA
Format
35mm
I was wondering why we don't have a thread on folks sharing their completed alternative process prints (hybrid or otherwise.)

It will be good to post a picture of the print and give some details of the materials and process used. In particular, please share if you like, if there was a particular technical hurdle and how you were able to surpass.

I will go first...

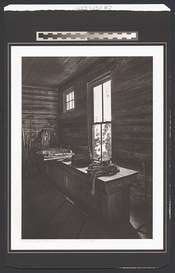
Process is salted paper.

Salting solution = NaCl (3%) + citric acid (7.5%)
Silver nitrate = 15%
Paper = COT 320, 5"x8" sheet
Exposure = 8 mins spiral BLB's

Straight silver, no toning.

Main hurdle was the digital negative - specifically the high UV density required to obtain clean whites. The printer I have, the Epson P400, didn't quite cut it when used in the conventional way, even with a colorized negative. The printer driver unfortunately does not allow spiking the ink density unlike the other higher-end printers. I had given up but then thought I will give one more try to QTRip, that allows one to control density of individual inks. That, in conjunction with Pictorico Ultra Premium transparency allowed me to print (100%PK + 50%Y and 50%C) all together at the 0%B step with the negative coming out pretty much dry from the printer. The whites came out near paper-white with this combo. Fixxons was a no-go for this high of an ink density, it maxed out at around +20% before severe puddling became a problem.

The picture:

2023-06-15-0002.jpg

Blacksmith Shop / Ghost Town of Garnet, MT.


Comments/questions welcome. Feel free to add your work too.


:Niranjan.
 
Last edited:

koraks

Moderator
Moderator
Joined
Nov 29, 2018
Messages
20,327
Location
Europe
Format
Multi Format
That's a damn fine print, well done! Your technique is impeccable.

I hear you on the Fixxons vs Pictorico; with this amount of ink, you're really pushing the film to the limit. I'm actually surprised even the Pictorico holds up.
 
OP
OP

nmp

Member
Joined
Jan 20, 2005
Messages
1,992
Location
Maryland USA
Format
35mm
That's a damn fine print, well done! Your technique is impeccable.

Thanks!

I hear you on the Fixxons vs Pictorico; with this amount of ink, you're really pushing the film to the limit. I'm actually surprised even the Pictorico holds up.

I was too. I made a negative that had patches with successively higher ink loads, keeping PK at 100% and then adding Y and C each at 10%, 20% etc. up to 60% and Pictorico came out good in all of them. The white border area of the picture in the negative looks like a dark adhesive tape! I also printed at highest resolution (2880 Super) and lowest speed (Unidirectional.) In addition, I took out the star wheels from the middle of the printer so they don't touch and leave their trail on the negative.

:Niranjan.
 
Last edited:
Joined
Jul 31, 2012
Messages
3,274
Format
35mm RF
That is excellent Niranjan. I've never tried salted paper but I should put it on the list. And I agree with you. Not sure why we don't have a thread like this already since it seems quite a few people are doing alt stuff these days.

This is a cyanotype toned in tea. Pretty simple, basic stuff.

I acidify the paper with sulfamic acid before I coat it. Standard classic cyanotype chemistry 1:1. Paper is Saunders Waterford hot press watercolor paper. Not my favorite but it isn't too bad. This was a test of it. I doubt I'll buy it again. I also add citric acid to the sensitizer plus a touch of Edwal LFN. I've found that they both help across the board. I coat the paper with a cheap Golden Taklon brush from Michael's. I have the fancy Richeson brushes too but there is no difference in my experience so I use cheap ones. I've also tried puddle pushers but the brushes are best for smaller prints.

Negative is printed with a Canon Pro-10 on cheap Ultrafine Online (Photowarehouse) waterproof film. I have my own way of doing it. Maybe someday I'll post about it. Simple. With the Canon I have to dial the density back quite a bit or the neg is just way too dense making the highlights impossible to print without blocking up the shadows. Exposure was 3.5m on this one which is more than I usually expose. Different papers require different times. IIRC this paper is a bit slow. The print is put in a first bath of Citric Acid. About a tablespoon or so to a good liter and a half, maybe two, of water. Too much Citric Acid is almost as bad as not enough in my experience. I don't wash too much afterwards. A rinse then soak with a couple changes of water. I didn't bleach this one before I toned it in tea. Keeps it darker which is what I wanted here.

This is a pretty far out there look for a cyanotype but I thought I'd post it anyway. Print size is around 6x9".

2023-041-02_SWAT3.5m_ps_cc_1.jpg


This is the same exact print before toning for reference.

2023-041-02_SWAT3.5m_ps_cc_2.jpg
 

Vaughn

Subscriber
Joined
Dec 13, 2006
Messages
10,005
Location
Humboldt Co.
Format
Large Format
Burnt Snag, El Capitan Meadow
Yosemite National Park
5x7 Single transfer carbon print onto fixed-out photopaper
From in-camera 5x7 negative, 210mm lens.

I had exposed one sheet of film while the snag was in full sun. Knowing the high refectiveness of burnt wood, and noticing that the shadow line cast by the Valley Wall behind me was moving toward me as the sun set behind them, I waited until the snag was in full shadow to get a richness from the burnt wood (and more raised relief) against the brillance of the sun reflecting off El Capitan.
 

Attachments

  • Carbon_BurntSnag.jpg
    Carbon_BurntSnag.jpg
    1.7 MB · Views: 198
Last edited:

Vaughn

Subscriber
Joined
Dec 13, 2006
Messages
10,005
Location
Humboldt Co.
Format
Large Format
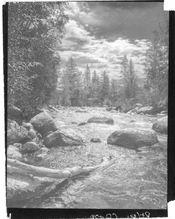
Ossagon Creek
Prairie Creek Redwoods State Park
5x7 Platinum/palladium print
From 5x7 in-camera negative, 180mm lens
No contrast agent used
 

Attachments

  • Creek,OssagonRocks.jpg
    Creek,OssagonRocks.jpg
    1 MB · Views: 170

fgorga

Member
Joined
Aug 31, 2015
Messages
736
Location
New Hampshire
Format
Multi Format
Thanks for starting this thread Niranjan, excellent idea!

Here are two platinum/palladium prints, I made about a year ago but re-scanned recently.

They were printed from digital negatives on generic "OHP" film using MK ink and an Epson P800.

The prints were made using Eugene Richard Puckett's "ferric-ferrous" method (see: https://www.texaschrysotype.com/) using a 3:1 ratio of Pd to Pt.

The beaver lodge is on Legion Lenox 100 paper (pre-treated with acid to remove carbonates) and the bison is on Hahn. Platinum Rag (directly from the package). The images are 4x5 inches on approx. 6x7.5 inch sheets of paper. (I have cropped the scans to eliminate most of the margins of the paper.)

Regards,

--- Frank
--- www.frg-photo.com

rescanned - Jun 2023 (cropped, 800 pixels).jpg rescanned Jun 2023 (cropped, 800 pixels).jpg
 

fgorga

Member
Joined
Aug 31, 2015
Messages
736
Location
New Hampshire
Format
Multi Format
@nmp

Niranjan... wonderful print. All the work on figuring out how to print negatives with the P400 was well worth the effort.

@Patrick Robert James

I fully agree with your comment about brushes. I started out with inexpensive 'no name' gold taklon brushes. Then I was acquired a Richeson brush in a lot of alt process stuff I bought. I found no advantage to the 'name brand' brush and still mainly use the generics.

Your 'toned' cyanotype is very nice... and different (in a good way!). The original print is nice as well.

I put 'toned' in quotes because unless you bleach first, your are not toning in the strict sense of the word... i.e. you are not chemically altering the image forming pigment. You are basically adding the tea stain on top of the Prussian Blue. Not that any of that matters... the effect you get is unique and certainly works for this image.

Have you tried this method on other images? Especially ones with more light tones.

@Vaughn

Two beautiful prints.

I have a friend who dabbles in many alt processes, including carbon. I always say that he needs to show me how it is done, but I have not (yet) taken the leap!
 

fgorga

Member
Joined
Aug 31, 2015
Messages
736
Location
New Hampshire
Format
Multi Format
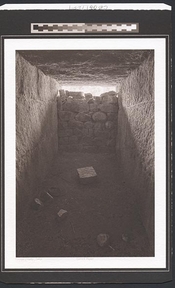
Here are some cuprotypes I have made over the past several months.

My interest in this process (and the genesis of the latest version) was piqued by a post herein from just about a year ago (see: https://www.photrio.com/forum/threa...is-this-an-existing-process-variation.193208/).

The details of my version of process can be found in the article I wrote for alternativephotography.com, see: https://www.alternativephotography.com/cuprotype-process/

1 - "flag in window" is toned only with ferricyanide on Fabriano Unica paper

2 - "window & vines" is toned with ferricyanide then with citric acid (as first described by Niranjan (@nmp) on Fabriano Unica

3 - "roots" has the same toning as "windows & vines" and is on Fabriano Artistico HP

4 - "tractor engine" is toned with ferricyanide and then with iron on Fabriano Artistico HP

flag in window(800 pixels).jpg window & vines (cropped, 700 pixels)).jpg roots (700 pixels).jpg tractor engine (800 pixels).jpg

Cuprotype is inexpensive and versatile. It is not as simple as cyanotype but it is not difficult either. It also seems to be tolerant of carbonate buffers in paper and works on cotton cloth as well. I urge folks to give this process a try!
 

KYsailor

Member
Joined
Oct 29, 2021
Messages
134
Location
Louisville, KY
Format
Hybrid
Niranjan,


Thanks so much for starting this thread, and you salt print is truly excellent - I will post a few of my recent efforts, as soon as I can gather all the information ( paper, chemistry etc); however....
natalie009.jpg
here is one my 10 year old granddaughter did with me yesterday - clearly not art but we had a lot of fun making it ....
 
OP
OP

nmp

Member
Joined
Jan 20, 2005
Messages
1,992
Location
Maryland USA
Format
35mm
OK, so this is some really good stuff....thanks for playing along and sharing.


@Patrick Robert James Those are exquisite cyanotypes - I don't know, I think subject matter is well suited here. In my opinion, they work much better for simple images - simple composition and simple lines. I am not a big fan of cyanotypes of complicated, grand vista type of landscapes, for example (of course, someone will prove me wrong - so I am sure there are exceptions.) I also prefer the untoned print here - the toned print lost a little bit of the drama of the bright background at the top. But it is still good in its own subdued right/light.


@Vaughn Wow...I could almost touch the contours of that burnt snag. I like the fact that it right in center and and not on the side to (co)emphasize the background, which would have been wonderful on its own. Talk about (pre?) visualization - this would be a great lesson in demonstrating its power. The second one is great too. One of these days I might have to sign up for your Yosemite workshop, just to see your work in person.


@fgorga Nice couple of Pt/Pd's (What, no selfie with the bison?) and of course the set of cuprotypes encompassing the range of what it can do. Puckett's process is kind of counter-intuitive, but looks like it works for you. Now that I have the high UV density digital negative figured out, I am going to make some dedicated ones for cuprotypes (the only other process that that I know requires nearly the same, if not greater, DR as salt prints) and print some new ones of my own (as soon as I stop the never-ending experimentation and settle on one set of conditions.)


@KYsailor May not be art, although I couldn't tell until I read the end...🙂 but I'm sure it is much more precious.

Keep them coming!


:Niranjan.
 

KYsailor

Member
Joined
Oct 29, 2021
Messages
134
Location
Louisville, KY
Format
Hybrid
Sorry for my earlier lighthearted post.... here are three Kallitypes that I recently made while learning the process - not perfect but a good start. Revere Platinum, 35 seconds with the dual UV LED lightbank (see roliflexible's set up), standard kallitype B&S solutions (from what I have read the developer is Sodium Acetate). Also used the B&S Pd/Pt curve as a starting point.


Dave


kalli_R0004.jpg kalli011.jpg kalli012.jpg
 
  • nmp
  • Deleted
  • Reason: Off Topic
OP
OP

nmp

Member
Joined
Jan 20, 2005
Messages
1,992
Location
Maryland USA
Format
35mm
Sorry for my earlier lighthearted post.... here are three Kallitypes that I recently made while learning the process - not perfect but a good start. Revere Platinum, 35 seconds with the dual UV LED lightbank (see roliflexible's set up), standard kallitype B&S solutions (from what I have read the developer is Sodium Acetate). Also used the B&S Pd/Pt curve as a starting point.

Those are mighty neutral prints - toned with Au, Pt, Pd?

:Niranjan.
 

KYsailor

Member
Joined
Oct 29, 2021
Messages
134
Location
Louisville, KY
Format
Hybrid
Sorry, I forgot to mention, toned with simple Gold Chloride/citric acid. After my cyanotype and VDB print experiences, I was after some truly neutral blacks. While these are neutral, they are a bit flat and lack some deep blacks. I scanned these on an Epson V600 flat bed and they are a close representation to the prints themselves.

I am learning that part of the appeal of these processes is the final "look" of the print matched to a suitable subject. I personally like the the blue black tones I achieved with toned cyanotypes, nevertheless I have seen Kallitypes in the Photrio galleries that really impressed me and I would like to achieve similar results. I find the images by Tom Nelson (tnp651) and Roleiflexible particularly attractive, although much of that is due to their choice of subject matter.

I have a long way to go on learning these processes and all of your comments are appreciated. - thanks

Dave
 

fgorga

Member
Joined
Aug 31, 2015
Messages
736
Location
New Hampshire
Format
Multi Format
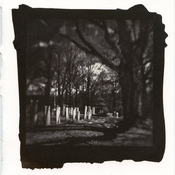
Some salt prints from the last couple of weeks...

Paper is salted with 2% NaCl and dried at ambient temperature. Sensitizer is 30% silver nitrate, 12% citric acid and 10% Tween 20 mixed in a 10:10:2 ratio. Sensitized paper is dried at ambient temperature for a minimum of 1h but as long as overnight.

Exposures run 7 or 8 min in my homemade black light LED unit.

Prints are processed as described in Chris Anderson's book: 2x 5% salt, 1X water, 2x alkaline fixer, 1x water and finally 1x sodium sulfite (hypo clear) for 4 min in each solution. Finally, prints are washed in static (i.e. non-running) water... 6 trays; 10 min per tray.

4x5 inch images from digital negatives / all are untoned / paper is either Hahn. Platinum Rag (cemetery & turtle) or Revere Platinum (baseball & rock)

img098 cropped (800 pixels).jpg img101 (cropped) (800 pixels).jpg

img100 cropped (800 pixels).jpg img099 cropped (800 pixels).jpg

Now you have seen the three processes (Pt/Pd, cuprotype and salted-paper) I use most commonly. Salt printing is my 'go to' process, sometimes gold toned but often not. I would guess that three-quarters of my printing is salted-paper.

As for selfies with bison... not likely for many reasons, not the least of which being that I can not reach the shutter release when standing in front of my 600 mm lens!!!! 🤣
 
OP
OP

nmp

Member
Joined
Jan 20, 2005
Messages
1,992
Location
Maryland USA
Format
35mm
Some salt prints from the last couple of weeks...

Paper is salted with 2% NaCl and dried at ambient temperature. Sensitizer is 30% silver nitrate, 12% citric acid and 10% Tween 20 mixed in a 10:10:2 ratio. Sensitized paper is dried at ambient temperature for a minimum of 1h but as long as overnight.

Exposures run 7 or 8 min in my homemade black light LED unit.

Prints are processed as described in Chris Anderson's book: 2x 5% salt, 1X water, 2x alkaline fixer, 1x water and finally 1x sodium sulfite (hypo clear) for 4 min in each solution. Finally, prints are washed in static (i.e. non-running) water... 6 trays; 10 min per tray.

4x5 inch images from digital negatives / all are untoned / paper is either Hahn. Platinum Rag (cemetery & turtle) or Revere Platinum (baseball & rock)

View attachment 341904 View attachment 341907

View attachment 341906 View attachment 341905

Now you have seen the three processes (Pt/Pd, cuprotype and salted-paper) I use most commonly. Salt printing is my 'go to' process, sometimes gold toned but often not. I would guess that three-quarters of my printing is salted-paper.

As for selfies with bison... not likely for many reasons, not the least of which being that I can not reach the shutter release when standing in front of my 600 mm lens!!!! 🤣

That's a nice set, Frank. I am intrigued by the color/tone variations among them. Paper would be my first order variable. But even within a paper type, you have nearly neutral black (with a greater Dmax to go with it) to a much warmer, reddish brown (more typical of salt prints) tone - Cemetery vs Turtle, for example. What in your opinion causes that? I have found that the conditions that make the sensitizer go deeper into the paper generally results in warmer print than if not. Higher humidity and temperature are a couple of conditions that favor absorption - something I have no control over. The other variable I have found affecting the tone as well as the speed is how dry is the paper is before putting it in the exposure box. Drier the paper, more reddish the print and slower the speed. All of these are mostly at the mercy of the weather conditions - controlling them is a challenge. So summer prints are different than winter prints. The humidity 100% today and I am going to make another print later - see how that turns out.


Meanwhile, here is an another salt print of mine:

2023-06-21-0001.jpg

Escape / Hampi, India.

Same process/materials as the 1st one. I didn't give the wet process conditions in that one - which are kind of unconventional:

1. 5% Sodium sulfite for 6 minutes
2. Fixer (15% Hypo + 0.2% Na carb + 2% Na sulfite,) single shot, 30 mins with intermittent agitation
3. Rinse, tap water, 2 + 5 mins
4. Hypo Clear (2% Na sulfite + 0.2% Na metabisulfite) 10 mins soak
5. Wash, 3x Tap water, 10 min each, + final 1x dist. water, 10 min. Stationary tray.
6. Hang dry, followed by convection oven dry @50C if I am in a hurry.


:Niranjan.
 
Last edited:

fgorga

Member
Joined
Aug 31, 2015
Messages
736
Location
New Hampshire
Format
Multi Format
That's a nice set, Frank. I am intrigued by the color/tone variations among them. Paper would be my first order variable. But even within a paper type, you have nearly neutral black (with a greater Dmax to go with it) to a much warmer, reddish brown (more typical of salt prints) tone - Cemetery vs Turtle, for example. What in your opinion causes that? I have found that the conditions that make the sensitizer go deeper into the paper generally results in warmer print than if not. Higher humidity and temperature are a couple of conditions that favor absorption - something I have no control over. The other variable I have found affecting the tone as well as the speed is how dry is the paper is before putting it in the exposure box. Drier the paper, more reddish the print and slower the speed. All of these are mostly at the mercy of the weather conditions - controlling them is a challenge. So summer prints are different than winter prints. The humidity 100% today and I am going to make another print later - see how that turns out.
Meanwhile, here is an another salt print of mine:

View attachment 341927

Escape / Hampi, India.

Same process/materials as the 1st one. I didn't give the wet process conditions in that one - which are kind of unconventional:

1. 5% Sodium sulfite for 6 minutes
2. Fixer (15% Hypo + 0.2% Na carb + 2% Na sulfite,) single shot, 30 mins with intermittent agitation
3. Rinse, tap water, 2 + 5 mins
4. Hypo Clear (2% Na sulfite + 0.2% Na metabisulfite) 10 mins soak
5. Wash, 3x Tap water, 10 min each, + final 1x dist. water, 10 min. Stationary tray.
6. Hang dry, followed by convection oven dry @50C if I am in a hurry.


:Niranjan.

Niranjan,

I think that you "hit the nail on the head"... paper is certainly a major determinant in the final tone of a salt print and, additionally, I think humidity also plays a major role.

The prints I showed above were made in two different sessions separated by a few days. However, my dim room is in my basement and the conditions (temperature and humidity) are pretty consistent over short periods... consistency over seasons is another matter.

In the depths of the New England winter I give up printing when the temperature in the basement gets to about 50 F or less... it is just too cold to work. I can start up the wood stove down there but then the humidity drops to 35% or below... way too low for alt process printing.

The length of time between coating and exposure is a major variable in my work flow. I wait a minimum of one hour after coating with sensitizer before I expose paper. However, sometimes life interfers and that interval can be two or three hours, or even overnight. Also, I generally coat multiple sheets of paper at the beginning of a printing session. Thus the time between coating and exposure varies for each print within a session. All of this probably has some effect on the residual moisture in the paper and thus affects the final results.

In my view, these types of variations are part and parcel of alternative process printing. One just needs to accept the variability and have fun!

--- Frank

P.S. That is a very nice print. It demonstrates nicely the range and subtlety of tones possible with salt printing.
 
Joined
Jul 31, 2012
Messages
3,274
Format
35mm RF
I hope everyone keeps these coming. I'm interested to see things I haven't done.

Here is another cyanotype. No toning on this one. It was done on Legion Somerset from a 35mm neg scan so it is a bit grainy. Cyanotypes can be grainy by themselves of course depending on the paper, but in this case it is the scan. Same process as the last. Acidified paper with sulfamic acid. First "dev" in citric acid, then a couple soaks and hang up to dry. Easy peasy. Looks like my exposure on this one was 3:45 which is a bit long for me, but I was playing around with negs too so that could have accounted for it. I usually go for the thinnest neg that will get me the print. No use standing around all day waiting for the exposure. The Canon Pro 10 that I use needs the density to be dialed back otherwise it just won't expose right.

I have to say UV LED exposure units/digital negs are a godsend. Back in the 90s I made cyanotypes with BLB fluorescents and they just took forever with film. I kept wanting to do alts over the years, even restarting with occasional experiments that quickly fizzled out when my interest did, but it wasn't until I build a UV LED unit that things really took off. Instead of making two prints a day because of 40 minute exposures, I can make literally dozens with the short exposures I typically get. It makes experimenting with different variables so much easier. If I want to try a different idea with a neg I have a new one in a few minutes. After more than 4 years now of doing all this I think I have it down pretty well. Still more to do though. That said some of the prints I made back in the 90s were fantastic. And I had no idea what I was doing. Lol.

2023-043-04a_LegSom3.45m_ps_cc_1.jpg
 

KYsailor

Member
Joined
Oct 29, 2021
Messages
134
Location
Louisville, KY
Format
Hybrid
A few more cyanotypes from yesterday. Arches WC with std CC about 3 ml per print, + 3-4 drops 40% citric and 2 drops of 10% tween. Developed in tap water/vinegar (10%) a few washes in mild citric water ( my tap is ~8 so it will bleach if not careful). Exposure was about 4 minutes in the UV unit I have. I like the flower - I need to work on the oceanscape negative a bit. Starting to get the hang of this... While I like the cyanotypes, want to do more Kallitypes but I need to find images that look best in these alt process monochromes.

Dave

PXL_20230627_181455601.jpg
PXL_20230627_181514823.jpg

PXL_20230627_181533079.jpg
PXL_20230627_181549856.jpg
 
Photrio.com contains affiliate links to products. We may receive a commission for purchases made through these links.
To read our full affiliate disclosure statement please click Here.

PHOTRIO PARTNERS EQUALLY FUNDING OUR COMMUNITY:


Ilford ADOX Freestyle Photographic Stearman Press Weldon Color Lab Blue Moon Camera & Machine
Top Bottom