Showcase for Your HCWP's

Untitled

A
Untitled

  • 0
  • 0
  • 32
Jerome Leaves

H
Jerome Leaves

  • 2
  • 0
  • 52
Jerome

H
Jerome

  • 1
  • 0
  • 48
Sedona Tree

H
Sedona Tree

  • 1
  • 0
  • 51
Sedona

H
Sedona

  • 0
  • 0
  • 47

Recent Classifieds

Forum statistics

Threads
197,429
Messages
2,758,846
Members
99,494
Latest member
hyking1983
Recent bookmarks
0

koraks

Moderator
Moderator
Joined
Nov 29, 2018
Messages
20,598
Location
Europe
Format
Multi Format
very stable if one sprays the exposed paper with sodium carbonate.

Hey, that's a neat trick, I didn't know that. You mean stable in the dark, right?
I do vaguely recall that turmeric was very pH-dependent in the hue it gave, but I only played with anthotypes briefly, and it's about a decade ago...
 

fgorga

Member
Joined
Aug 31, 2015
Messages
737
Location
New Hampshire
Format
Multi Format
Hey, that's a neat trick, I didn't know that. You mean stable in the dark, right?
I do vaguely recall that turmeric was very pH-dependent in the hue it gave, but I only played with anthotypes briefly, and it's about a decade ago...

Also fairly stable in the light, however I have not really investigated this systematically.

The turmeric extract (using iso-propanol) is bright yellow when coated on the paper. Thus the untreated print is fairly low contrast (yellow image on white paper). Spraying the print with a solution of sodium carbonate turns the image a red/brown and the paper generally a light brown. Different papers give varying results both in term of the image color and the background "stain". One has to carefully spray on the carbonate as the pigment is water soluble and thus the image will "run" ("bleed"?) is one get the paper too wet at this stage.

Examples can be found here: https://porfolio.gorga.org/anthotype (the first two images are made with paprika, the remainder with turmeric).
 
OP
OP

nmp

Member
Joined
Jan 20, 2005
Messages
1,995
Location
Maryland USA
Format
35mm
Also fairly stable in the light, however I have not really investigated this systematically.

The turmeric extract (using iso-propanol) is bright yellow when coated on the paper. Thus the untreated print is fairly low contrast (yellow image on white paper). Spraying the print with a solution of sodium carbonate turns the image a red/brown and the paper generally a light brown. Different papers give varying results both in term of the image color and the background "stain". One has to carefully spray on the carbonate as the pigment is water soluble and thus the image will "run" ("bleed"?) is one get the paper too wet at this stage.

Examples can be found here: https://porfolio.gorga.org/anthotype (the first two images are made with paprika, the remainder with turmeric).

Hi, Frank:

Looks like the 2nd one has pure white - does paprika get bleached out completely?

Also did you try borax to stain turmeric and does that make any difference in bleedability?

:Niranjan.
 
OP
OP

nmp

Member
Joined
Jan 20, 2005
Messages
1,995
Location
Maryland USA
Format
35mm
An 8x10 Kallitype from an in-camera negative (FP4, developed in double strength PMK). This print was gold toned before fixing. Paper used: Hahnemuhle Platinum Rag.

Well done print of a nice image. I love trees, specially when they hanging for dear life on the bank of a river. Thanks for sharing.

:Niranjan.
 

fgorga

Member
Joined
Aug 31, 2015
Messages
737
Location
New Hampshire
Format
Multi Format
Hi, Frank:

Looks like the 2nd one has pure white - does paprika get bleached out completely?

Also did you try borax to stain turmeric and does that make any difference in bleedability?

:Niranjan.

Borax works as well. The effect is (I think) due to pH. Pretty much any base should work.

The problem with bleeding is simply that the pigment is water soluble. Thus any aqueous solution can cause the problem. I use a cheap plastic spray bottle and very lightly mist the print and let it sit out in the sun for several minutes. Then I re-mist a second time if I decide that the print needs it. The key is not to get puddles of water on the print.

As for the paprika prints, I put the first batch of prints I made away in a print box in a cabinet (i.e. in the dark). I was surprised when I went back to them several months later and found that they had all faded badly. Eventually they faded away completely. This was true for untreated prints as well as a few that I had sprayed with an acrylic fixative thinks that that might protect them from light.
 

cliveh

Subscriber
Joined
Oct 9, 2010
Messages
7,485
Format
35mm RF
So, an anthotype. Thanks for the details.

I've experimented with anthotypes, mainly using tumeric which is relatively fast (exposures of several hours) and very stable if one sprays the exposed paper with sodium carbonate.

I have also tried paprika which is also fast but not very stable. The prints faded to 'zero' in the dark over a few months.

Yes, I should have mentioned it was an anthotype. I have never used sodium carbonate in this process, just tincture of flower juice in a medium of distilled water or Gin. Incidentally poppy juice works really well.
 
OP
OP

nmp

Member
Joined
Jan 20, 2005
Messages
1,995
Location
Maryland USA
Format
35mm
Borax works as well. The effect is (I think) due to pH. Pretty much any base should work.

The problem with bleeding is simply that the pigment is water soluble. Thus any aqueous solution can cause the problem. I use a cheap plastic spray bottle and very lightly mist the print and let it sit out in the sun for several minutes. Then I re-mist a second time if I decide that the print needs it. The key is not to get puddles of water on the print.

As for the paprika prints, I put the first batch of prints I made away in a print box in a cabinet (i.e. in the dark). I was surprised when I went back to them several months later and found that they had all faded badly. Eventually they faded away completely. This was true for untreated prints as well as a few that I had sprayed with an acrylic fixative thinks that that might protect them from light.

I thought may be boron did some kind of funky complexing with phenol groups like it does with PVOH. That would make it insoluble. But probably not.

:Niranjan.
 
Joined
Jul 31, 2012
Messages
3,281
Format
35mm RF
I think I am finally making some progress on these salt prints. Seems to be a process that is more finicky with paper choice than I am used to with cyanotype. This image was done on Revere Platinum which turned out the best I've used so far. I started just soaking the paper in 20g NaCL/50g Citric Acid per liter instead of brushing on the salt coat. That seems to help with the issues I have had with inconsistent coatings, at least for the salt coat, and bleeds out any paper buffering. I also switched brushes. I don't know why people love those Richeson brushes. I have nothing but problems with them. I coated the silver with a crappy $3 Langnickel taklon brush I found at walmart. Nary a streak to be found. I guess the salt process it is like most things you first start doing. You have to take your lumps to eventually get something worthwhile. Gotta just keep plugging away!

2023-041-02_ni_Salt_8m_RevPl_Lustreneg_1.jpg
 

koraks

Moderator
Moderator
Joined
Nov 29, 2018
Messages
20,598
Location
Europe
Format
Multi Format
Nice progress, @Patrick Robert James !
I started just soaking the paper in 20g NaCL/50g Citric Acid per liter

You may want to experiment with different ratios of salt to silver. In my experience, it takes surprisingly little salt to get the job done. E.g. I do brush my salt solution and use a 1.6% solution of sodium chloride and a 11% solution of silver nitrate. I apply volumes of both in a 1:1 ratio, so if I coat a sheet with 2ml salt solution, I also use 2ml of silver nitrate solution.

I don't add any acid to the salt solution, nor do I get any streaking as a result of the salt application. Things get tricky in terms of brushing when the silver nitrate is added (brushed on), since this will instantly form silver chloride. Since silver chloride is insoluble, you're basically brushing around a kind of white pudding across the paper, and this does easily result in streaking. Using a puddle pusher (glass rod etc.) tends to work better for applying the silver nitrate, I find, but it's kind of tricky to get that to work well in terms of the right volume of sensitizer etc. Brushing works well for me for smaller prints up to about 5x7". 8x10" and larger I find very difficult to brush evenly.

There are many ways to do this; the above reflects my own workflow and experience. I know some people use cotton balls for the sensitizing step, float the paper on top of a solution etc. Whatever gets the job done and works best for you - keep experimenting!

Also, it may be worthwhile to do a dmax test. How long are you exposing? I find salted paper takes quite a bit of exposure before it prints a nice black (which wil still be very warm, of course). Then adjust the negative density range so that you get a good white. If you start with a negative and just back up in exposure until you get the highlights to render, you generally end up with anemic shadows.
 

fgorga

Member
Joined
Aug 31, 2015
Messages
737
Location
New Hampshire
Format
Multi Format
I think I am finally making some progress on these salt prints. Seems to be a process that is more finicky with paper choice than I am used to with cyanotype. This image was done on Revere Platinum which turned out the best I've used so far. I started just soaking the paper in 20g NaCL/50g Citric Acid per liter instead of brushing on the salt coat. That seems to help with the issues I have had with inconsistent coatings, at least for the salt coat, and bleeds out any paper buffering. I also switched brushes. I don't know why people love those Richeson brushes. I have nothing but problems with them. I coated the silver with a crappy $3 Langnickel taklon brush I found at walmart. Nary a streak to be found. I guess the salt process it is like most things you first start doing. You have to take your lumps to eventually get something worthwhile. Gotta just keep plugging away!

View attachment 374022

Not bad!

I am surprised at the amount of citric acid you are adding. What is the reason for this? Revere Platinum does not contain a carbonate buffer so you should not need it for that reason.

Your are correct, salt printing is pretty finicky about paper. These days, I pretty much stick with one of the papers designed for alt process printing (i.e. Platinum Rag, Revere Platinum or Bergger Cot). I salt my paper by soaking in a plain salt solution (2% w/v). But I include citric acid in my silver nitrate solution which gets brushed on without trouble.

If I want to use a carbonate buffered paper, I have had better luck by pre-treating with acid, drying the paper and then salting the paper by immersion in a separate step rather than combining the two processes. These days, I pre-treat with 0.5% hydrochloric acid and don't bother to wash the paper, I just hang it to dry.

I agree with you about brushes... the Richeson brushes work just fine. However, pretty much any gold/brown Taklon brush I have tried also works well. Thus, I just buy inexpensive brushes these days.
 
Joined
Jul 31, 2012
Messages
3,281
Format
35mm RF
Thanks Frank and Koraks.

I have been going on what I read here and there. I didn't really have an issue with the salt solution I got from Bostick, but I did have issues with streaking so I decided to just dunk the paper in the salt. Solves the streaking problem. Not sure on where I got the citric acid amount, but I read it somewhere (probably on iogroups). Maybe I read it wrong. I'll have to go back and look. It does get the buffer out of the papers that have it. Figure I'll kill two birds with one stone.

I do have a puddle pusher but it is a bigger one and has two upbends on the ends instead of a handle. Kind of a pain to use really. Need two hands for it. I did try that on a couple prints a while back and it did fine. I think I am going to make or buy a smaller one since I like making smaller prints, but the cheapo brush did a decent enough job. The Richeson always made a mess of things. Not enough spring in the brush.

For small cyanotypes the brush I use is an old 1" watercolor wash brush I've had for ages. It is a bit thicker than the ones I have seen around these days. Great brush. For larger prints I've used a 3" golden taklon brush that I removed the ferrule and replaced it with cloth. No staining that way. I guess the Richeson brushes don't stain, but they also don't coat well. I've had some issues with other brushes.

I should probably buy Anderson's salt book and read it. I'm sure that would be a big help. I also read what you guys write and try to take it all in. I think I've done maybe two to three dozen salt prints now.

Koraks- Yeah, I need to really test the black levels. I know some of the earlier prints were a bit weak. More exposure is better I think. Richer prints. I am usually between 8 and 12 minutes in my UV printer depending on the paper. Revere Platinum prints faster. Speaking of papers, curiously enough, Canson XL Bristol also makes a pretty nice salt print. Better than the others I've tried. That paper really delivers I think. I also use it for cyanotypes after acidifying it, but if I want a little more contrast with it I won't acidify it first. I do mix citric acid in with my cyanotype though.

Frank- I've been thinking of pre acidifying all paper. Every paper I've done that with for cyanotype improved it or did no harm. Might just do that for salt as well. I use all kinds of papers though which is rather dumb, but I find repeating things boring. I don't make prints for exhibition anymore so it doesn't really matter much if only one out of ten is good enough.
 

koraks

Moderator
Moderator
Joined
Nov 29, 2018
Messages
20,598
Location
Europe
Format
Multi Format
The concern with (so much) citric acid for a salt print is that AFAIK it acts a bit as a restrainer. In small quantities (1-2 or so drops of 10% per 1ml of silver nitrate solution ), I find it very helpful. Adding more I'd expect would affect printing times (longer), image tone (warmer) and dmax (lower). You could run some experiments to see where the optimum is. On some papers you'll find using no citric acid whatsoever gives highight staining.

I've done some printing on some Canson papers as well; I don't quite recall which, but I think it was called "XL" in fact. It worked fine!
 

KYsailor

Member
Joined
Oct 29, 2021
Messages
135
Location
Louisville, KY
Format
Hybrid
Kind of quiet here... finished my new 365 nm UV box based on Clay Harmon's 20X30 design. Started with a few cyanotypes just to see how it was working - the first on Arches WC the second on Canson Bristol XL (neither paper pre acidified, but used citric acid/tween in the cyano solution, classic) . Going to try some photopolymer plates this weekend.

Dave
 

Attachments

  • untitled-3.jpg
    untitled-3.jpg
    1.6 MB · Views: 42
  • untitled-4.jpg
    untitled-4.jpg
    617.4 KB · Views: 44

fgorga

Member
Joined
Aug 31, 2015
Messages
737
Location
New Hampshire
Format
Multi Format
Way back in June, Niranjan (@nmp) posted a cyanotype toned with sumac, see: https://www.photrio.com/forum/threads/showcase-for-your-hcwps.199853/page-20#post-2803705

Seeing this very nice print piqued my interest in toning cyanotypes, a topic I had explored several years ago, see: https://www.photrio.com/forum/threads/on-the-toning-of-cyanotypes.175185/

Thus, I bought Annette Golaz's book about toning cyanotypes with botanical material, see: https://www.routledge.com/Cyanotype...ueprints-Naturally/Golaz/p/book/9780367553548 and, earlier this week, I did some tests following the method she describes. I'll not describe the method. Buy the book if you are interested; authors deserve to be compensated for their efforts.

The last time I made cyanotypes was four years ago. All of these prints were made on Hahn. Bamboo Mixed Media paper using traditional cyanotype chemistry with one small change; the stock solutions which were mixed 1:1 by volume were both 10% (w/v) rather than the more typical 25% and 10%. Prints were 'developed' in 15% vinegar and then washed extensively. Toning occurred several days after printing... i.e. the prints were dry before they went into the toning tray.

I was half expecting results similar to those seen with the typical tea, etc. toning of cyanotypes (lots of staining of the paper with concomitant loss of contrast) but was very pleasantly surprised with the results.

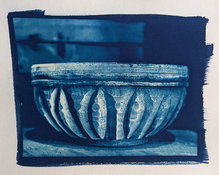
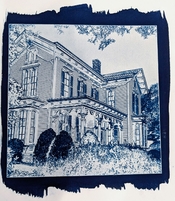
Here are a few of my results:

Cyanotype toned with ferns (foraged from my yard)
img162.jpg


Cyanotype toned with sumac gall tannins (purchased from a supplier of natural dyes)
img163.jpg


Cyanotype toned with marigold (purchased from a supplier of natural dyes)
img164.jpg


Cyanotype toned with weld (purchased from a supplier of natural dyes)
img168.jpg


Untoned Cyanotype
img172.jpg


And one more... sorry for the different negative. I ran out of prints of the other image.

Cyanotype toned with dried tarragon (from the grocery store)
img167.jpg


The supplier of natural dyes I bought from is https://longridgefarm.com/. They are located fairly near my home which is why I chose them. I took a drive and picked up small amounts of various materials rather than having them shipped.
 
Last edited:

Tom Taylor

Member
Joined
Jul 10, 2005
Messages
558
Location
California
Format
Multi Format
Salt Print

Port-of-San-Francisco.169105649_large.jpg

One of my favorite salt prints which I have had on display since I printed it back in 2013. I forget now the paper that was used - either Fabriano Artistico, Lanaquarelle, or Bergger Cot 320, all of which I was using in those days, and (IIRC) toned it with a gold sodium acetate toner. What I do recall vividly is the difficulty I ran into in shooting the negative. This was shot with a Toyo 810G from the end of Pier 1 looking back at the Ferry Building which is located at the foot of Market and Embarcadero in downtown San Francisco where it is next to impossible to find a parking space. I arrived at the end of the workday when everyone was leaving for home and was there ready to snag an open spot when one suddenly became available 1 block away. I wheeled the camera in its hard case and a Manfrotto 475B tripod with my 2-wheel dolly to the end of the pier. The plan was to set up the camera and focus while it was still daylight and wait until darkness had set-in to take the exposure only to discover while determining the exposure with the spot meter that I had left the Delta 100 exposure sheet with the reciprocity curve at home. So I returned the next day and again managed to get a parking spot just a few feet from where I was parked the day before. The plan was the same and this time I had the data sheet. But upon determining the proper exposure and waiting for the incoming/outgoing ferries were both away from the Pier and the swells produced by their propellers had subsided (I wanted an unobstructed and smooth as possible foreground) just as I was getting ready to trip the shutter the lights all along the waterfront suddenly went out! Initially I entertained the idea that this was some sort of conspiracy by security whom I knew were aware of my presence from the security cameras that are employed on the Pier. The next morning I called the Pier and was informed that a construction contractor had accidently cut a cable which resulted in the power failure. So back out for the 3d consecutive night and unbelievably got a parking space just 1/2 block from the previous. This time everything went according to plan and I took the 15 second exposure using a 360mm Schneider Symmar-S.
 

fgorga

Member
Joined
Aug 31, 2015
Messages
737
Location
New Hampshire
Format
Multi Format
Interesting work @fgorga !
The sumac in particular looks very pretty.
How do the different toners relate in terms of staining of the paper base?

Thanks!

The marigold and the weld show some mild staining. Look at the lighthouse which is pure white.

I did not bother to show the print toned with black walnut husks. The 'tea' looks like a cola soda, very dark brown. and there is heavy staining.

I also did not show the print toned with kale. This one is very extensively bleached. The image is almost gone.
 
Last edited:

fgorga

Member
Joined
Aug 31, 2015
Messages
737
Location
New Hampshire
Format
Multi Format
Salt Print


One of my favorite salt prints which I have had on display since I printed it back in 2013. I forget now the paper that was used - either Fabriano Artistico, Lanaquarelle, or Bergger Cot 320, all of which I was using in those days, and (IIRC) toned it with a gold sodium acetate toner. What I do recall vividly is the difficulty I ran into in shooting the negative. This was shot with a Toyo 810G from the end of Pier 1 looking back at the Ferry Building which is located at the foot of Market and Embarcadero in downtown San Francisco where it is next to impossible to find a parking space. I arrived at the end of the workday when everyone was leaving for home and was there ready to snag an open spot when one suddenly became available 1 block away. I wheeled the camera in its hard case and a Manfrotto 475B tripod with my 2-wheel dolly to the end of the pier. The plan was to set up the camera and focus while it was still daylight and wait until darkness had set-in to take the exposure only to discover while determining the exposure with the spot meter that I had left the Delta 100 exposure sheet with the reciprocity curve at home. So I returned the next day and again managed to get a parking spot just a few feet from where I was parked the day before. The plan was the same and this time I had the data sheet. But upon determining the proper exposure and waiting for the incoming/outgoing ferries were both away from the Pier and the swells produced by their propellers had subsided (I wanted an unobstructed and smooth as possible foreground) just as I was getting ready to trip the shutter the lights all along the waterfront suddenly went out! Initially I entertained the idea that this was some sort of conspiracy by security whom I knew were aware of my presence from the security cameras that are employed on the Pier. The next morning I called the Pier and was informed that a construction contractor had accidently cut a cable which resulted in the power failure. So back out for the 3d consecutive night and unbelievably got a parking space just 1/2 block from the previous. This time everything went according to plan and I took the 15 second exposure using a 360mm Schneider Symmar-S.

Tom,

A very nice print.

I think that every landscape photographer has a similar story about the patience needed to get the photo one has in mind. Too many beginning photographers don't understand the patience that photography needs. Come to think about it, one can leave the "beginning' out of my previous statement and it would still be true!!! 😉

Thanks for sharing your tale.
 
Joined
Jul 31, 2012
Messages
3,281
Format
35mm RF
Kind of quiet here... finished my new 365 nm UV box based on Clay Harmon's 20X30 design. Started with a few cyanotypes just to see how it was working - the first on Arches WC the second on Canson Bristol XL (neither paper pre acidified, but used citric acid/tween in the cyano solution, classic) . Going to try some photopolymer plates this weekend.

Dave

Nice prints Dave. The UV box is the way! Makes things so much easier.

I am curious how much Tween you are using. I've been using LFN instead of Tween but I have some Tween now, just have no idea how much to use...
 

TheFlyingCamera

Membership Council
Advertiser
Joined
May 24, 2005
Messages
11,548
Location
Washington DC
Format
Multi Format
Doing something a little different:
full


I took the portrait image, made two different digital negatives; one straight, one tweaked to give deeper shadows. I made prints from each negative on different papers, then tore the one print to split the model's face, and then stitched the two prints together and attached the top layer to the bottom layer with wheat paste to keep it stable. The "clean" half was printed on Velke Losiny Prague, which is a textured cold press paper. The "dirty" half is on Berger COT320. Both prints are palladium with NA2, developed in Potassium Oxalate.
 

fgorga

Member
Joined
Aug 31, 2015
Messages
737
Location
New Hampshire
Format
Multi Format
Nice prints Dave. The UV box is the way! Makes things so much easier.

I am curious how much Tween you are using. I've been using LFN instead of Tween but I have some Tween now, just have no idea how much to use...

Regarding Tween 20... Make a 10% weight per volume stock solution. The exact amount of this solution needed is dependent on the paper and the probably process. I typically use 1 or 2 drops of the 10% stock per mL of sensitizer.

Tween is a very viscous liquid so it is difficult to measure and transfer it by volume. Thus, the w/v solution. I put a graduated cylinder on the balance and set the balance to zero.. Then I add the required weight of Tween 20 to the cylinder, add water to required level, then mix thoroughly right in the cylinder and finally transfer to a bottle for storage. Mix gently as it foams if you mix vigorously. Tween 20 is, after all, a detergent.
 

fgorga

Member
Joined
Aug 31, 2015
Messages
737
Location
New Hampshire
Format
Multi Format
Doing something a little different:
full


I took the portrait image, made two different digital negatives; one straight, one tweaked to give deeper shadows. I made prints from each negative on different papers, then tore the one print to split the model's face, and then stitched the two prints together and attached the top layer to the bottom layer with wheat paste to keep it stable. The "clean" half was printed on Velke Losiny Prague, which is a textured cold press paper. The "dirty" half is on Berger COT320. Both prints are palladium with NA2, developed in Potassium Oxalate.

Nice! I really like the choice of the red thread.

If you happen to be in Vermont in the next month there is currently an exhibit at the Vermont Center for Photography in Brattleboro titled " Women On the Edge: ALTERNATIVE PROCESSES IN NEW ENGLAND" which includes a number of altered objects in a similar vein. The exhibit closes on 1 Sept.
 

bernard_L

Member
Joined
Feb 17, 2008
Messages
1,955
Format
Multi Format
Salt Print


One of my favorite salt prints which I have had on display since I printed it back in 2013. I forget now the paper that was used - either Fabriano Artistico, Lanaquarelle, or Bergger Cot 320, all of which I was using in those days, and (IIRC) toned it with a gold sodium acetate toner. What I do recall vividly is the difficulty I ran into in shooting the negative. This was shot with a Toyo 810G from the end of Pier 1 looking back at the Ferry Building which is located at the foot of Market and Embarcadero in downtown San Francisco where it is next to impossible to find a parking space. I arrived at the end of the workday when everyone was leaving for home and was there ready to snag an open spot when one suddenly became available 1 block away. I wheeled the camera in its hard case and a Manfrotto 475B tripod with my 2-wheel dolly to the end of the pier. The plan was to set up the camera and focus while it was still daylight and wait until darkness had set-in to take the exposure only to discover while determining the exposure with the spot meter that I had left the Delta 100 exposure sheet with the reciprocity curve at home. So I returned the next day and again managed to get a parking spot just a few feet from where I was parked the day before. The plan was the same and this time I had the data sheet. But upon determining the proper exposure and waiting for the incoming/outgoing ferries were both away from the Pier and the swells produced by their propellers had subsided (I wanted an unobstructed and smooth as possible foreground) just as I was getting ready to trip the shutter the lights all along the waterfront suddenly went out! Initially I entertained the idea that this was some sort of conspiracy by security whom I knew were aware of my presence from the security cameras that are employed on the Pier. The next morning I called the Pier and was informed that a construction contractor had accidently cut a cable which resulted in the power failure. So back out for the 3d consecutive night and unbelievably got a parking space just 1/2 block from the previous. This time everything went according to plan and I took the 15 second exposure using a 360mm Schneider Symmar-S.

Nice! and deserved.
 
Photrio.com contains affiliate links to products. We may receive a commission for purchases made through these links.
To read our full affiliate disclosure statement please click Here.

PHOTRIO PARTNERS EQUALLY FUNDING OUR COMMUNITY:


Ilford ADOX Freestyle Photographic Stearman Press Weldon Color Lab Blue Moon Camera & Machine
Top Bottom