Stubborn screws: Milling out screw heads, recommendations for milling cutters

Protest.

A
Protest.

  • 7
  • 3
  • 178
Window

A
Window

  • 5
  • 0
  • 92
_DSC3444B.JPG

D
_DSC3444B.JPG

  • 0
  • 1
  • 108

Forum statistics

Threads
197,216
Messages
2,755,740
Members
99,425
Latest member
sandlroofingand
Recent bookmarks
0
OP
OP
Andreas Thaler

Andreas Thaler

Subscriber
Joined
Nov 19, 2017
Messages
4,210
Location
Vienna/Austria
Format
35mm
Drilling PCB's (RF4 material) and sometimes softer metals such as aluminium. Forget about anything harder; I tried using them on copper once and that was a total failure; this was with the larger and much more sturdy 3mm bits.

You'll destroy at least a handful of these figuring out how to use them with a Dremel without breaking them on soft and thin materials. Anything hard or thick simply isn't going to work. The Dremel's torque simply snaps the bit instantly.

Thanks, interesting, then I'll use the thin cutters for fine work. I'm excited.

There are some small cutters for the Dremel that are shaped to be suitable for milling away screw heads. Unfortunately, they fail on steel screws.
 
OP
OP
Andreas Thaler

Andreas Thaler

Subscriber
Joined
Nov 19, 2017
Messages
4,210
Location
Vienna/Austria
Format
35mm
And I'll see if I can remove stuck screws intact.

Recently I tried it with the hot soldering tip plus solder, which I then removed with the desoldering braid. This should make the heat transfer work better. But the soldering tip was probably too small for that.

I'll try again with my cordless branding iron ;-)
 

Dan Daniel

Subscriber
Joined
Jul 4, 2009
Messages
2,829
Location
upstate New York
Format
Medium Format
Think about mounting the Dremel in a fixed position and bring the work to the cutter, Andreas. Sometimes this can make for a more stable way to work.

Some of this is along the lines of whether we should modify equipment for our needs or not. The way you are working is not going to give the most finished or proper solutions. But you can still get a solution of some sort and move on to getting a camera working again. Like the lens mount plate you showed- pretty crude, but it will get you where you want to be. But I'm the kind of person who was given a nice Olympus OM system lens that had a major ding in the filter threads. After some consideration, I decided to simply grind away the bent part of the threads- there was still 3/4 diameter of clean threads and all worked well! Yes, I am a heathen...

I did product prototyping for many years and learned to do things with rotary cutters like a Dremel that no one would suggest you do. Making engineering spec models to tight tolerances with a Dremel is a lost art :smile: Well, Foredom tool, actually, much less gyroscopic forces to fight with the hand as the motor is a meter away. Worth a consideration and breaks down fairly tight.

Not sure what Dremel you have. Not too long ago I had burnt out yet another and the store only had the more expensive model in stock. So I got it, and will never look back. I don't know the terms, but it has a motor that adjusts for loads. In other words, maintains a constant speed in cutting, not slow down in reaction to cutting and pressure. Wonderful feature. Not sure how they are marketed in Europe, but it is the 4000 model here with the electronic speed control. Well worth getting if you can or don't have it yet (having a couple of Dremels is a good thing, keeping them set up with different tools rather than swapping all the time)

There are times and objects where proper tools and setup are the only way to go. Keep learning about the proper ways and work towards it, and in the meantime do what you can on the more mundane objects, eh?

On something like the lens mopunt earlier in this thread, those are decent sized screws. If the surrounding material is also metal, you have a huge heat sink pulling away any applied heat on the screw. Any soldering iron that is useful for working on camera electronics is not going to produce enough heat on screws like that. Small pin-point blow torch is the best cheap way to get enough heat on it. Of course also the best way to melt other parts, start a fire, etc.
 
Last edited:
OP
OP
Andreas Thaler

Andreas Thaler

Subscriber
Joined
Nov 19, 2017
Messages
4,210
Location
Vienna/Austria
Format
35mm
@Dan Daniel Thank you!

I'm confident I can improve my milling performance.

I tried using the Dremel fixed in place and moving the workpiece, but I didn't have enough control. I'll keep practicing freehand, which has produced the best results so far. To do this, I clamp the workpiece in the Dremel vice.

Of course, a clean job is always the goal, but if the spot where the screw has been drilled out is not visible (as was the case recently with the Nikon F4), I can tolerate something a bit ugly that still works. You also scratch marks into the barrels of lenses for adjustment.

I work with the Dremel 4250, where more power is needed:


For fine work I use the Dremel Stylo:


I think Dremel offers very good value for money. The devices and tools are solid and I'm always happy when I can use them.
 

tom williams

Subscriber
Joined
Jan 24, 2020
Messages
282
Location
Arizona
Format
4x5 Format
I
Thanks!

If that doesn't work, I'll stick with the „Dremel egg“ and use the 0.5 mm cutter to work on soldering points. Maybe I can remove old solder with that.

I've come across soldering points on the Nikon F4 that I couldn't melt with the soldering tip despite adding flux.

Or other delicate work.

Tools are never superfluous 🙃

If you do try your luck boring out a screw shaft with a tiny end mill, I'd recommend giving the end mill a pocket to start in - namely by using a small center bit. At least with that starting pocket you can minimize the prospect of the end mill skittering across the workpiece. And with steel, low rpms are best. Is cutting oil a possibility?
 
OP
OP
Andreas Thaler

Andreas Thaler

Subscriber
Joined
Nov 19, 2017
Messages
4,210
Location
Vienna/Austria
Format
35mm
If you do try your luck boring out a screw shaft with a tiny end mill, I'd recommend giving the end mill a pocket to start in - namely by using a small center bit. At least with that starting pocket you can minimize the prospect of the end mill skittering across the workpiece. And with steel, low rpms are best. Is cutting oil a possibility?

My plan is to just remove the screw head and then unscrew the screw shaft using special pliers. This worked well and preserved the thread.

To drill out screws I would need a suitable tool and doubt I would be successful with size M1.
 

dxqcanada

Member
Joined
Jun 9, 2011
Messages
329
Location
Ontario, Canada
Format
Multi Format
Did you mention that you have a Dremel workstation??

I got one for my Dremel ... it does make it much like a "real" drill press ... much better than hand holding.

041016_1604_toolstoolst1.jpg
 

Ian C

Member
Joined
Feb 8, 2009
Messages
1,233
Format
Large Format
I speculate that, someone installed the screws in the lens mount using a PERMANENT thread-locking compound. Or the “rocket scientist” might have used an epoxy cement. Normally, the fastening screws of Nikon lens mounts unscrew without a problem.

When locking screw threads that might have to be disassembled at some point, the correct choice is Loctite #242 REMOVEABLE THREADLOCKER.

This prevents the screws from loosening on their own, but still allows disassembly with a wrench or screwdriver using reasonable force.

Don’t depend on the color of the fluid as a guide. There are permanent adhesives that have the same blue color as Locktite #242. You must check the labeling on the bottle before using.

After viewing the photos of post #14, I doubt that your attempts to remove the screws will succeed. The screws are small-diameter stainless-steel wide-panhead screws. I measured the distance from the bottom of the counterbore to the bottom of the mount. It is 0.50 mm. That means that if you mill away the screw head and remove the mount, you’ll have at most, 0.50 mm of screw shank left to grip with a plier or similar tool. I think that would be impossible based on what has been shown in the photos of post #14. They’re obviously held into the threads tenaciously.

I wish you success. It doesn't look promising.
 

DREW WILEY

Member
Joined
Jul 14, 2011
Messages
13,633
Format
8x10 Format
A Dremel is rather hard to control. If you don't have a serious drill press, the little Dremel version as depicted in a previous post might work if you clamp it to something even more solid. You first want to create a central dimple in the top of the screw with some kind of countersink to prevent your drill bit itself from straying off center. Inexpensive drill chucks have some wobble to them, and you'll be working with a small drill bit, preferably cobalt steel.

Once you've got a hole in it, you can try a small Easy Out. Avoid the cheap hardware store variety, which can easily snap off itself, and obtain it from an actual industrial supplier like McMaster instead.

If any of the screw head is still there instead of fully broken off, a better trick is to file a couple of flats on the side of the head and try to plier it out. I keep on hand a needle-nosed Vise Grip for that application. A purist might want to invest in a set of high-quality miniature pliers. Or pay your favorite dentist a visit and seen what he can do with his tools. You can always repay him in teeth.
 
OP
OP
Andreas Thaler

Andreas Thaler

Subscriber
Joined
Nov 19, 2017
Messages
4,210
Location
Vienna/Austria
Format
35mm
I speculate that, someone installed the screws in the lens mount using a PERMANENT thread-locking compound. Or the “rocket scientist” might have used an epoxy cement. Normally, the fastening screws of Nikon lens mounts unscrew without a problem.

When locking screw threads that might have to be disassembled at some point, the correct choice is Loctite #242 REMOVEABLE THREADLOCKER.

This prevents the screws from loosening on their own, but still allows disassembly with a wrench or screwdriver using reasonable force.

Don’t depend on the color of the fluid as a guide. There are permanent adhesives that have the same blue color as Locktite #242. You must check the labeling on the bottle before using.

After viewing the photos of post #14, I doubt that your attempts to remove the screws will succeed. The screws are small-diameter stainless-steel wide-panhead screws. I measured the distance from the bottom of the counterbore to the bottom of the mount. It is 0.50 mm. That means that if you mill away the screw head and remove the mount, you’ll have at most, 0.50 mm of screw shank left to grip with a plier or similar tool. I think that would be impossible based on what has been shown in the photos of post #14. They’re obviously held into the threads tenaciously.

I wish you success. It doesn't look promising.

Thanks, Ian!

I used the Nikon F4 bayonet just for practice. The screws can be easily removed with a screwdriver.
 
OP
OP
Andreas Thaler

Andreas Thaler

Subscriber
Joined
Nov 19, 2017
Messages
4,210
Location
Vienna/Austria
Format
35mm
A Dremel is rather hard to control. If you don't have a serious drill press, the little Dremel version as depicted in a previous post might work if you clamp it to something even more solid. You first want to create a central dimple in the top of the screw with some kind of countersink to prevent your drill bit itself from straying off center. Inexpensive drill chucks have some wobble to them, and you'll be working with a small drill bit, preferably cobalt steel.

Once you've got a hole in it, you can try a small Easy Out. Avoid the cheap hardware store variety, which can easily snap off itself, and obtain it from an actual industrial supplier like McMaster instead.

If any of the screw head is still there instead of fully broken off, a better trick is to file a couple of flats on the side of the head and try to plier it out. I keep on hand a needle-nosed Vise Grip for that application. A purist might want to invest in a set of high-quality miniature pliers. Or pay your favorite dentist a visit and seen what he can do with his tools. You can always repay him in teeth.

Thank you!
 
OP
OP
Andreas Thaler

Andreas Thaler

Subscriber
Joined
Nov 19, 2017
Messages
4,210
Location
Vienna/Austria
Format
35mm
IMG_7840.jpeg


This screw head in the Nikon F4 that I was recently working on could be milled out with the Dremel.

That saved my project, but with two collateral damages. Once on the metal board and once on the circuit board next to it, but fortunately neither had any negative effects.

Since it is a spot that is not visible from the outside, I accept that the spot is not pretty. But of course I want a visually better result too. And of course a conductor track should not be damaged.
 
Last edited:

Rrrgcy

Subscriber
Joined
Mar 10, 2016
Messages
211
Location
So FL
Format
Medium Format
Egads. Don’t use an egg shaped or other drill bit. Instead use a 90 degree HSS or Cobalt or carbide 2-flute spot drill w a drill press. $20 for 5 of em. Free-hand center prick punch a round spot divot in the center of the screw (using a center punch)(or not, just go with the center placing the spot drill into the center formed depression made by the existing screw head slot) and apply spot drill.
 
OP
OP
Andreas Thaler

Andreas Thaler

Subscriber
Joined
Nov 19, 2017
Messages
4,210
Location
Vienna/Austria
Format
35mm
Egads. Don’t use an egg shaped or other drill bit. Instead use a 90 degree HSS or Cobalt or carbide 2-flute spot drill w a drill press. $20 for 5 of em. Free-hand center prick punch a round spot divot in the center of the screw (using a center punch)(or not, just go with the center placing the spot drill into the center formed depression made by the existing screw head slot) and apply spot drill.

Thank you!

One of my characteristics is stubbornness.

If someone tells me not to do something like that, I want to do it that way until it works or it completely fails 😇

I have to work with what I have and will keep practicing. If it doesn't work, I'll keep looking around.
 
OP
OP
Andreas Thaler

Andreas Thaler

Subscriber
Joined
Nov 19, 2017
Messages
4,210
Location
Vienna/Austria
Format
35mm
Egads. Don’t use an egg shaped or other drill bit. Instead use a 90 degree HSS or Cobalt or carbide 2-flute spot drill w a drill press. $20 for 5 of em. Free-hand center prick punch a round spot divot in the center of the screw (using a center punch)(or not, just go with the center placing the spot drill into the center formed depression made by the existing screw head slot) and apply spot drill.

I checked and the Dremel cutters that would fit are made of high-speed steel, so they should be HSS. But I can't get any further with them on bayonet screws, only the tungsten carbide cutter works. But HSS should be HSS, right?
 
OP
OP
Andreas Thaler

Andreas Thaler

Subscriber
Joined
Nov 19, 2017
Messages
4,210
Location
Vienna/Austria
Format
35mm
I checked and the Dremel cutters that would fit are made of high-speed steel, so they should be HSS. But I can't get any further with them on bayonet screws, only the tungsten carbide cutter works. But HSS should be HSS, right?

This one for example:


„Hochgeschwindigkeitsstahl“ means high-speed steel means HSS?
 
OP
OP
Andreas Thaler

Andreas Thaler

Subscriber
Joined
Nov 19, 2017
Messages
4,210
Location
Vienna/Austria
Format
35mm
Now it worked 🙃

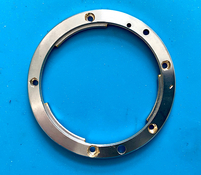
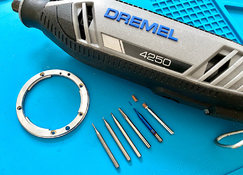
Assuming that the Dremel cutters are made of HSS steel, I tried out different cutters one after the other and was able to remove the bayonet ring of my training Nikon F4 without causing any major damage.

If I had taken more time, the result would certainly have been even better (the ring still shows damage from my attempt with the egg-shaped tungsten carbide cutter).

Two bits failed.

The point goes to @koraks 😉


1.jpg 2.jpg 4.jpg

From left to right:

3 x HSS, 2 x tungsten carbide and a corundum grinder


5.jpg 3.jpg
 

DREW WILEY

Member
Joined
Jul 14, 2011
Messages
13,633
Format
8x10 Format
Dremel has a limited number of carbide tipped items. But there are industrial suppliers which have a much wider selection carbide tips from other manufacturers which will fit. And serious work isn't done with hobby tools like Dremel anyway. I wish I had bought an industrial version machine for myself back when I was a distributor for that kind of thing. But I just couldn't justify the extra expense for only intermittent personal use, especially since I could borrow high quality machines as needed back then. So I too now own just a Dremel. But I go to sources like McMaster in this country for specialized inserts.

Most "high speed steel" isn't ideal for this kind of application. It overheats at extreme speeds. Therefore you should dial the RPM of the Dremel down about halfway.
 

Dan Daniel

Subscriber
Joined
Jul 4, 2009
Messages
2,829
Location
upstate New York
Format
Medium Format
There are mini milling machines out there for under $500. Such as-


I have a Unimat SL-1000. Made in the 1950s. Underpowered motor but usable. If you set it up right, very accurate. I made some jigs where I roughed out some slugs on an engine lathe elsewhere and did the finish work on this lathe. ended up with tolerances an under 5/10,000" based on measurements at a high-end aerospace machine shop. Not bad for a $200 dollar machine over 60 years old. Keep your eyes open, I expect prices have gone up but still...
 
OP
OP
Andreas Thaler

Andreas Thaler

Subscriber
Joined
Nov 19, 2017
Messages
4,210
Location
Vienna/Austria
Format
35mm
Dremel has a limited number of carbide tipped items. But there are industrial suppliers which have a much wider selection carbide tips from other manufacturers which will fit. And serious work isn't done with hobby tools like Dremel anyway. I wish I had bought an industrial version machine for myself back when I was a distributor for that kind of thing. But I just couldn't justify the extra expense for only intermittent personal use, especially since I could borrow high quality machines as needed back then. So I too now own just a Dremel. But I go to sources like McMaster in this country for specialized inserts.

Most "high speed steel" isn't ideal for this kind of application. It overheats at extreme speeds. Therefore you should dial the RPM of the Dremel down about halfway.

But it worked well with the Dremel.

If you proceed carefully and patiently, you can remove a screw head with little or no damage. That's more than enough for work inside a device. And it's the most I can do in our kitchen.
 

DREW WILEY

Member
Joined
Jul 14, 2011
Messages
13,633
Format
8x10 Format
I once sold specialty products to machinists. It got real "interesting" whenever a hardened small screw extractor itself broke off in a hole in an expensive machine.

But even in later years I was still selling high-speed drill bits and screwdriver tips which last hundreds of times longer apiece than the kind you can buy in a typical hardware store. True industrial quality, and the kind I keep in my own shop, and many of those, incidentally, made in Austria. I even have a few special diamond drill bits which fit in a Dremel tool.

Dremel is now a minor holding of the big German company, Bosch. But many of Bosch's own high quality bits were subcontracted to a US factory owned by Makita of Japan. It gets interesting, tracing the interwoven supply sources.
But there is a world of difference when true industrial quality is demanded. In lieu of Dremel or even Foredom, I would have liked to have had a German-made Metabo flex-shaft die grinder.

I wish I had also bought a Jet mini milling machine when I was a dealer for Jet and Powematic too. More expensive than the Proxxon. But by then I had already completed all kinds of complicated projects with an ordinary old Jet floor standing industrial drill press. Precision drill presses have almost no run-out chuck wobble like amateur presses. I had access to one of those I ordered for our huge shop at work, but nothing that fancy in my own shop. If any item was too complicated for me to personally mill, I simply had some local machinist make it.
 
Last edited:
OP
OP
Andreas Thaler

Andreas Thaler

Subscriber
Joined
Nov 19, 2017
Messages
4,210
Location
Vienna/Austria
Format
35mm
Photrio.com contains affiliate links to products. We may receive a commission for purchases made through these links.
To read our full affiliate disclosure statement please click Here.

PHOTRIO PARTNERS EQUALLY FUNDING OUR COMMUNITY:


Ilford ADOX Freestyle Photographic Stearman Press Weldon Color Lab Blue Moon Camera & Machine
Top Bottom