(Unicolor C-41 kit) Are my negatives coming out right?

Untitled

A
Untitled

  • 1
  • 1
  • 38
Jerome Leaves

H
Jerome Leaves

  • 2
  • 0
  • 53
Jerome

H
Jerome

  • 2
  • 0
  • 50
Sedona Tree

H
Sedona Tree

  • 1
  • 0
  • 53
Sedona

H
Sedona

  • 0
  • 0
  • 47

Recent Classifieds

Forum statistics

Threads
197,429
Messages
2,758,860
Members
99,494
Latest member
hyking1983
Recent bookmarks
0
Joined
Jun 2, 2016
Messages
5
Location
Canada
Format
35mm
I'm using the Unicolor C-41 press kit. I warm the chemicals to the correct temperatures, I use a lab timer app on my phone to time development, seemingly I follow all the instructions to a tee.

But the results I get seem wrong, and I don't have much/any experience with shooting/developing/scanning C-41 negatives, so I don't know where in the pipeline the problem lies.

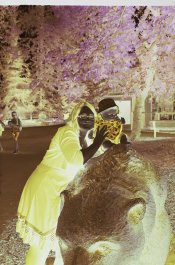
Here's an example negative (Portra 400), with some stock for colour correction purposes. Only processing has been white balance adjustment to make the film stock neutral.
sample-bad-colors.jpg

Inverting it yields,

sample-bad-colors-inverted.jpg

Note the blue cast despite white balance correction. No matter what I do to this in Photoshop or Lightroom, I can't get the colours to come out right.

This is digitized using a digital camera, copy stand, and light box. But I get similar results using a flatbed scanner. I can upload the RAW .dng file if needed.

Any ideas would be greatly appreciated.
 

Bob Carnie

Subscriber
Joined
Apr 18, 2004
Messages
7,734
Location
toronto
Format
Med. Format RF
Mark - just looking at the inverted file you need to add at least 25 yellow and some magenta, Basically you are heavy blue, cyan. I think with a big correction you should get much closer
 

Kirks518

Member
Joined
Oct 5, 2013
Messages
1,495
Location
Flori-DUH
Format
Multi Format
I've only done one roll of C-41, and it was Portra as well. I wasn't happy with my results, and determined it was due to my inability to maintain the proper temp during the entire developing process (3 minutes IIRC). What method are you using to maintain the temp of the developer during processing? If there is variation greater then 1°F, I think you'll get color-shifts like what you (and I) got here.
 

mklw1954

Member
Joined
Dec 2, 2009
Messages
396
Location
Monroe, NY
Format
Medium Format
Keep in mind that, although your chemical temperature may be right, if your empty tank/reel/film temperature is not the same as the chemicals when you add them, the chemical temperature will change upon addition. If your tank is at room temperature (some 30 degrees F lower than the chemical temperature) it will lower the chemical temperature when you add the chemicals. Pre-warm the empty tank/reels/film to the developer temperature. I use a small 6-pack insulated cooler for this purpose, and a digital thermometer with a wire probe (calibrated to a color thermometer) in the water, adding warm water when needed to maintain the temperature; when the temperature is constant you know the tank/reels/film have come to the developer temperature and you can begin. Relying on the initial water pre-soak to do this may not be sufficient.
 
OP
OP
Joined
Jun 2, 2016
Messages
5
Location
Canada
Format
35mm
Thanks for the comments, everyone.

I took my last two rolls to the lab to be developed, and the difference is night and day.

So there definitely has to be something wrong with my development process! I think the most likely possibility is, like mklw1954 suspected, I don't use a regulated bath. Once the chemicals reach 102F I'm pretty easy going with them and it's definitely possible that the developer drops by a degree or two by the time I'm done development.

Next time my process will be:

- Heat up bottles of chemicals in a hot bath in a cooler along with the developer tank filled with water
- Once developer (and others) reach 102F, add cold water to the bath to make the bath exactly 102F (everything should now be exactly the same temperature)
- Pour out water from tank and start development, keeping the tank in the water in between inversions

Is there any danger in letting the film soak for the 20 minutes or so it takes to warm up the chemicals?
 

Kirks518

Member
Joined
Oct 5, 2013
Messages
1,495
Location
Flori-DUH
Format
Multi Format
I don't think there is a need for a presoak with C-41 and modern film stock, and the film will heat to temp quickly, as there is not much mass to it.

How will you maintain temperature during the developing process? Starting at the correct temp does not meant the temp will stay there during the developing time. You'll probably drop a couple degrees (at least) from start to finish.
 
Last edited:
OP
OP
Joined
Jun 2, 2016
Messages
5
Location
Canada
Format
35mm
Surely it should stay within a degree for only 3.5 minutes in a closed cooler (opened just to agitate/invert) in 102F water?

Maybe I'll do a test run without film to see how the temperature changes in the tank after 3.5 minutes of development.
 

Photo Engineer

Subscriber
Joined
Apr 19, 2005
Messages
29,021
Location
Rochester, NY
Format
Multi Format
The film is quite yellow but can be corrected in Photoshop. Then it shows crossover meaning some sort of bad processing.

Without some sort of pre-tempering (I use presoak) the mass of the processing tank and reel outweigh the mass of the developer and the temp drops by as much as 3 deg C. This could be the problem. IDK.

There is a long thread here that shows the benefit of presoak.

PE
 

Kirks518

Member
Joined
Oct 5, 2013
Messages
1,495
Location
Flori-DUH
Format
Multi Format
Is there any danger in letting the film soak for the 20 minutes or so it takes to warm up the chemicals?

To clarify an earlier comment I made, I agree in presoaking the tank and reel, but I don't think you need to presoak the film for 20 minutes. By presoaking the tank and reel to temp should be enough (assuming the film is on the reel).
 

Photo Engineer

Subscriber
Joined
Apr 19, 2005
Messages
29,021
Location
Rochester, NY
Format
Multi Format
Extended presoak can affect the film due to contaminants in city water. A brief presoak of 1' or less is just fine.

PE
 

mklw1954

Member
Joined
Dec 2, 2009
Messages
396
Location
Monroe, NY
Format
Medium Format
I bring the empty tank/reels/films to the processing temperature, not doing so by filling it with water. Then I use a normal 1 minute water pre-soak.

This provides very good consistency, which I need because I make RA4 prints and do not scan to make prints. You'd go crazy finding the color filtration settings for each roll if the film was inconsistently developed. Adjusting for inconsistently developed film is easily done when scanning.

As a check sometimes I'll scan a negative to see if the development was good and they always turn out to not need changes in color balance. 90% of the time I can make a final print on the first try and to me this validates the process.
 

Diapositivo

Subscriber
Joined
Nov 1, 2009
Messages
3,257
Location
Rome, Italy
Format
35mm
I don't know if the positive you posted is a scan of a printed positive or is a digitally-inverted scan of the negative.

By just colour-balancing it, after cropping the black on top, it yields:

sample-bad-colors-inverted.jpg

Which, as far as colours are concerned, seems much more in the ballpark. Yes the woman and the bear have a greenish cast, but that might be the result of being under the shade of a green tree!
I would suggest trying a more neutral subject in a more neutral light (using, maybe, a colour chart and a mid-grey carboard) before revising anything in my process. Try to pinpoint exactly which is the dominant that you get. Be sure to insert a really neutral subject (such as a Kodak 18% grey card) in your subject to drive filtering. You will then be able, in principle, to filter the same way all pictures obtained in the same light.

And yes, for colour developing a more precise control of temperature is desirable. A rotary processor would probably help and I would consider buying one in perspective, if colour is your favourite field.
 

bvy

Member
Joined
Jul 22, 2009
Messages
3,286
Location
Pittsburgh
Format
Multi Format
With Paterson tanks, I need a water bath of 120F (that's not a type) to maintain developer temperature at 100F. Do a test run. Take the temperature of the developer (or water) before and after the development time.
 

pentaxuser

Member
Joined
May 9, 2005
Messages
19,606
Location
Daventry, No
Format
35mm
If scanning is all you want to do with the negative then I think that as has been said most of the cast can be corrected in Photoshop. Key to whether the neg is really printable is to have a lab do an RA4 print. I think that a reasonable print is possible which is what I think Bob Carnie was stating when he gave the kind of colour print Y and M filtration needed on an enlarger

I am no expert at reading colour negatives but when I saw it I could not see any major problem with it that wasn't correctable with Y and M filtration on a colour head.

We seem to heading down the road of concluding that a small deviation from 100F is the cause of it all and yet we know that some manage development at much less than 100F.

I just find it difficult to believe that a small temp deviation from 100F has ruined the negative. You must follow whatever posts you believe in of course but do the kind of check that bvy suggests to see how far off 100F you are

If it were me I'd try another film of the same scenes and then ask a lab to do a RA4 print from that as well as asking it to do a RA4 print from the "suspect" negative to see how much the filtration differs

How did the other negatives turn out?

pentaxuser
 

mtjade2007

Member
Joined
Jan 14, 2007
Messages
679
Format
Medium Format
By looking at the op's photo there is obviously processing error. The error must be huge to cause the image to be so wrong. I shot and processed quite some films recently. All films were expired films. With the processing correctly done I found that I almost never needed to do any color correction. My scanner scanned all of them happily.
 
Joined
Jun 12, 2015
Messages
24
Location
Louisiana
Format
Multi Format
I got this result with colorperfect plugin and color variations tool. Either the dress was too purple or the skin was too yellow.
HtDvHZN.jpg
I'm not precise with my temperature and my results have been pretty good (judge for yourself on my flickr). I fill a stockpot with steaming hot water and put my developer, stop bath, bleach, and fixer in it for a few minutes. When the developer reaches 103f I pour it in the film tank. I don't use any tempering bath to keep it at a constant temperature, just hold the tank in my hand. I calculated that the temp falls to 97 degrees by the end of the development, thus the average temp being 100 degrees. I recall reading in a Kodak manual that you can do it this way. I might be totally wrong about that but it's never caused me an issue that I can see. I also don't test the temperature of the bleach and fixer. I just go by how hot they feel, since the manual said they can be anywhere from 100 to 75 degrees. Maybe your chems have gone bad. I'm using Flexicolor stuff. I did get similar sallow skin tones one time when my negatives came out brown instead of orange. Never figured out what caused that, but it never happened again.

https://www.flickr.com/photos/dontgetmewrongbby/
 

MMXVI

Member
Joined
Aug 1, 2016
Messages
10
Location
USA
Format
Medium Format
Don't know if the OP is coming back. Just did this using global CC in PS manually. Still some crossover. Not sure the original dress color, though black dyes are usually made with blue, green, or red based dye.
 

Attachments

  • global adjustment.jpg
    global adjustment.jpg
    901 KB · Views: 230

fdonadio

Member
Joined
Jan 15, 2015
Messages
2,059
Location
Berlin, DE
Format
Multi Format
Here's an example negative (Portra 400), with some stock for colour correction purposes. Only processing has been white balance adjustment to make the film stock neutral.

(there was a url link here which no longer exists)

Inverting it yields,

(there was a url link here which no longer exists)

Let me see if I understand this correctly: the OP got a straight scan from a negative, corrected it for color balance "to make the film stock neutral" and, then, inverted the colors?

I don't think that should be the way to do it.

It would be easy to identify black and white points (which would, intuitively, be white and black on the negative, respectively). But to correct the midtones, it would be rather difficult to do, looking at a negative image. If there was a neutral gray object in the image, it would be much easier, but this is never the case.

I would just invert it right away and, only then, color correct. If there are casts after color balance, they would be in certain specific tones, which would indicate crossover — and scanning — problems.


Cheers,
Flavio
 

pentaxuser

Member
Joined
May 9, 2005
Messages
19,606
Location
Daventry, No
Format
35mm
Key question here for APUGers is: Does the straight scan of the negative look/is right? If it is then it doesn't have colour crossover which poor processing might produce and will produce a good RA4 print with the correct Y and M filtration.

If the problem is a scanning one then we are into the HYBRID area, aren't we?

It is the OP's problem, assuming it exists and isn't simply a scanning issue and we won't know enough unless the OP contributes again which he hasn't for nearly a month.

Problem solving usually involves extensive dialogue with the "victim" and that's been lacking unfortunately in the last few weeks

pentaxuser
 

Rudeofus

Member
Joined
Aug 13, 2009
Messages
5,047
Location
EU
Format
Medium Format
I have a large stash of c-41 negatives which have at least this much color crossover and related weirdness in my scans, and which print perfectly fine optically on RA-4 paper. My impression is that scanner software always tries to be extra smart and adjusts contrast at will, and that it is next to impossible to turn this auto-smartness off. If you just scan your C-41 negs, adjust brightness and contrast for each channel individually, and only if you can't print these negs optically I'd start looking for process errors.
 

sfaber17

Member
Joined
Jun 1, 2014
Messages
245
Location
Illinois
Format
35mm
Could someone expand on what the definition of crossover is? I take it that if you plot density vs exposure of a test strip for example, you would ideally get parallel lines with the blue at the higher density then green and then red. So if the lines are not parallel or perhaps actually cross, that is what crossover means? What are the classic signs of crossover?
 

mnemosyne

Member
Joined
Jan 19, 2011
Messages
759
Location
Europe
Format
Multi Format
Could someone expand on what the definition of crossover is? I take it that if you plot density vs exposure of a test strip for example, you would ideally get parallel lines with the blue at the higher density then green and then red. So if the lines are not parallel or perhaps actually cross, that is what crossover means? What are the classic signs of crossover?

The classic sign of crossover would be that you cannot achieve a uniform color balance from shadows over midtones to highlights. E.g. a magenta cast in the shadows paired with a green cast in the highlights when the midtones are filtered to neutral.
 

sfaber17

Member
Joined
Jun 1, 2014
Messages
245
Location
Illinois
Format
35mm
I guess that is equivalent to what I was saying. Is the magenta-green a "classic" problem, or just an example? In my limited experience even when the development is correct, it seems hard to avoid dark shadows being bluish, or night shots being dark blue. Not sure if that is normal.
 
Photrio.com contains affiliate links to products. We may receive a commission for purchases made through these links.
To read our full affiliate disclosure statement please click Here.

PHOTRIO PARTNERS EQUALLY FUNDING OUR COMMUNITY:


Ilford ADOX Freestyle Photographic Stearman Press Weldon Color Lab Blue Moon Camera & Machine
Top Bottom