hartacus
Member
Just before Christmas (haven't had much internet since) I fixed the light meter on a Nikon FG. I bought it cheap because the light meter was faint.
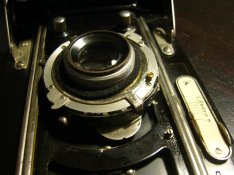
The FG meter uses LEDs and I could see that the amount of light from these was varying as I moved my eye around the finder, so I figured it wasn't bad LEDs and was probably an alignment issue. The adjustment for the LED alignment is done by two screws with flanges that sit under the LED connector next to the finder prism. Through trial and error, I found that I could make the LEDs brigter by screwing the adjustment screws in all the way, but the LEDs were still not fully clear. In this case the screw flanges were too thick and the LEDs couldn't be lowered far enough.
My hacked-together solution involved using a piece of card about half the thickness of the flange (I tried a piece of film but this was too thin) underneath the connector instead. The adjustment screws were then used on top of the connector to secure it. Alignment is just about perfect. The LEDs are only just bright enough to see in daylight but are fully clear and usable in anything less than full sun. When I got the camera, they could barely be seen indoors at night, so it's an improvement. And having put through a test roll I have to say that the meter is an annoyance on an otherwise underrated camera that is small, light, and capable.


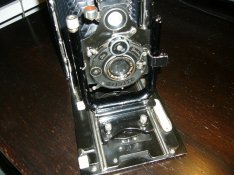
There's another hack you can do with this camera to make the shutter activate before the frame counter reaches 1 by soldering a piece of wire between the two contacts or where they meet on the PCB. I recently moved and my soldering kit is packed away. However, I remembered a method for overclocking first generation Intel Celeron computer processors by drawing a line with a lead pencil between two exposed components on the processor chip, because pencil lead is conductive and it bypassed whatever overclocking protections the chip had. I thought I'd try this here as the contacts are soldered to the PCB next to each other. I used a 3B pencil, applied fairly liberally, and despite appearances it actually works and allows the shutter to fire and meter to work as soon as the film door is closed (and should be easily removable with a rubber eraser if required).
.jpg")
The FG meter uses LEDs and I could see that the amount of light from these was varying as I moved my eye around the finder, so I figured it wasn't bad LEDs and was probably an alignment issue. The adjustment for the LED alignment is done by two screws with flanges that sit under the LED connector next to the finder prism. Through trial and error, I found that I could make the LEDs brigter by screwing the adjustment screws in all the way, but the LEDs were still not fully clear. In this case the screw flanges were too thick and the LEDs couldn't be lowered far enough.
My hacked-together solution involved using a piece of card about half the thickness of the flange (I tried a piece of film but this was too thin) underneath the connector instead. The adjustment screws were then used on top of the connector to secure it. Alignment is just about perfect. The LEDs are only just bright enough to see in daylight but are fully clear and usable in anything less than full sun. When I got the camera, they could barely be seen indoors at night, so it's an improvement. And having put through a test roll I have to say that the meter is an annoyance on an otherwise underrated camera that is small, light, and capable.
There's another hack you can do with this camera to make the shutter activate before the frame counter reaches 1 by soldering a piece of wire between the two contacts or where they meet on the PCB. I recently moved and my soldering kit is packed away. However, I remembered a method for overclocking first generation Intel Celeron computer processors by drawing a line with a lead pencil between two exposed components on the processor chip, because pencil lead is conductive and it bypassed whatever overclocking protections the chip had. I thought I'd try this here as the contacts are soldered to the PCB next to each other. I used a 3B pencil, applied fairly liberally, and despite appearances it actually works and allows the shutter to fire and meter to work as soon as the film door is closed (and should be easily removable with a rubber eraser if required).