What did you fix today? (part 2)

Dog Opposites

A
Dog Opposites

  • 0
  • 1
  • 56
Acrobatics in the Vondelpark

A
Acrobatics in the Vondelpark

  • 5
  • 3
  • 116
Finn Slough Fishing Net

A
Finn Slough Fishing Net

  • 1
  • 0
  • 83
Dried roses

A
Dried roses

  • 10
  • 7
  • 155
Hot Rod

A
Hot Rod

  • 4
  • 0
  • 101

Recent Classifieds

Forum statistics

Threads
197,462
Messages
2,759,404
Members
99,509
Latest member
Tiarchi
Recent bookmarks
0

awty

Subscriber
Joined
Jul 24, 2016
Messages
3,643
Location
Australia
Format
Multi Format
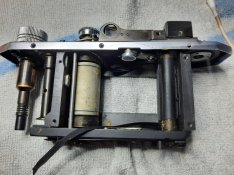
Tried the liquid rubber, had to do several coats and then some. Was looking promising, everything apart from the slow speeds looked ok, but this morning wasn't so good. Shutter kept sticking, worth a try. Think it would bo fine if it were just a small hole, but the whole curtain was a bit ambitious.
Guess I got to bite the bullet and do major surgery and replace them.
Think I will try the method of not removing the ribbons if they are still ok.
20201012_140506.jpg
 

Pentode

Member
Joined
Feb 14, 2017
Messages
959
Location
Brooklyn, NY
Format
Multi Format
Minolta SR-1 minor surgery today:

I had a fully operational SR-1 with a prism that was desilvering where the foam light seals were breaking down.

I had another, non-operational, SR-1 with a good prism so I swapped prisms.

They are both early versions of this model and both from 1961 but they are not identical under the hood. Luckily, the prisms were still interchangeable so I won.

I put this repair off for a really long time thinking I was sure to botch it somehow and end up with two broken cameras. I’m glad that it turned out to be a pretty easy procedure.
 

Saganich

Subscriber
Joined
Nov 21, 2004
Messages
1,232
Location
Brooklyn
Format
35mm RF
...break and then fix...I decided to take apart an old FOOLY 50mm enlarging lens made for Valoy and Focomat IIB's to clean up the elements. Well, in the process I mistakenly removed the basket holding the aperture blades and guess what happened...tiny little blades all over the place. I thought there is no f@#$in way that's going back together, but after the tears subsided I found a nice post by a person who did the same with a Summicon and explained how he managed to get it back together. Took me about 10 attempts over several days making little wedging thingies and nudgers out of paperclips and toothpicks to get them all back in place...phew.
 

Donald Qualls

Subscriber
Joined
Jan 19, 2005
Messages
12,068
Location
North Carolina
Format
Multi Format
...break and then fix...I decided to take apart an old FOOLY 50mm enlarging lens made for Valoy and Focomat IIB's to clean up the elements. Well, in the process I mistakenly removed the basket holding the aperture blades and guess what happened...tiny little blades all over the place. I thought there is no f@#$in way that's going back together, but after the tears subsided I found a nice post by a person who did the same with a Summicon and explained how he managed to get it back together. Took me about 10 attempts over several days making little wedging thingies and nudgers out of paperclips and toothpicks to get them all back in place...phew.

Nice save. Shutter blades are easier, because there are generally fewer of them.
 

awty

Subscriber
Joined
Jul 24, 2016
Messages
3,643
Location
Australia
Format
Multi Format
Apart from my job of fixing things at work, when I got home I fixed my wifes pedestal led light lamp. Had to fix my CD player, because it didnt like me skipping back and it slipped a cogg. Wish I could fix the neighbour to stop complaining about the boundary fence.
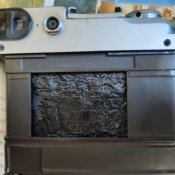
Now Im looking at the dreaded shutter curtains on my old canon iiD1 that I've been avoiding. Need to practice on this before tackling the Leica.

Can anyone tell what type of glue I should use glueing the curtains on the drums? The two I tried weren't any good. So need to clean off an try another.

20201013_175510.jpg
 

Lucid

Member
Joined
Jun 18, 2018
Messages
102
Location
England
Format
Multi Format
I recently picked up an old Marrutt drying cabinet. While the unit is fully functional, it was apparent that the filter was original....

So after much vacuuming and cleaning the unit is back to its old self. I replaced the original fiberglass filter with a modern G4 pleated filter. While having my head in the bottom of the cabinet, I noticed that the unit has two cavities which bypass the filter. I suspect this was an intentional design by Marrutt to help prevent the fan unit burning out from a clogged filter. This evening I made some airflow tests, and while the strongest airflow is through the filter, there is still the potential for non filtered air to make its way in to the unit. I think the next time I open it up I'll fully seal those sections with foil tape.

The exterior now has a light coat of Renaissance Wax. I don't ever see myself setting the temperature high enough for the wax coat to melt. Hopefully, this wax coating will preserve the existing patina and prevent further surface rust.

Still on the to-do list are to make some new hanger bars out of 316 steel, and to remove the rust from the bottom plate and seal the metal from further attack. The years of high heat and humidity have corroded the air intake grate, so that may be replaced down the line too. There is a bit of glue left from where various notices were taped to the unit. After some testing, I was able to remove the glue, but the gloss finish on the paint was removed, too. Due to this, I've paused on removing the rest of the glue residue, until I decide how to proceed.

While tinkering with the "thermostat", I discovered that it doesn't have much bearing on reality. It's essentially a resistor/timer working on intervals for triggering the heating element. I suspect it controls a variable resistor to the heating element. The higher the temperature setting the less resistance to the element. I'm getting into PID controllers at the moment, so when I finally become compelled to replace the current thermostat, that'll be the way I go.
 

hartacus

Member
Joined
Nov 15, 2016
Messages
115
Location
Sydney, Australia
Format
35mm
Today I reattached two small patches of leatherette behind the winder of a Zenza Bronica ETRSi. They had been curling badly, often jabbing into my hand when using the grip. I gently removed them, removed the adhesive with acetone (not particularly easy), and put them under some heavy books for a few weeks.They weren't completely flat after that, but they were enough improved to be held flat by double sided tape. At least initially. Time will tell.
 

PFGS

Member
Joined
Jul 22, 2020
Messages
282
Location
NC USA
Format
Digital
Apart from my job of fixing things at work, when I got home I fixed my wifes pedestal led light lamp. Had to fix my CD player, because it didnt like me skipping back and it slipped a cogg. Wish I could fix the neighbour to stop complaining about the boundary fence.
Now Im looking at the dreaded shutter curtains on my old canon iiD1 that I've been avoiding. Need to practice on this before tackling the Leica.

Can anyone tell what type of glue I should use glueing the curtains on the drums? The two I tried weren't any good. So need to clean off an try another.

View attachment 256919

I just started working on my own cameras this summer, and have done a shutter curtain ribbon reattachment to the drum exactly once, on my Leica IIIc, so I can't claim much experience or expertise - it was my very first repair. But, the job was successful and has survived a couple hundred exposures so far.

I used Pliobond (https://www.amazon.com/gp/product/B00176HL9Y) which seems to be the most frequently recommended. I applied it with a toothpick and it was pretty easy to work with, just watch out for "strings" like cheese on a pizza. Took me a couple of tries but I was able to remove the residue of failed attempts pretty easily with nail polish remover and q-tips.
 

PFGS

Member
Joined
Jul 22, 2020
Messages
282
Location
NC USA
Format
Digital
Today I reassembled a Yashica D. It was the very first medium format camera I ever bought and I really enjoyed it, but eventually (possibly foolishly) set it aside for a succession of others. The slow speeds were always a little dodgy, and when I dusted it off earlier this summer, the shutter was hanging on every speed. Since I now have two additional Yashica TLRs, I decided to see what I could do and since then it has been an on and off process of research, trial and error, buying tools, etc. But now the shutter is happy on all speeds, self-timer works, flash sync is still a pile of tiny parts in a baggy and I don't care, and test roll is waiting for development tonight - fingers crossed!
 

Kino

Subscriber
Joined
Jan 20, 2006
Messages
7,599
Location
Orange, Virginia
Format
Multi Format
Chris Sherlock has a series of videos on YouTube on repairing Retinas and other leaf blade shutter cameras, in which he uses a set of nested sockets as a tool to replace both aperture and shutter blades in their respective retainers.


Go to 18:00 to see the tool and how and he is reassembling a Rollecord shutter after cleaning it.
 

PFGS

Member
Joined
Jul 22, 2020
Messages
282
Location
NC USA
Format
Digital
Chris Sherlock has a series of videos on YouTube on repairing Retinas and other leaf blade shutter cameras, in which he uses a set of nested sockets as a tool to replace both aperture and shutter blades in their respective retainers.


Go to 18:00 to see the tool and how and he is reassembling a Rollecord shutter after cleaning it.

I improvised something like this with a zippo lighter and a stack of nickels, but this is 1000 times better - thanks for posting!
 

Tel

Subscriber
Joined
May 9, 2011
Messages
932
Location
New Jersey
Format
Multi Format
Sherlock's Compur-Rapid video convinced me to try a teardown, cleaning and reassembly of a Seikosha-S shutter. His method worked perfectly. Some of these guys posting on youtube actually know what they're doing!
 

Kino

Subscriber
Joined
Jan 20, 2006
Messages
7,599
Location
Orange, Virginia
Format
Multi Format
Sherlock's Compur-Rapid video convinced me to try a teardown, cleaning and reassembly of a Seikosha-S shutter. His method worked perfectly. Some of these guys posting on youtube actually know what they're doing!
Nobody beats Chris for rebuilding these type shutters. He can do it in his sleep.

I am thankful he is willing to share his expertise unselfishly. I have a sneaky feeling that rather than diminish is backlog of repairs, he's probably increased it! Many will watch and go, "no way"!
 

Tel

Subscriber
Joined
May 9, 2011
Messages
932
Location
New Jersey
Format
Multi Format
Just now did the final reassembly of a Nikkormat FT2 I bought ("inoperative") on the 'bay. Involved a complete stripdown, except for the shutter. I learned a lot about the Copal S and more about how the Nikon techs thought. In some ways it seems more complicated than my F2s. Still don't have the frame counter working, but there's always tomorrow.
 

eli griggs

Member
Joined
Nov 15, 2005
Messages
3,799
Location
NC
Format
Multi Format
Sorry to be slightly OOT, anybody knows where could I get small screw for Nikon top and bottom cover?

For the price some people will charge for couple of screws, you can probably find a junker for parts for nearly as cheap, and have spares for the next time something falls out.

Currently, for example, I am looking for a trashed Hasselblad 500 cm and V series lenses that have been dropped out a window, or destroyed beyond repair, just so I have them on hand for my own Kit.

I did go the buy a spare route earlier this week, bought a 150mm C or CM, no lens name plate, to use as parts, out of Japan, which arrived in three days only, the lens is so much nicer than expected, I'll see if I can restore it to full function; the glass is very clean!

iMO.
 

Pentode

Member
Joined
Feb 14, 2017
Messages
959
Location
Brooklyn, NY
Format
Multi Format
Not even remotely camera-related but I restored two antique fountain pens today.

Then I came to my senses and opened up a badly damaged Nikon TN finder to get the lay of the land in there. This one is trashed; other people have been inside, parts missing.... a real mess but I have a clean one with a non-functioning meter and I figured I could crack this one open first before I ruin a decent one. It was educational enough to have been worth it. There's a lot of information on the web about the FTn but very little on the TN.
 

eli griggs

Member
Joined
Nov 15, 2005
Messages
3,799
Location
NC
Format
Multi Format
What were the two pens, Waterman, Coklin, Esterbrook, ?

I have a Nikon Photomic off the Nikon F I bought here recently, waiting to be torn down. one of the issues is that the meter will no firmly lock down on the camera, with only one 'catch' taking hold and releasing with the controls.

This will be my first venture into that type meter, do you have any advice on approaching it?

Good Luck
Eli
 

Pentode

Member
Joined
Feb 14, 2017
Messages
959
Location
Brooklyn, NY
Format
Multi Format
What were the two pens, Waterman, Coklin, Esterbrook, ?
One was an Esterbrook Deluxe, circa late forties/early fifties and the other was an Aurora 88P, circa late fifties/early sixties.

will be my first venture into that type meter, do you have any advice on approaching it?
Start with the leatherette on the top. Beneath that are four screws that will allow you to lift the stamped steel cover off. The rest of the access screws are on the bottom but start with those four. I believe that's true of all the F Photomic meter prisms, but I don't know which version you have.
 

Mr Flibble

Member
Joined
Mar 12, 2014
Messages
363
Location
The Lowlands
Format
35mm RF
Not today, but earlier this month I cleaned the haze out of a CZJ 32.5mm f/2.8 Tessar from 1938 in M26 (RoBoT) mount.

32mmTessar.jpg


And tested it on a Leica I (model E from 1938) with an adapter ring.
LeicaIRobot.jpg


Results look alright.
LR201007.jpg
 

Mr Flibble

Member
Joined
Mar 12, 2014
Messages
363
Location
The Lowlands
Format
35mm RF
Thanks, this lens is mainly designed to go on the half-frame RoBoT II camera of the period, of course. But it also covers a full frame, albeit with a noticable drop off in resolving power the corners on some apertures.
The aperture opening changes from round to triangular as you stop down.
 

Mr Flibble

Member
Joined
Mar 12, 2014
Messages
363
Location
The Lowlands
Format
35mm RF
Took this Olympus PEN-F apart, there was a lot of gunk in the viewfinder, mainly between the main prism and the ground glass.

About 10 minutes in the tear-down
PENF01.jpg


Viewfinder is a lot clearer now. Though the prism had a chip and the mirror has some scratches. So this thing must've had a full life before. And now it's ready to be properly used again.

PENF02.jpg
 

moggi1964

Subscriber
Joined
Oct 18, 2020
Messages
266
Location
Rossendale, UK
Format
Hybrid
Took the lid off a Welta Belmira as the spool wasn't rotating when I wound on so the film was gathering loosely. Decided to cut my losses on the film that was in, rewound it and I'll see what comes from it when it is processed.

Once the lid was off I could see how the mechanism worked. Whilst the spring around the wheel that turns the spool mechanism appeared to be working it wasn't exerting sufficient pressure to make it turn when I wound on. In the end all that was needed was to tighten a single screw.

Works a treat now.
 
Photrio.com contains affiliate links to products. We may receive a commission for purchases made through these links.
To read our full affiliate disclosure statement please click Here.

PHOTRIO PARTNERS EQUALLY FUNDING OUR COMMUNITY:


Ilford ADOX Freestyle Photographic Stearman Press Weldon Color Lab Blue Moon Camera & Machine
Top Bottom