What did you fix today? (part 2)

Playing

Playing

  • 0
  • 0
  • 20
On The Mound

A
On The Mound

  • 6
  • 4
  • 143
Finn Slough-Bouquet

A
Finn Slough-Bouquet

  • 0
  • 1
  • 91
Table Rock and the Chimneys

A
Table Rock and the Chimneys

  • 4
  • 0
  • 139
Jizo

D
Jizo

  • 4
  • 1
  • 123

Forum statistics

Threads
197,419
Messages
2,758,688
Members
99,492
Latest member
f8andbethere
Recent bookmarks
1

bernard_L

Member
Joined
Feb 17, 2008
Messages
1,954
Format
Multi Format
Just remove the anchor and hold a demagnetizer (electromagnetic coil, feeded with AC) on it.
Maybe that is enough to solve the problem.
This goes against the original design.
I guess whether the problem is a weak coil or over-magnetised metal, there is a possibility that it could get worse and my fix may stop working. I'm happy to have an apparently perfect camera again for the time being.
This !! 👆
 

Donald Qualls

Subscriber
Joined
Jan 19, 2005
Messages
12,049
Location
North Carolina
Format
Multi Format
Why, for heavens sake?

As I read the posts above, the anchor is supposed to be weakly magnetized, but it won't be after subjecting it to a demagnetizer.
 

bernard_L

Member
Joined
Feb 17, 2008
Messages
1,954
Format
Multi Format
Fixed an old Compur shutter with a 10.5cm Heliar. As handed over by a friend, the shutter would hang and not complete the cycle. Repeated cleaning in naphta ("Essence F" in French).
Then adjustment of speeds. Especially painful as this early Compur model has a simpler construction that actually makes adjustment more delicate. The speed ring does not contact the pallet lever with a cam, and the same speed ring has a single slope/valley profile for the retard lever. There is indeed the possibility to adjust one end of the retard mechanism for faster speeds, and the other end for slower speeds, but it's all within a hair width.

Example below: 1/50 measured at 25ms (20ms ideally). About 1/3 stop extra; Won't hurt anybody except maybe sissies.

IMG_2856.JPG


IMG_2802.JPG


IMG_2825.JPG


50.png
 

Dustin McAmera

Subscriber
Joined
Feb 15, 2023
Messages
605
Location
UK
Format
Multi Format
I'm happy to have an apparently perfect camera again for the time being.

Shouldn't have said that! I must be getting old and silly. I loaded a film to try my camera out without doing basic stuff like looking at the shutter. With my tape fix in place, the two shutter blinds are releasing together, so not exposing the film. Thankfully I only loaded a shortish length. So maybe I need to get, or make, a de-gaussing wand after all. I'll investigate the fault a bit more before dismantling anything; I'm really reluctant to do this. 😾

[Update; I found out the price of a demagnetiser: would prefer to avoid that. I also looked at how the anchor (if we're calling it that) is fastened on. I think I could get that out without breaking it all; maybe even get it back in. I can't convince myself the anchor is magnetised, or that it definitely isn't. In the meantime I removed my scrap of tape from the electromagnet, and the camera now works. With periods of idleness up to an hour, I can't make the shutter delay come back. I'll try it again in the morning. Sorry - this is now off topic really,for a thread of short reports after the fix. ]
 
Last edited:

Michel Hardy-Vallée

Membership Council
Subscriber
Joined
Apr 2, 2005
Messages
4,790
Location
Montréal, QC
Format
Multi Format
OK, this was a while ago, but still I fixed it, and I'm proud because it worked.

I have a 135mm lens for the Rapid-Omega 6x7 RF system that would never give proper focus, except at infinity when fully racked back.

Eventually I thought to myself that this system descended from a military camera, hence it should have been designed with linkages that are simple enough for someone to fix in the field with limited tools.

I found out the cause was that one of the pins linking the lens to the focusing mechanism in the body was slightly bent. So I put together a makeshift anvil using a cheap planing iron I wasn't using much, and lightly hammered it back into straightness, rolling the pin to hammer it from different directions so that it would straighten, and not just flatten.

This did the trick and now the focus is precise enough to use the lens at full aperture for some bokeh portraits.
 

Mark Crabtree

Member
Joined
Apr 21, 2009
Messages
782
Format
Large Format
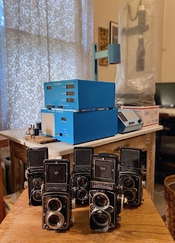
I've been working at learning Leica screw mount and Rollei tlr. I got a Rolleicord Va in from a friend yesterday that I really thought was going to be a parts camera. Double exposure prevention didn't work; frame counter didn't work, and the shutter would only trip with the self timer, plus a host of the usual issues. It turns out that all the major problems were due to a missed coupling when the lens board was installed.

Here are the Rolleis I've been working on so far. The Va is in the front with the leather still off; I'll shoot a test roll today, then go back and do a better job on the shutter. The early Automat in the rear still has a wind issue I haven't been able to figure out, so I'll probably ask about it here soon.
Fixed Rolleis.jpg
 

Mark Crabtree

Member
Joined
Apr 21, 2009
Messages
782
Format
Large Format
Congratulations!
Interesting pieces of equipment in the background. Would you care to put names on them?

That is all equipment from a friend who had a repair business at one time. It has been more help than I could have imagined. All of it had been sitting for a long time and has some quirky issues. ZTS shutter tester I use for focal plane shutters since it has a 3 sensor probe. A very old Camline shutter tester I discussed here recently. I believe it had been unreliable for a long time, but I got it working fairly reliably with its larger sensor that is designed for leaf shutters.

Then an autocollimator that is shockingly handly for checking focus on the Rollei and for the Leica. I just put the Rolleicord Va back on it to touch up focus and was surprised to find how far off it is. A much easier fix now than back and forth outside with ground glass. I still like to do a final check with gg for the Rollei though.
 

88E30M50

Subscriber
Joined
Nov 24, 2023
Messages
174
Location
Indiana
Format
Multi Format
Today, I adjusted the infinity focus on a Pentax 50mm f1.4 SMC lens. I had disassembled this lens last week to fix a loose f-stop number ring and sticky focus helicoil. Now that it's calibrated, it goes back on the KX that it was bought for.

Other projects over the last couple of days has been the refurb of another Agfa Jsolette V 120 folding camera. Those can be fun, easy projects, and typically cost about $13 on eBay.
 

88E30M50

Subscriber
Joined
Nov 24, 2023
Messages
174
Location
Indiana
Format
Multi Format
Today, I adjusted the infinity focus on a Pentax 50mm f1.4 SMC and then replaced the light seals on a nice MX. The MX will be film tested tomorrow and if all goes well, it will be shipped to one of my son's in exchange for his MX, which sounds like it needs a CLA. Once I'm done with his MX, we'll swap them back again and this may become my EDC.
 

Ian Grant

Subscriber
Joined
Aug 2, 2004
Messages
23,246
Location
West Midland
Format
Multi Format
I dug out my old first enlarger last week, a Gnome "Universum" last week, I noticed woodworm holes in the base board. Back in 1968 a local radio & TV parts depot (every town had them for valves etc, to supply the local radio & TV repair shops) had a small photo section, mostly materials and a few second hand items, they were not a camera shop. That summer I cycled there regularly hoping to find a second hand enlarger, they took my parent's telephone number.

Then one day I had a phone call, I have an enlarger for you, pop down. When I got there I was told they'd had a massive tidy up and found an enlarger, new but the case was damaged, and it had been there quite a few years. I asked how much, the deal was free as long as I bought an enlarger lens from them. Of course, it was no-brainer.

That was 56 years ago, I used the enlarger for 7 years, making prints up to 20"x16". After treating the woodworm yesterday, I realised I could easily repair the case, the enlarger breaks down into a wooden box. The problem was caused by the poor quality ply-wood used back in 1948 when the enlarger was introduced. But that was a time of severe austerity here in the UK, almost all imports were banned without a special licence, rationing was more severe than during WWII, as we were feeding some of the Dutch & Germans as well while they recovered agriculturally.

Aside from the wooden case, it's a well made & designed compact enlarger, typical German engineering, although made in Wales :D The founder of Gnome, Heinrich Loebstein, had a similar business in Stuttgart, but had fled the Nazi's.

The enlarger uses a 12v car head-light bulb and a 240:12V transformer, the ground glass diffuser got broken many years ago, I need to determine the diameter and get some glass cut, for a new one.

So for the first time in 56 years, the case works & actually locks in place. All the original woodwork had a grey flock finish, inside and outside the case, the base-board being an integral part of the case. Can O be bothered . . . . . . .

Ian
 

Mr Flibble

Member
Joined
Mar 12, 2014
Messages
363
Location
The Lowlands
Format
35mm RF
Cleaned, repainted, lubed and reassembled one of my Junghans Timers.

JHrep001.jpg


JHrep012.jpg


JHrep013.jpg


Still have another one I could refurbish, but the axel of the winding key has broken off...that'll be an interesting repair.
 

Woutervg97

Member
Joined
Jul 30, 2024
Messages
13
Location
Netherlands
Format
35mm
Well I repaired the spring of my frame counter in my Chinon 35EE, but I might have messed it up myself to begin with.

But.. I did manage to repair the exposure signal on my Agfa Optima 1A. It wouldn't go green at all. Was afraid it was the selenium cell giving up, but after taking it apart, cleaning some mechanics and tightening some screws, it now works! It takes a bit to get used to the light, but the signal now goes green at last.

Sadly, some of the old plastic protecting the front part was so brittle that it broke. Wondering wheter to find a fix or leave it like this.
 

Mr Flibble

Member
Joined
Mar 12, 2014
Messages
363
Location
The Lowlands
Format
35mm RF
HaulDB2408.jpg


Picked up a 1937 CZJ 35mm f/2.8 Biogon yesterday. It had a little haze between the elements in the front group. Possibly condensation build-up.
Took all of 5 minutes to dissasemble, clean and reassemble.

The small B&H crank in the picture needed straightening out a bit as well
 

Mr Flibble

Member
Joined
Mar 12, 2014
Messages
363
Location
The Lowlands
Format
35mm RF
Good work!
But this

I doubt.
Are you a speed master?

Okay, it might have been 10 minutes. I took my time cleaning the inside surface of the front element.
It was likely some mineral deposits from dried up condensation or vapour that got in between the front two elements somehow.
Access to the effected element is quite easy (with the right lens tools), as the front lens group unscrews as a single unit. and that unscrews into its two lens elements.

This wasn't the first Biogon (or Jupiter-12) I've taken apart.
 

Helios 1984

Member
Joined
Aug 4, 2015
Messages
1,844
Location
Saint-Constant, Québec
Format
35mm
I've fixed/tinkered a few things in the past few weeks, but here are my 2 favorites. The first is a utility dolly that I turned into a wheels kit for my pop's generator (Here's a pic). I also fixed the generator, while I was at it. The second is a Panasonic VCR model DMR-EZ48V sold as-is because of a defective HDMI port with a crooked pin. I was able to unbend the pin, to an acceptable shape, and re-solder its leg to the PCB. Certainly, the tiniest solder I've ever done.

Capture.JPG


d5TxKJM[1].jpeg
 

Attachments

  • ssOGzs7[1].jpeg
    ssOGzs7[1].jpeg
    30.1 KB · Views: 18

mshchem

Subscriber
Joined
Nov 26, 2007
Messages
14,218
Location
Iowa City, Iowa USA
Format
Medium Format
I've fixed/tinkered a few things in the past few weeks, but here are my 2 favorites. The first is a utility dolly that I turned into a wheels kit for my pop's generator (Here's a pic). I also fixed the generator, while I was at it. The second is a Panasonic VCR model DMR-EZ48V sold as-is because of a defective HDMI port with a crooked pin. I was able to unbend the pin, to an acceptable shape, and re-solder its leg to the PCB. Certainly, the tiniest solder I've ever done.

View attachment 376943

View attachment 376941

Well done!
 

forest bagger

Subscriber
Joined
Nov 9, 2023
Messages
244
Location
Germany
Format
DSLR
A few months ago I was given a Nikon 35-135/3.5-4.5 AI-S Nikkor, whose macro focusing no longer worked at 135 mm.

DSC_1106.jpg


In addition, the zoom adjustment was quite stiff, so I put it on the shelf for now.

Yesterday I wanted to give it to someone who had shown interest in it for €10 including shipping.
I took the lens off the shelf and then noticed that the zoom was even tighter than before and there were tiny, transparent arachnids crawling around inside!

I immediately turned down the interested party and today I disassembled the lens down to the very last screw.


DSC_1107.jpg


I was able to remove the vermin, but discovered that the previous owner had already dismantled it and damaged it beyond repair. There was also a slight cloudiness between the lenses in the middle set of lenses.
So it was a huge effort for nothing, and I've now thrown the individual parts in the junk box.

😠
 

Andreas Thaler

Subscriber
Joined
Nov 19, 2017
Messages
4,297
Location
Vienna/Austria
Format
35mm
A few months ago I was given a Nikon 35-135/3.5-4.5 AI-S Nikkor, whose macro focusing no longer worked at 135 mm.

View attachment 377080


In addition, the zoom adjustment was quite stiff, so I put it on the shelf for now.

Yesterday I wanted to give it to someone who had shown interest in it for €10 including shipping.
I took the lens off the shelf and then noticed that the zoom was even tighter than before and there were tiny, transparent arachnids crawling around inside!

I immediately turned down the interested party and today I disassembled the lens down to the very last screw.


View attachment 377081


I was able to remove the vermin, but discovered that the previous owner had already dismantled it and damaged it beyond repair. There was also a slight cloudiness between the lenses in the middle set of lenses.
So it was a huge effort for nothing, and I've now thrown the individual parts in the junk box.

😠

Nikkor MF zooms are one of the biggest challenges on the workbench.
 
Photrio.com contains affiliate links to products. We may receive a commission for purchases made through these links.
To read our full affiliate disclosure statement please click Here.

PHOTRIO PARTNERS EQUALLY FUNDING OUR COMMUNITY:


Ilford ADOX Freestyle Photographic Stearman Press Weldon Color Lab Blue Moon Camera & Machine
Top Bottom