Today I fixed a broken meter selection switch on a Nikon F100. This was hard mainly because there are no online guides for it, not even any photos of one opened up. I actually put screws through the switch to replace the thin plastic that had worn out. I will post photos later.
- Home
- Forums
- Analog Workflow Forums (100% Analog/Traditional)
- Analog Equipment
- Camera Building, Repairs & Modification
You are using an out of date browser. It may not display this or other websites correctly.
You should upgrade or use an alternative browser.
You should upgrade or use an alternative browser.
What did you fix today? (part 2)
-
A
- Thread starter Sean
- Start date
Recent Classifieds
-
For Sale Classic Hasselblad 500 C/M 6x6 all manual Medium Format film camera system
- Started by pdccamerqs
-
For Sale Horseman SW612 w/Rodenstock 45mm f4.5 Apo Grandagon, Ground Glass
- Started by djdister
-
For Sale Canon 28mm f/3.5 LTM plus finder in case
- Started by Steve Goldstein
-
Want to Buy Durst Printo / or any Table Top Processor
- Started by juniejun
-
Want to Buy LF/WTB: Ilex No. 5 Shutter
- Started by Jurgen Estanislao
Forum statistics
Ian Grant
Subscriber
Fixed an Alphax 3 shutter so I now finally have a shutters for my 7x5 Turner Reich. Along the path I acquired 2 other Alphax 3's with cells, a 6¾" Velostigmat and a 159mm WA.
Ian
Ian
Meyer Trioplan
Member
Disassembled the shutter and lens of a broken Welta Perle I received. Was able to re-set the leaves in the shutter, but they are still not moving just as they should. May try some light oiling.
Also removed the top viewfinder housing of a Franka Solida to clean the inside glass surfaces on the viewfinder, and reassembled. The result is a night and day difference without having 65 years of dust and dirt clouding the view through the finder!
Also removed the top viewfinder housing of a Franka Solida to clean the inside glass surfaces on the viewfinder, and reassembled. The result is a night and day difference without having 65 years of dust and dirt clouding the view through the finder!
anfenglin
Member
I adjusted the viewer and taking lens of my Rolleicord III. I have a Rick Oleson screen in it and it's wonderful.
Jeff Bradford
Member
Today I unstuck the shutter on my Yashica Electro 35. Removing the front element was easy enough. A few drops of Ronsonol got the shutter moving again. The hard part was figuring out why shutter speed wasn't being controlled by the meter. It was in Bulb mode. Duh...
OptiKen
Member
Fixing - not fixed.
Actually, barely started.
i have a gorgeous Minolta Autocord whose film transport mechanism has decided to use it's imagination and creativity while advancing the film.
Sometimes advancing half a frame....sometimes two or three frames....sometimes not at all.
I've yet to figure out how to remove the side cover to get to the gearing mechanism inside.
Fixcinater
Member
Cleaned out a Pentax 67 300mm f/4.0's aperture mechanism on my lunch break home from work.
Replaced and cleaned out a Canon LTM/RF 50mm f/1.4's aperture mechanism tonight after work. Got it with the aperture ring not responding and the blades all messed up. Now it's nice and smooth all the way through.
It was a productive Friday, now I can run some film behind these over the weekend and see if I want to keep them or not.
Truzi
Member
- Joined
- Mar 18, 2012
- Messages
- 2,624
- Format
- Multi Format
With a spring from Home Depot and a bit of vacuum hose from a '70 Buick Skylark, I fixed the take-up spindle drive on my father's old Crestline S 800 super-8 projector. I may revisit it, as I need an hose with a slightly smaller outer diameter - maybe one from a later model car 
Oddly, my Grandfather's regular-8 Brownie One Six does not need any repair. Next on the list is my Grandfather's Penncrest 777 slide projector, though that will be a bit more difficult for me.

Oddly, my Grandfather's regular-8 Brownie One Six does not need any repair. Next on the list is my Grandfather's Penncrest 777 slide projector, though that will be a bit more difficult for me.
EdColorado
Member
A really nice little Voigtlander Vito B. Cool little camera and easy to work on. The shutter was stuck solid so I disassembled the lens and cleaned the shutter in naptha. Put it all back together and got it (hopefully) collimated. Films loaded and with luck tomorrow I'll have a chance to put the little beauty through its paces. 
Also did some work on a beater Mamiya C3. This has been an on going project. I don't know the cameras history but I'm guessing it shot a few thousand weddings in its day. Its beat and bashed and had rattles where rattles shouldn't be. I opened it up and put screws back where they belonged, cleaned and lubed the winding side, and dropped the ground glass... ah well, I hope Rick Oleson has replacements. I had to use a hammer to pound the left side cover back in to shape. It was so badly caved in the lens lock wouldn't move. I hate throwing cameras out and this thing called to me. As it sits everything is working and seems to be running smoothly. The covering on both sides was trashed so I think I might just leave this one in plain metal. Once I order a new focusing screen (I hope Rick has em) and get everything adjusted I have an old hippie strap waiting for a camera to hold up. Should be a good companion for my cherry clean C330f!

Also did some work on a beater Mamiya C3. This has been an on going project. I don't know the cameras history but I'm guessing it shot a few thousand weddings in its day. Its beat and bashed and had rattles where rattles shouldn't be. I opened it up and put screws back where they belonged, cleaned and lubed the winding side, and dropped the ground glass... ah well, I hope Rick Oleson has replacements. I had to use a hammer to pound the left side cover back in to shape. It was so badly caved in the lens lock wouldn't move. I hate throwing cameras out and this thing called to me. As it sits everything is working and seems to be running smoothly. The covering on both sides was trashed so I think I might just leave this one in plain metal. Once I order a new focusing screen (I hope Rick has em) and get everything adjusted I have an old hippie strap waiting for a camera to hold up. Should be a good companion for my cherry clean C330f!

EdColorado
Member
Fixing - not fixed.
Actually, barely started.
i have a gorgeous Minolta Autocord whose film transport mechanism has decided to use it's imagination and creativity while advancing the film.
Sometimes advancing half a frame....sometimes two or three frames....sometimes not at all.
I've yet to figure out how to remove the side cover to get to the gearing mechanism inside.
I have an Autocord parts body here. If it would help I can peel the covering off the wind side and see whats what. No loss, this thing is well beyond repair.
If you get to the point of needing parts, let me know. If I have what you need its yours.
4season
Member
- Joined
- Jul 13, 2015
- Messages
- 1,915
- Format
- Plastic Cameras
Since late last year.
Lomo LC-A purchased as working but it wasn't: Cleaned out battery chamber, re-foamed, cleaned internal switch contacts which were pretty gross. Probably will unload it as the vignetting at some apertures is too extreme for my taste. It does have an aperture lever, but that's really for use with flash and only works at a fixed 1/60th sec shutter speed.
Noblex 6/150E2 panoramic camera purchased as-is with dead electronics: Cleaned out battery chamber, replaced power MOSFET and driver IC, fabricated new brass bushing for shutter speed switch (seems to be a weak spot of the design and the bushing greatly reinforces it). Very solidly made camera and happily none of the semiconductors are proprietary, though I did have to do some parts substitutions. No foam! Heck of a performer but I'll probably unload this one too as I think my minimal panorama needs could be amply handled by something cheaper, smaller and lighter.
Olympus 35RC purchased as-is: Gross, it included a leaky old mercury battery! Cleaned battery chamber and fortunately there wasn't much corrosion. Cleaned and re-foamed. Might wind up flipping this one too as I've already owned so many FF rangefinder cameras.
Canon Demi EE17 purchased as-is from KEH: Not bad! The battery chamber looked alright, but once I got inside I discovered that the - wire had corroded and the solder itself looked strangely crumbly. Cleaned it up, replaced the wire but am I imagining things or is that battery contact made of stainless steel?? Rather than purchase special solder, I just fabricated a clip-on terminal out of brass sheet, though in retrospect I might've also tried one of those wire-glue types of products. The old leatherette sustained minor damage during removal as someone had really cemented it good! Tempted to replace with Aki-Akashi leatherette--surprisingly they offer it pre-cut for this model. Only seems to be one tiny bit of foam in this model, right around the finder eyepiece (hooray).
Olympus Pen S: Removing the top cover was an adventure! Could not find a how-to online for this specific model, so I followed someone's guide to one of the EE-series Pens which looked very similar in that regard. Removed the indicated fasteners but that cover was still holding fast. Dismissed the notion that there could be a hidden screw under the cold shoe, but in the end discovered that's exactly what it was: Spring clip actually pops out easily once you realize that it's supposed to, and right below it was the last screw. Finder was foggy with I-don't-know-what but it cleaned up OK. Cleaned, re-foamed and re-lubed, as some of the old lubricants seemed awfully dry. Applied a tiny bit of Molykote on a couple of metal-to-metal contact areas. Sweet camera: Love the size, controls are smooth, and it's got the quietest mechanical shutter that I've ever encountered.
jeffreythree
Member
I fixed a couple of issues the last week or so on old cameras. I think I finally cured my Ciro-Flex of it's habit of scratching the film. 2 rolls developed without scratches so far. I don't know what did it in the end, but I repeatedly polished and lubed the rollers plus cleaning up any areas that might touch the emulsion. It was annoying because I really like that camera, and the repeated attempts at repair were ticking me off. Repair number 2 reinforced the old mantra "if it ain't broke, don't touch it". I decided to CLA an old Universal Meteor and ended up with an extra, loose rubber o-ring part falling out during disassembly that gave no clues as to where it goes. I think child labor was used to put those things together because there are some tricky little bits to reassemble in tiny blind holes. Camera still works so I guess no harm, no foul. I couldn't even get at the main issue of a cloudy viewfinder that looks to be a sealed unit screwed to the top of the camera.
removed account4
Subscriber
- Joined
- Jun 21, 2003
- Messages
- 29,844
- Format
- Hybrid
i was fixin' to eat so i made 4 hand made pizzas
they were tasty !
they were tasty !
Sirius Glass
Subscriber
Installed insides of busted case Bronica AEII Finder E into Not functioning properly AE Finder E case!
Like a glove!
Larry
Welcome to APUG
Kav
Member
Fixed the stuck aperture blades, and misaligned focus scale on my old Nikon 300mm f2.8 AI-s lens. She's back in action now.
nosmok
Subscriber
- Joined
- Jun 11, 2010
- Messages
- 676
- Format
- Multi Format
Got the cover apart on the brass Regno shutter on an old Wolly triple-convertible 8x10 lens (28", 20" and 12") that I got for 8 bucks at St. Vinny's. Even though it's dead simple I'm flummoxed-- maybe it's missing a spring. For now will use a hat or a lenscap, can't really complain for 8.00. Now to mount the flange to one of the tiny 4" lensboards my Eastman/ Empire State #2 (Improved) takes. Test shots coming soon after I tape the obvious holes in the bellows.
Sethasaurus
Member
- Joined
- Sep 1, 2010
- Messages
- 96
- Format
- Medium Format
Got a beater camera posted over from India. I call it my Bashicamat:
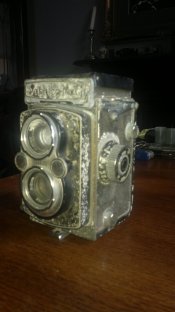
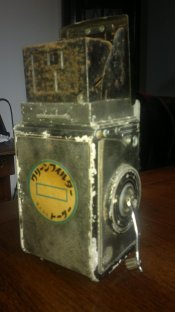
Here's the "during" pic. Nobody sneeze!
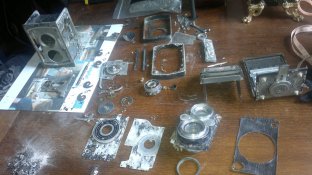
Some cleaning, sanding... painting...lubricating, adjusting..
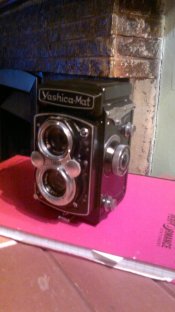
After covering with some red dyed ostrich leather:

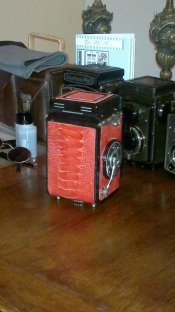
Just need to tidy up the leather edges but she's looking much healthier now!


Here's the "during" pic. Nobody sneeze!

Some cleaning, sanding... painting...lubricating, adjusting..

After covering with some red dyed ostrich leather:


Just need to tidy up the leather edges but she's looking much healthier now!
Last edited by a moderator:
Theo Sulphate
Member
Impressive restoration. Was it corroded from humidity? Looks like the lenses were ok, though.
Sethasaurus
Member
- Joined
- Sep 1, 2010
- Messages
- 96
- Format
- Medium Format
Impressive restoration. Was it corroded from humidity? Looks like the lenses were ok, though.
This camera sure had a rough life.
There was a lot of corrosion which made removing the old paint a little easier.
The film advance lever was held on with a mangled paperclip and it was a mess inside and out. Luckily, the only missing part was the pin on the winding lever.
The Yashinon taking lens was stuck solid, had corrosion around the front ring and cleaning marks. I replaced it with a Yashikor lens.
Everything works well but I did not repair the self-timer as I never use them but that mightl be a job for another day.
jeffreythree
Member
I put some light seals in my new to me Fuji GL690 and cleaned and lubed the extremely stiff R-S switch I thought was stuck on R after switching it off of S. I did not want to test with film since nothing was left in there except glue residue and a few bits of rotten foam. I used black adhesive backed felt and yarn instead of foam. A test roll will go pretty quick with only 8 shots to a roll. If the test goes well, I might do something about the cosmetics. A lot of screw heads are rust colored and the paint on the top cover is 25% original, 25% worn to brass, and 50% poorly applied touch ups. A lot of honest wear on this one, but no signs of abuse.
jeffreythree
Member
Today I remembered there is always a reason something is being sold as-is. In the further saga of my new GL690, the test roll was horribly out of focus on some frames but only off by a little on others. Rangefinder was off a little but not in the direction the pictures were out of focus; so I stuck a ground glass on the film plain and found out infinity on the lens maxed out at 5 feet. Mulled it over during dinner, checked it again afterwards, and it was now about 15 feet. Everything is in the lens on this camera; so I started inspecting and there was evidence of Bubba's handiwork in the form of nicks and scratches on fasteners and retainers. Bubba had been in there all right. I started in from the front and all seemed OK except the front element could move side to side a tiny bit but not fore and aft. It still did after reassembly which I thought strange. I checked it with the ground glass again and it was still out of whack; so I gave it a whack by thumping the tripod it was on down onto the floor since I was at a loss. I found the front element retention ring could move again after that thump on the next inspection, and screwed it and the front element in at least another 1/8" or so. My lessons for the day are that it always pays to follows Bubba's tracks when something is not right, and sometimes old things just need a little persuasion.
removed account4
Subscriber
- Joined
- Jun 21, 2003
- Messages
- 29,844
- Format
- Hybrid
did the yearly fix of the expresso machine portafilter...
which means taking it apart carefully ( it is spring loaded )
and removing a nearly invisible leaf spring
flusing the whole thing out in a basin ( incase something falls off that shouldn't )
and re-assembling it.
i was told years ago by the company that sold the machine to us that one should
never take these apart they sent me a new portafilter so i wouldn't have to ...
when that one started acting weird, i put goggles on and unscrewed it ... piece of cake
when i worked in the coffee retail trade, i was the person who did all the maintenance (weekly)
on the brewers, grinders and expresso machines, so its always fun to take apart and re-assemble the portafilter
makes me feel as if i still have a clue.
which means taking it apart carefully ( it is spring loaded )
and removing a nearly invisible leaf spring
flusing the whole thing out in a basin ( incase something falls off that shouldn't )
and re-assembling it.
i was told years ago by the company that sold the machine to us that one should
never take these apart they sent me a new portafilter so i wouldn't have to ...
when that one started acting weird, i put goggles on and unscrewed it ... piece of cake

when i worked in the coffee retail trade, i was the person who did all the maintenance (weekly)
on the brewers, grinders and expresso machines, so its always fun to take apart and re-assemble the portafilter
makes me feel as if i still have a clue.
NedL
Subscriber
My espresso "machine" looks something like this:

except it's all black from being on many camping and backpacking trips. It has also been used at the summits of various sierra peaks....
No maintenance required, I don't think I've ever even replaced the gasket thing-a-ma-gig. These days I mostly use a chemex and every once in a while an aeropress ( which is also great for traveling ).
I used my chemex to fix some coffee this morning.
Attachments
| Photrio.com contains affiliate links to products. We may receive a commission for purchases made through these links. To read our full affiliate disclosure statement please click Here. |
PHOTRIO PARTNERS EQUALLY FUNDING OUR COMMUNITY:  |


