What did you fix today? (part 2)

Untitled

A
Untitled

  • 0
  • 0
  • 32
Jerome Leaves

H
Jerome Leaves

  • 1
  • 0
  • 52
Jerome

H
Jerome

  • 1
  • 0
  • 48
Sedona Tree

H
Sedona Tree

  • 1
  • 0
  • 51
Sedona

H
Sedona

  • 0
  • 0
  • 47

Recent Classifieds

Forum statistics

Threads
197,429
Messages
2,758,846
Members
99,494
Latest member
hyking1983
Recent bookmarks
1

Ian Grant

Subscriber
Joined
Aug 2, 2004
Messages
23,247
Location
West Midland
Format
Multi Format
An 1890's tripod. This doesn't show the damage but part of the U section woodwork that holds one of the the lower legs was missing broken off and lost. I've just rebuilt the section grafting in new wood, photos of the repair to follow the Tightbond is drying over-night :D

tripod-hp-sm.jpg


Ian
 

naeroscatu

Subscriber
Joined
Oct 15, 2004
Messages
1,031
Location
Newmarket On
Format
Multi Format
Yesterday I stripped the vulcanite off of a Zorki 1C. The original covering looked terrible, worn out and discolored. I used a paint removal gel - two passes with a time out in between of about one hour. After that I was able to scrape off the vulcanite completely. I ordered the custom leatherette from Aki-Asahi and can't wait to bring this camera back to a decent appearance.
 

jeffreythree

Member
Joined
Jul 6, 2015
Messages
309
Location
DFW, Texas
Format
Multi Format
It is not quite a fix, but leaving the batteries in a Minolta AF-Tele for 3 weeks finally woke up all the led's and the ability to set the focus with a half press of the shutter button. Fill flash was a bit dodgy before that as well. I will keep that in mind for the next electronic camera I happen to acquire.
 

IloveTLRs

Member
Joined
May 22, 2007
Messages
1,132
Location
Boston
Format
Sub 35mm
My Minox B case needed fixing. Upon closing, the tab on the top cover slips into this tiny leather loop, which is now gone. I made a make-shift one out of stiff paper. Who knows how long it'll last, but I have plenty of material to replace it with.
IMG_1367.jpg
 
Last edited:

jeffreythree

Member
Joined
Jul 6, 2015
Messages
309
Location
DFW, Texas
Format
Multi Format
Realigned the shutter speed and aperture knobs on my new Horizont. It was a pain counting clicks off one end or another since someone misaligned them at some point. Cleaned the gears a bit while in there and diagnosed a banding problem that was me not holding down the shutter button for the whole turret movement. It was a friction issue of the shutter button touching an interlock lever. Hold down button, no touching, no friction to slow turret, no overexposure at very end of travel.
 

Kawaiithulhu

Member
Joined
Sep 20, 2013
Messages
550
Location
Southern Cal
Format
Multi Format
Took the shell off a 500c/m and flushed away some very old lubricants that had turned to sludge. At least the gears turn like they aren't mired in cold molasses.
If I can figure out why the shooting sequence still doesn't work I'll be happy. If not then it'll still go out to a pro and I've learned a little about Hassy guts in the process :surprised:
 

Sirius Glass

Subscriber
Joined
Jan 18, 2007
Messages
50,117
Location
Southern California
Format
Multi Format
Took the shell off a 500c/m and flushed away some very old lubricants that had turned to sludge. At least the gears turn like they aren't mired in cold molasses.
If I can figure out why the shooting sequence still doesn't work I'll be happy. If not then it'll still go out to a pro and I've learned a little about Hassy guts in the process :surprised:

See Mike Davidson at Samy's Camera on Fairfax on the fourth floor.
431 S. Fairfax Ave.
Los Angeles, CA 90036

Telephone: 323-938-2420

Hours:
Mon-Fri: 9:30am-6:30pm; Sat: 10:00am-6:00pm; Sun: 11:00am-5:00pm
(Film & Rental Departments) Mon-Fri: 8:00am-6:30pm; Sat: 9:00am-6:00pm; Sun: 11:00am-5:00pm.
 

John Koehrer

Subscriber
Joined
Apr 3, 2004
Messages
8,280
Location
Aurora, Il
Format
Multi Format
Cleaned corrosion from all contacts of 283 battery holders.
 

Kawaiithulhu

Member
Joined
Sep 20, 2013
Messages
550
Location
Southern Cal
Format
Multi Format
An update on the 500c/m (1973) I upped the ante and went for the denatured alcohol and a syringe to focus effort on the sticky gears. Soaked and flushed a couple times and exercised the gearing. With a little dab of nyoil in a couple spots the body is now working almost flawlessly. One of the springs on the closing flaps is weak, but that will wait.
Hassy800x800.jpg
I have its lens that I will take to Samy's, I got it to run but the speeds are a bit slow.
 

nosmok

Subscriber
Joined
Jun 11, 2010
Messages
676
Format
Multi Format
Finally got my ultimate 127 camera project going--- an old Agfa 4x6 folder with stuck Apotar is getting the 75mm Heliar from a thrashed Bessa 66. I have to knock a big hole in the front because the Heliar is taller, but will epoxy half a mini Altoids tin over it. Patch the leather with gaffer's tape, should be good to go. An old Kodak France bellows has been cut down to replace the original, so battered all the folds were smoothed over. Will screw 2 cold shoes on top for a rangefinder and light meter, and will have 4x6cm negatives from a camera smaller than a Leica iii, and jacket or shirt pocketable. I'm stoked to finish this !
 
Joined
Mar 30, 2011
Messages
2,149
Location
NYC
Format
Multi Format
Repaired a very rough stereo realist 2.8 camera, its shutter was stuck, shutter cocking lever hanging loose and not winding on, very tight aperture adjustment, partially blocked rangefinder, and only leather on the bottom plate with bare metal around, with a good layer of dirt all around it. This is my very first stereo camera, when I saw it in person I was actually pretty worried that it was a lost cause, it was really the one of roughest and ugliest camera I have ever bought.

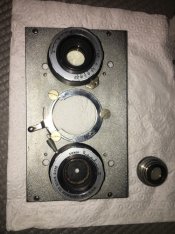
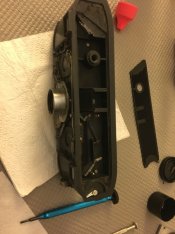
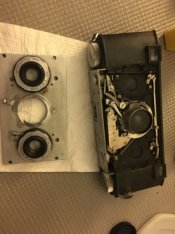
I stripped it all down, and cleaned furiously, and scrapped off the remaining leather pieces. I went through many many Q-tips. The camera was worked on by someone before me in the past, which is a bit scary when repairing camera as you dont know what went on previously. The shutter mechanism was flushed to get it firing, T mode did not work as well, but I traced it back to a spring that was stuck under a part and not resting on a return lever, with it in place T worked and did not act as bulb. The shutter cocking ring also did not return as the spring was knocked off as well. I had to unscrew the front lens cells, as the aperture change was very stiff, the cause of it was a very dirty/rusty aperture blades on the right lens. These were cleaned (took forever) and lubed with graphite/moly powder and internal lens surfaces cleaned. The connecting aperture band was also a bit wrinkled and was flipped, I had to reposition it after shooting my test roll as I installed it incorrectly and it blocked aperture adjustment smaller than f8. The moving shutter blades inside the camera/facing the film chamber that were partially stuck also had a bit of this reddish rust and also took a bit to clean off before it was firing smoothly. The remaining leather on the bottom plate was scraped off to get access to the rangefinder. Within the rangefinder two pieces of black felt were peeling off and hanging in the way of the mirrors path. These were carefully glued back with a bit of black liquid electrical tape with a very fine brush, alignment was also checked for accuracy. The top plate was also removed and cleaned to check on a slightly sticking double exposure lever that turned out to be nothing. Inside the film compartment also needed a good bit of cleaning. With everything bare, I shot a test roll, the spacing was good, and the shutter speeds worked ok, but there were a lot of light leaks throughout the roll and a few shots oddly double exposing (I think my fault). I then used some very thin and fine grained calf leather, using a paper templates I cut and plioboned the leather on all sides and the base. The film door on the locking latch received an additional piece of black adhesive closed cell foam to prevent light leaks as that edge is not as robustly shielded as on the other film door edges.

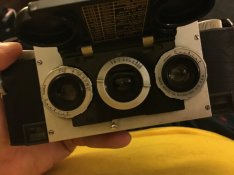
I just developed the second test roll and everything looks good. though the spacing is very tight (with a clear line and no overlaps) which will make it pretty hard to cut without a special cutter. In another post I made, I added a bubble level into the viewfinder with some removal poster putty, its working well but the blockage takes some getting used to. Overall this repair actually had some of the most useful information online, and even a guide video on youtube which I studied as well, everything on the camera can be taken apart with a flat head screwdriver, and access to most parts were very easy and linkages pretty straight forward compared to the other cameras I have fixed.
 

Attachments

  • 1.jpg
    1.jpg
    286.5 KB · Views: 183
  • 2.jpg
    2.jpg
    238.7 KB · Views: 174
  • 4.jpg
    4.jpg
    137.4 KB · Views: 165
  • 3.jpg
    3.jpg
    242.9 KB · Views: 184

naeroscatu

Subscriber
Joined
Oct 15, 2004
Messages
1,031
Location
Newmarket On
Format
Multi Format
Zorki 1C - restoration. Here is a camera looking and working like new:

DSC_5480-sm.jpg
DSC_5482-sm.jpg
DSC_5489-sm.jpg
DSC_5642-sm.jpg
DSC_5645-sm.jpg
 

removed account4

Subscriber
Joined
Jun 21, 2003
Messages
29,844
Format
Hybrid
it was yesterday, and it was a household thermostat. i i tried to fix it a week before
adn it didn't take, so i replaced it.
 

tomfrh

Member
Joined
Jan 27, 2015
Messages
653
Location
Sydney, Aust
Format
Medium Format
Reassembled my Pentax 645n after a failed attempt to restore the self timer and missing shutter speeds.

It wasn't faulty dials it turns out, but deeper problems with the electronics...
 

Kawaiithulhu

Member
Joined
Sep 20, 2013
Messages
550
Location
Southern Cal
Format
Multi Format
Very minor job: replaced the light trap in an ancient A12 film magazine. The old one was flatter than Texas and spitting up gobs of foam.
One of these days I promise myself that I'll buy a camera that I don't have to do CPR to before being able to use it :tongue:
 

John_Nikon_F

Member
Joined
Apr 18, 2008
Messages
1,965
Location
Duvall, WA,
Format
Multi Format
Going to be doing some minor repair work to one of the Nikkormat FTn bodies I own this evening. That way, at least the rewind crank will stop flopping around aimlessly. Will be sending it in for an overhaul next week. Probably once the donor FTn arrives.

-J
 

4season

Member
Joined
Jul 13, 2015
Messages
1,915
Format
Plastic Cameras
Lomo LCA+ with sticky shutter. This made-in-China unit was too new to have crumbling foam or hardened lubricants, and switch contacts looked reasonably clean. Discovered some poorly soldered wires, two of which broke off while I was disassembling the camera. Tidied up the soldering, did a light cleaning and camera was good to go.
 

Bill Burk

Subscriber
Joined
Feb 9, 2010
Messages
9,155
Format
4x5 Format
Has "prints" been given as an answered to the OP's question yet?
That's funny.

Fixing the SEI Photometer has taken my time the past few days. I know it's just an exercise in overcoming inertia (or procrastination).

I'll admit I have film lined up to be developed and something is keeping me from it.

Maybe I'll get this kit from Radio Shack so the next time my siphon breaks I'll get fair warning...

Dead Link Removed

But first! The film.
 
Photrio.com contains affiliate links to products. We may receive a commission for purchases made through these links.
To read our full affiliate disclosure statement please click Here.

PHOTRIO PARTNERS EQUALLY FUNDING OUR COMMUNITY:


Ilford ADOX Freestyle Photographic Stearman Press Weldon Color Lab Blue Moon Camera & Machine
Top Bottom