What did you fix today? (part 2)

Hot Rod

A
Hot Rod

  • 0
  • 0
  • 8
Relics

A
Relics

  • 0
  • 0
  • 14
The Long Walk

A
The Long Walk

  • 0
  • 0
  • 33
totocalcio

A
totocalcio

  • 4
  • 1
  • 78
Untitled

A
Untitled

  • 7
  • 3
  • 143

Recent Classifieds

Forum statistics

Threads
197,447
Messages
2,759,137
Members
99,501
Latest member
Opa65
Recent bookmarks
0

Helios 1984

Member
Joined
Aug 4, 2015
Messages
1,844
Location
Saint-Constant, Québec
Format
35mm
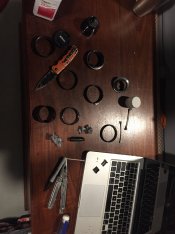
I've replaced the light seals & mirror dampener on my newly acquired Minolta SRT-101.
 

craigclu

Subscriber
Joined
Sep 8, 2002
Messages
1,300
Location
Rice Lake, Wisconsin
Format
Multi Format
Decided to hide from the heat after mid-day. I dug out my tripods and heads, rethinking combos for how I will be more likely using them. This led to disassembly, clean-up and lubing that was long overdue and I found gear that I thought was sold that now can have a new life. I was also humbled by how I had forgotten some of the wrinkles of disassembly and re-assembly of some of the hardware. Of course, I've never been this old before, either.....
 

Ian Grant

Subscriber
Joined
Aug 2, 2004
Messages
23,247
Location
West Midland
Format
Multi Format
I'm in the middle of restoring quite a large number of second hand 5x4 DDS film and plate holders, this means removing stickers and other markings, checking the light traps removing damaged tape from the end flaps along with any adhesive and then re-taping the end flaps, checking slides aren't cracked and cleaning them. Finally repainiting the holders if necessary and the black painted bit you pull on the slide. Finally making sure the slides are smooth.

Part way through restoring a lot of Quarter plate, Half Plate, whole Plate and 12"x10" book form plate holders. All takes time but worth the effort.

Ian
 

Helios 1984

Member
Joined
Aug 4, 2015
Messages
1,844
Location
Saint-Constant, Québec
Format
35mm
I re-attached the latch of this old camera bag with pop rivets.

GBXu6dw.jpg
kCJS6dT.jpg
SUb1nst.jpg
 

Ian Grant

Subscriber
Joined
Aug 2, 2004
Messages
23,247
Location
West Midland
Format
Multi Format
upload_2019-7-6_18-56-24.png


Finished restoring this unknown make Half Plate camera has an Ivory name plate "The Standard Camera". It has design flaws, it had been repaired sometime in its past but that was quite obvious and is now hard to spot.

I've now found two lenses that fit the same flange, a WA and a Standard. I managed to match 3 lenses to flanges always an issue.

Ian
 
Joined
Mar 25, 2019
Messages
20
Location
Anglesey
Format
35mm
Olympus OM 1 MD. Strangest but easiest fix I've had. Picked the camera up this morning at the local car boot. The seller told me it was stuck and he wanted five pounds for it. Thought I would take the risk at that price as I could sell it spares or repair if I couldn't fix it. Got it home, aperture ring was stuck as was the winder, shutter and back release. Soaked everything with a bit of lighter fluid, got the aperture ring moving and have been working the door catch and gently trying the winder. Eventually got the door catch open and found a penny stuck against the shutter curtain. Eased it out with a pair of tweezers and the shutter now winds on and fires. I'll clean the camera up. The lens is the 50mm 1.8 F Zuiko but is fungused. I'll try cleaning it (I think I've got a spare stashed somewhere.) I'm now a happy boy, I've been looking for an OM 1 for a while.
 

MattKing

Moderator
Moderator
Joined
Apr 24, 2005
Messages
51,926
Location
Delta, BC Canada
Format
Medium Format
So I guess that means your net cost was actually four pounds ninety-nine pence?:whistling:
 

Helios 1984

Member
Joined
Aug 4, 2015
Messages
1,844
Location
Saint-Constant, Québec
Format
35mm
Update on the defective Instamatic 714

I've found a way to use it without electric eye nor flash. This model has an all mechanical "Automatic Flash Control" which is not battery dependent. When inserting a flashcube, it engages a mechanism which set the speed at 1/40, and the "correct" lens opening (up to f/64) based on the ASA of the cartridge and the output of the flashcube (GN 50 at ASA 64, GN 70 at ASA 80-125 etc). So, I wrote a table with estimated f/numbers for distances on the focus ring, and use my handheld meter to know the distance range I can shoot depending on how sunny it is.

bdFXZ50.jpg


Note: You just need the base of the flashcube.
0epTfnk.jpg
 
Last edited:
Joined
Mar 25, 2019
Messages
20
Location
Anglesey
Format
35mm
So I guess that means your net cost was actually four pounds ninety-nine pence?:whistling:
I hadn't thought of it like that, even cheaper. Can't remember what I did with the penny, I was so excited that I'd got the shutter working.
Found out why the rear catch was sticking, the rear door was slightly bent so I straightened it out on flat surface. After looking at the rear door thinking there is something missing I realised that the pressure plate wasn't there. Looked in my spares box and found the plate from an OM 10 fits. I've also found a spare Zuiko 50mm lens. I'll find a battery tomorrow and test the meter.
 

John51

Member
Joined
May 18, 2014
Messages
797
Format
35mm
I got a cheaply made 'Miranda Panorama 35mm Compact' from a charity shop.

The pressure plate is ribs on the camera back. :smile:
 

Grim Tuesday

Member
Joined
Oct 1, 2018
Messages
738
Location
Philadelphia
Format
Medium Format
Cleaned some fungus out of the middle elements on a Mamiya 65mm I just got from Roberts Photo. It was very clear that someone (Roberts?) Had been trying to get there before me because some of the retaining rings were ever so slightly loose on the easier elements to access. I took the damn lens apart in three different ways and accessed every single element except the one with fungus before I figured out how to do it right. For opening rings with no notches, my mouse pad has turned out to be a marvelous tool.
 

Helios 1984

Member
Joined
Aug 4, 2015
Messages
1,844
Location
Saint-Constant, Québec
Format
35mm
I’ve replaced 2 worn out springs on my Carl Zeiss Jena Tessar 50mm f/2.8. The one behind the click stop steel ball of the A/M switch, and the one behind the click stop steel ball of the aperture ring. Now the stop positions are snappy and secure.
 
Last edited:

kingbuzzie

Member
Joined
Jan 18, 2015
Messages
411
Location
Athens, GA
Format
Medium Format
I just got back from a trip to Toroweap with this kodak stereo camera. I had to rinse the shutter assembly several times with a slurry of graphite and lighter fluid. I broke one teensy lens retainer though and had to buy a parts camera on fleabay. Surprisingly easy camera to disassemble, very few parts / screws.
 

Attachments

  • kodak.jpg
    kodak.jpg
    728.5 KB · Views: 106

Ian Grant

Subscriber
Joined
Aug 2, 2004
Messages
23,247
Location
West Midland
Format
Multi Format
An MPP Micro Technical MkVIIi with issues, needed to lift the leatherette tighten loose rear rail guides and the blocks holding the door positioning arms. It was in a bit of a mess but is ready to be boxed and sent back to its owner :D

Ian
 

cjbecker

Member
Joined
Dec 9, 2010
Messages
1,356
Location
IN
Format
Traditional
Did my first cla on a lens. 50 1.4 ai. Focus was stiff and had slop in the helical. Ordered some #10 grease from japan. Had to guess on the helical alignment. After thinking about it. I don't think the outer helical matters on alignment. The inner one just needs to have the one turn out from bottomed out, so it has enough room to rotate to focus. At least that worked for me.
 

Attachments

  • E1D23242-E7A8-4C08-8728-1237CC90C7B2.jpeg
    E1D23242-E7A8-4C08-8728-1237CC90C7B2.jpeg
    761.5 KB · Views: 104

Neil Grant

Member
Joined
Jan 30, 2007
Messages
543
Location
area 76
Format
Multi Format
Mamiya 105mm DS. Light traces of fungus removed from inner surface of rear cemented group in viewing lens) Unscrewed rear group using Zyliss bottle opener (no need to undo collar using spanning wrench) applied cleaning fluid and gave a good scrub with a lens tissue.
 

Main_Cogg

Member
Joined
Jan 25, 2019
Messages
94
Location
VA
Format
Medium Format
I recently acquired a couple nice lenses from an estate, of course there were no caps to be seen. Time to see if I remember how to use my lathe. Found a source for 1/2 inch thick PVC, took some measurements and started turning. The front came out nice, a snug slip fit. Hopefully the rear will come out just as good.
1564772981109-426071074.jpg 15647731149612053779233.jpg 1564773174430-2117052367.jpg
Front is done, rear on the lathe.
 

Helios 1984

Member
Joined
Aug 4, 2015
Messages
1,844
Location
Saint-Constant, Québec
Format
35mm
I've removed the top cover of my newly acquired Minolta SRT-101 to fix a loose strap lug. The hard part was removing the red dot screw without trashing the red dot, the rest was relatively easy.

Spr9sV3.jpg
TA9rXKq.jpg
 
Last edited:

Europan

Member
Joined
May 21, 2009
Messages
628
Location
Äsch, Switzerland
Format
Multi Format
Finished the complete overhaul of a Paillard-Bolex H-16 Reflex-5. Somebody had tinkered with the camera and put the front so back that the reverse claw was folded down onto the forward claw. Timing of claw and shutter was off, too. On the shutter shaft was a wrong washer. Variable shutter dysfunctional. The turret lever was torn out of its bracket, bracket bent, piston missing, square hole washer missing. Fortunately all three lens ports have a FFD within half the specified tolerance. Reflex prisms in order, finder sharp and centered. Cleaned and freshly lubricated a fully functioning instrument again
 

wahiba

Member
Joined
Mar 19, 2004
Messages
190
Location
Keighley, UK
Format
Analog
Dropped my Rollie 35 some time back. Jammed so assumed it was broken inside. Decided I might as well take it pieces, might be something useful. Ripping off cover at front revealed 4 screws holding lens plate. Unscrewed plate and discovered shutter still worked. Ripped out long useless LED meter and carefully reassembled and found it now works.
A while back a dealer I was buying a 120 camera from gave me another dud Rollie 35 LED as I needed a bit to tidy mine up. Anyhow decided to give it the same treatment and now I have two battered looking, but seemingly working Rollie 35s.

Test film in both yet to finish and process, so absolute certainty yet to come.
 

hartacus

Member
Joined
Nov 15, 2016
Messages
115
Location
Sydney, Australia
Format
35mm
Today I reattached the small circle of leatherette on the self timer lever of my Zenit 12XP. It was curling and I had tested flattening it under a piece of wood and some weights... and then forgot about it for about 5 weeks. It's now quite flat. I've readhered it with some double sided tape, so I'll see how it goes. Hoping to fix a Bronica ETRSi that is particularly stabby when using the action grip due to curling leatherette.
 

Helios 1984

Member
Joined
Aug 4, 2015
Messages
1,844
Location
Saint-Constant, Québec
Format
35mm
Yesterday, I’ve found this clean Trip 35 at a flea market for a couple bucks. The shutter worked but the aperture wouldn’t budge and the red flag was nowhere to be seen. I remembered having the same problem with my Pen-EE2 when I got it, so I figured (hoped) that the aperture blade were probably stuck together. However, unlike the Pen-EE2, this one was more fiddly to work with. Anyway, I got to the aperture mechanism, dumped it in Ronsonol and gave it a bit of exercise. Bingo! Everything works. All that is left is to re-adjust the focus and replace the light seals.

Ps: Big thanks to @thuggins for his Trip 35 repair tutorial.
wfLZGEm.jpg
ety88fT.jpg

k7wjjDz.jpg
unKToZ9.jpg
kfNi4s1.jpg
 
Last edited:

Helios 1984

Member
Joined
Aug 4, 2015
Messages
1,844
Location
Saint-Constant, Québec
Format
35mm
I had to re-adjust the focus of the Trip 35 because I forgot to mark the 12 O'clock position of the front element before removing the "Olympus Ring".
By the time I realized my error, the front element was already 1/2 inch unscrewed. Then I marked the approximative spot with a sharpie and noted where the thread started.
After re-adjusting the focus, the peak focus zone wasn't far away from my approximative 12 O'clock mark (about 3mm).
I'll test with a roll and re-adjust if needed but at least now I know where the ballpark is.

Note: I used a piece of frosted negative sleeve as ground glass and a printed Snellen chart as target.

kFBRW0n.jpg
Zhpm8Dr.jpg
0sjdOpB.jpg
 
Photrio.com contains affiliate links to products. We may receive a commission for purchases made through these links.
To read our full affiliate disclosure statement please click Here.

PHOTRIO PARTNERS EQUALLY FUNDING OUR COMMUNITY:


Ilford ADOX Freestyle Photographic Stearman Press Weldon Color Lab Blue Moon Camera & Machine
Top Bottom