Marco B
Subscriber


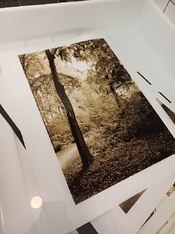
Looking very good!
Nice tones, which paper and developer did you use?
What's the print size?
Is the image format 645?
Marco, there are multiple methods for sepia toning. Which do you use? The color is quite lovely!
This was with an odourless ferricyanide bleach, thiocarbamide(thiourea) redeveloper, that had an extra bottle in the package containing a sodiumhydroxide solution. Adding more sodiumhydroxide shifts the color tone from yellow via sepia (used here) to brown-red.
Looking good and it's nice to have a productive day in the darkroom. I'm going to be trying my hand at split toning with sepia/selenium very soon but I messed up and bought the stinky type.
If you do want to have any hope of achieving a true split tone, I strongly recommend diluting the ferricyanide bleach considerably more than is usually written in instructions.
At full recommended strength, the bleaching is very fast and will continue during the intermediate rinse before redeveloping. This makes it really hard to prevent over-toning.
I think about 3-4x dilution compared to instructions might be a good starting point. Don't over do diluting either, as that may make the bleaching very slow.
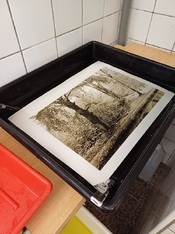
I usually pull the print quite quickly from the bleach once highlights start to disappear. Then dump it in a clean water bath, agitate shortly, pull the print out and rinse with running water, while dumping and replacing the water bath.
You want to get rid of the concentrated bleach as soon as possible, as otherwise the bleach soaked in the paper will continue its job. In my experience, it takes about 5 full water bath replacements and some vigorous agitating to get rid of the bleach. You can then redevelop in peace.
Thanks for the tips as I definitely will want this particular print to be more on the mild side with the sepia highlights and do not want the shadows to be held back at all in the selenium, so I have a few sacrificial work prints for practice. And I should correct my previous post, it was more that I was ignorant of the odorless variety of sepia when I purchased Photo Formulary's sepia sulfide toner. I just recently became aware of the odorless thiocarbamide type.
I did manage it in this print, but it is still quite hard to achieve a true split tone with warm highlights and cold shadows: https://www.photrio.com/forum/media/park-groenendaal.28897/
I think for true split toning the dual bath bleach / redevelop has the advantage over a one bath sulfide toner that you can more or less see how much of the silver in the print is going to be sepia, and how much will be retained for the cold tone selenium shadows.
That said, I would recommend pulling the print from the bleach even before the highlights have fully bleached, as otherwise it is very likely the shadows will have bleached to far to leave enough untoned silver for the selenium toner to act on and achieve a true spilt tone effect. You really need to leave significant black silver in the bleached print's shadows.
I did manage it in this print, but it is still quite hard to achieve a true split tone with warm highlights and cold shadows: https://www.photrio.com/forum/media/park-groenendaal.28897/
Thanks for that example, that looks like a nicely done split tone. I'm wondering about the decision point on when to pull the print. Is it best to pull the print based just off the important print high values or to pull the print based off the important print middle values and to just accept whatever level of bleaching you get in those upper print values? Is this an incorrect way of looking at it?
 . Accept the lucky coincidences and differences between prints. It will be somewhat easier to control with diluted bleach though.
If your middle tones start to significantly bleach, you're way to late with pulling the print: it will be sepia all over.
| Photrio.com contains affiliate links to products. We may receive a commission for purchases made through these links. To read our full affiliate disclosure statement please click Here. |
PHOTRIO PARTNERS EQUALLY FUNDING OUR COMMUNITY:  |