Diffusion Transfer Printing ("Polaroid" peel-apart) recipes

Protest.

A
Protest.

  • 3
  • 2
  • 83
Window

A
Window

  • 3
  • 0
  • 54
_DSC3444B.JPG

D
_DSC3444B.JPG

  • 0
  • 1
  • 84
20250405_094841.jpg

D
20250405_094841.jpg

  • 4
  • 0
  • 98

Recent Classifieds

Forum statistics

Threads
197,199
Messages
2,755,490
Members
99,423
Latest member
Sykopics
Recent bookmarks
0
OP
OP

alecrmyers

Member
Joined
Sep 24, 2009
Messages
85
Format
Large Format
By the way, the 4,6 diamino-orthocresol is the one whose immediate precursor (4,6-dinitro-o-cresol) is the toxic agent that was banned as a pesticide.
 
  • F4U
  • F4U
  • Deleted
  • Reason: Off topic

analogwisdom

Member
Joined
Aug 4, 2023
Messages
70
Location
KY
Format
Large Format
By the way, the 4,6 diamino-orthocresol is the one whose immediate precursor (4,6-dinitro-o-cresol) is the toxic agent that was banned as a pesticide.
Interesting, I had initially missed where you mentioned that one.

I wonder how often these more niche developers were actually used in the B&W stuff. One of the more interesting types was 51HC, which gave an ultra-high contrast positive with a rating of 640 ISO and a reclaimable negative with 50 ISO. I'm sure there was some unique Polaroid-schemed chemistry stuff beyond me that enabled this film to exist. Perhaps the positive had a unique layer, or a different silver solvent in the paste.

Banned is such a strong word, without any context.
The only concrete thing I've ever seen in this oft-repeated Polaroid rumor is from Christopher Bonanos' Instant: The Story of Polaroid, where it's said that the EU banned the glue which sealed the pods.
 
OP
OP

alecrmyers

Member
Joined
Sep 24, 2009
Messages
85
Format
Large Format
This is the best result of my latest work on this subject. I have been experimenting with palladium sulphide in partially hydrolyzed cellulose acetate as a receiver paper, but coating is very challenging. In the mean time I went back to do some more work with silica and metallic palladium, and I think I have fixed the problem with graininess in the print.

Forgoing the use of phenidone and/or metol as an additive developer loses some speed, but apart from that I am reasonably happy with progress. This is instant dry, 30 second development, with a reasonably neutral tone and dense blacks:
 

Attachments

  • photo.jpg
    photo.jpg
    317.3 KB · Views: 69

Qebs

Member
Joined
Mar 27, 2018
Messages
102
Location
Canada
Format
Digital
Hello Alec,
Great recent results!
Could I ask a few things?
What would you say is the best formulations yet that show consistently satisfactory results, use the most accessible chemicals that are the most affordable?
I've moved into the new photography studio that's an industrial loft out on King st East and the DVP area and I'm very determined to nail this process you have rediscovered/researched.
Perhaps in the future if there is anyone else in the area we can maybe work together and hold some workshops. I think the photography community will very much welcome it!

Hope you are well, continue the great work.

Thanks
Be well
Kevin
 
OP
OP

alecrmyers

Member
Joined
Sep 24, 2009
Messages
85
Format
Large Format
What would you say is the best formulations yet that show consistently satisfactory results, use the most accessible chemicals that are the most affordable?
You want consistently satisfactory, accessible and cheap? You’re not asking for much, eh?!!

Top priority for me is consistent good results. Cheap is next. Accessible is last. I don’t have a good answer for all three so far.

Metallic palladium nanoparticles seem like the easiest nucleation sites. Palladium is expensive but you need microscopic (almost literally) quantities. Silica base is easy to coat, and accessible. The required reducing agent is relatively inaccessible, and in fact the one I want to use the most is a restricted precursor in this country, but there are alternatives. PVP as a nanoparticle stabilizer (if you want it) is available on Amazon. I am still researching longevity (shelf life) of these materials once they have been prepared.

A readily available stain-free developer doesn’t exist, as far as I know. DEHA is cheap (it’s an industrial boiler treatment) and stain free but not a traditional diy photographic material (although it is used in colour developers). For silver solvents, uracil is very cheap but not easily available. TEA is available from photographic suppliers and can be used as the accompanying base.

I am trying to synthesize some N,N-bis(methoxyethyl)hydroxylamine to see if it works better than DEHA. I’m sure there’s a good reason Polaroid included it in a bunch of their products. Another thing I’d like to make is some tetramethyl reductic acid, used in the Polavision system. Active, and stain free. But the recorded synthesis requires liquid bromine, pyridine and buckets of dry ice, as well as a precursor (phorone) that needs careful synthesis in its own right, so I’m going to have to improve my organic chemistry skills. My goals are great results first (subordinate to price - I was quoted USD$5k for a kilo of MEHA which is too rich for my taste), as I figure accessibility just hinges on the simple matter of whatever Bostick and Sullivan or Photographers Formulary want to stock.

I published some exact formulae and videos earlier, in the hope that there would be some people who would positively engage and try to replicate and improve the results and this would be a collaborative endeavour. If absolutely everyone is just waiting for me to tell them what works so they can crack on, that’s not much fun. Contributions from skilled organic chemists with a lab are particularly welcome. I read somewhere that Polaroid was basically a chemistry company with a couple of small coating plants attached. I believe it.
 
Last edited:

Qebs

Member
Joined
Mar 27, 2018
Messages
102
Location
Canada
Format
Digital
Hey Alec,
You're right, you seem to be leading the charge, as it's said, but that does sound boring/not exciting.
I know there are lurkers, I've been telling people online about this thread and they are polaroid fanatics. You are doing valuable work to help a global community. I and I am sure many thank you! The research and experimentation will inspire many people for generations, I'm confident this is true!

May I ask how you find the laminator processing machine?
Is it what you used in your latest example? I see banding or lines, is that from a dirty roller bar?

Be well Sir. :smile:
 
OP
OP

alecrmyers

Member
Joined
Sep 24, 2009
Messages
85
Format
Large Format
I’m using the laminating machine in preference to anything else at the moment - it’s consistent and avoids any problems with technique.

The banding on the left is where the developer ran thin; the solution is to use more. I am not metering the amount used per sheet the moment (I’m working on TLAR principles), but I will be. The banding on the right is probably an artefact of the plating bar.
 

Qebs

Member
Joined
Mar 27, 2018
Messages
102
Location
Canada
Format
Digital
Thanks so much for all the replies Alec!
I'm setting up the studio in the coming weeks (month).
Getting a custom shutter, LED light source and of course sourcing and ordering the chemicals.
I'm trying to decide which formula I should investigate first.
1. You advised others to try formula 140the tones were not that neutral.
Was there a toner that could be added.
2. I really find formula 143 pleasant, I just have no experience with the chemicals DEHA, and AEEA. I'm currently looking to get in contact with a friend of a friend that is a chemist for advice on handling and storage.
Do you find these difficult to work with in terms of safety?
3. What was the process (Formula) you used for your post on Tuesday (Post #129).
Thank you for your continued community support!
 
OP
OP

alecrmyers

Member
Joined
Sep 24, 2009
Messages
85
Format
Large Format
I think it’s way too early to think about offering a commercial service using this process. Nobody has any idea of the longevity of any of these prints.
Do you find these difficult to work with in terms of safety?

I’m still alive. Do try to avoid drinking any of them.
What was the process (Formula) you used for your post on Tuesday

I haven’t published it yet; I think I can do better.
 
OP
OP

alecrmyers

Member
Joined
Sep 24, 2009
Messages
85
Format
Large Format
This is where we stand. I have a good chemistry that produces clean good contrast well toned b&w prints. I'd like some other people to try it.

Are there any volunteers to whom I could send some materials to see how this works in other people's hands? I will send the film, paper and developer, but you need to have a 4x5 camera, and a laminator (something like this: https://www.amazon.com/Laminator-Crenova-Thermal-Laminating-Pouches/dp/B08P3B8DSC/ - which, at $20 is almost less than the cost of my postage to send you the materials.)

This isn't a gift - you have to commit to trying several (not just one!) exposures and post or send me the results. Please don't try it once and then go silent, or tell me you'll get around to it "sometime" - that doesn't help anyone and I want to push this forward.

If you're genuinely willing to help and you actually have the spare time to do so, message me.
 

Attachments

  • IMG_4402.jpeg
    IMG_4402.jpeg
    79.9 KB · Views: 42
  • IMG_4403.jpeg
    IMG_4403.jpeg
    109 KB · Views: 41

koraks

Moderator
Moderator
Joined
Nov 29, 2018
Messages
20,319
Location
Europe
Format
Multi Format
I'd love to be in a position to say "yes", but I know I'm presently confined in the "will get round to it sometime" category. So I'd better not.
I do still watch in utter amazement at your progress.

On the first image (4402), is that the actual negative shown as well? It looks pretty darn dense.
 
OP
OP

alecrmyers

Member
Joined
Sep 24, 2009
Messages
85
Format
Large Format
I fished the negative out of the garbage and fixed it out for you. Here it is viewed against a white background by reflected light, and held up against a lit wall by transmission. There may be an element of in-iPhone image optimization going on that I don't have control over.
 

Attachments

  • IMG_4410.jpg
    IMG_4410.jpg
    277.3 KB · Views: 33
  • IMG_4411 2b.jpg
    IMG_4411 2b.jpg
    304.8 KB · Views: 33
OP
OP

alecrmyers

Member
Joined
Sep 24, 2009
Messages
85
Format
Large Format
Apropos of nothing, I see that someone is selling DEHA on Amazon - $25 for 100ml, which is enough to develop about 1500 4x5 sheets:

If anyone wants to start putting together what they need to try this, that would be a good start; I haven't seen DEHA retailed anywhere else.

Also: you can make palladium nanoparticles with black tea: https://www.sciencedirect.com/science/article/abs/pii/S0021979716306816

Who knew?
 
Last edited:

Qebs

Member
Joined
Mar 27, 2018
Messages
102
Location
Canada
Format
Digital
Hi, I would love to take part as a volunteer. I ordered a laminator and it arrives in two and half weeks.
In that time I hope to setup the rest of the studio with a darkroom, although the custom lighting setup will take a little longer.
I'm just in the east end of downtown Toronto. I have a Toyo 8x10 camera that I will adapt to shoot 4x5 as my reducing back has gone missing.
Thanks so much for the opportunity to help this along. Your energy spent on it is much appreciated.


edit: Hey Alec, I'm ordering custom Coating Bars, the manufacturer is asking if the micron rating is for when the liquid is 4 microns wet or when the liquid has dried up on the surface.
Could you assist here?
 
Last edited:

OrientPoint

Subscriber
Joined
Jan 25, 2018
Messages
389
Location
New York
Format
35mm
I gave the latest developer formulation and paper combination a try today with some Fuji HR-U Green x-ray film. Two shots are below, rating the material at ISO 200 and 400. It looks like proper exposure is closer to 400 than 200. My current lighting is too contrasty for the material; I'll try to improve that for the next round of tests. It'll be interesting to see how things look once I improve my form.

Using a cheap laminator for processing is light years more convenient than the pipe-on-granite-slab method of spreading developer. It's really quite easy to handle and process this material correctly, my deficiencies in lighting and keeping things clean (there's a line across the ISO 400 shot which I believe is due to some debris getting into the developing package) notwithstanding. HR-U can be safely handled under a red safelight, making things easier still.

This is really a lot of fun! It was quite exciting to peel the package apart and see a pretty clean image. I can see this process getting close to Polaroid quality soon. It's like being in 1975 all over again.

Thanks to @alecrmyers for all of this hard work, and for sharing! I'll have more tests in a few days.
 

Attachments

  • type-82-at-ISO400.jpg
    type-82-at-ISO400.jpg
    1.6 MB · Views: 34
  • type-82-at-ISO200.jpg
    type-82-at-ISO200.jpg
    1.8 MB · Views: 35
OP
OP

alecrmyers

Member
Joined
Sep 24, 2009
Messages
85
Format
Large Format
After a lot of effort, I finally got some repeatable results using paper prepared with an image receiving layer made of partially hydrolyzed cellulose acetate (with palladium sulphide). There are some obvious defects, like the streaking, but those can probably be fixed. The biggest difficulty is getting the CA to remain stuck to the paper and not slough off in chunks when you peel off the negative.
 

Attachments

  • FullSizeRender.jpg
    FullSizeRender.jpg
    292.5 KB · Views: 25

richyd

Member
Joined
Jul 24, 2012
Messages
184
Location
London UK
Format
Medium Format
Got my second tests done today. The first sheet split at ISO 200 / 100. Then one at 320 which looks good but maybe 250 would be better for more shadow detail, depending on the light. Remarkable tone straight out of the process. For interest I coated the top half of the print with a Polaroid coating bar to see that makes any difference over time.

For the processing part I thought that it would be good to have a gap on the receiver paper basically where you place the developer bead but that means you would have to place the negative beyond the bead which would also mess up the spreading.

So I created negative leader strip hinged at the pod crease and attached the negative to this. I got the inspiration from a sheet Fuji Quickload. I have kept the sleeves and parts from old exposures and used the plastic piece to which the film is attached. I cut a strip from this, the more opaque part visible in the pic and taped it to the hinge of the pod envelope. Why I thought of this part is that end where the film is attached has a little step so the film edge does not protrude. To attach the film to that little edge I used one of those glue dot rollers. A while ago I had thought of doing this to reload Quickload packs.

This means it is easier to line up the negative and attach it to this leader away from the developer beaded receiver then simply swing the hinged negative over the receiver all nicely lined up. It results in a cleaner edge at the start of the spread with a margin where the developer bead sat and for mosre consistent processing.
 

Attachments

  • IMG_4509.JPG
    IMG_4509.JPG
    458.4 KB · Views: 38
  • IMG_4506.JPG
    IMG_4506.JPG
    533.7 KB · Views: 33
  • IMG_4507.JPG
    IMG_4507.JPG
    470.5 KB · Views: 36
  • IMG_4511.JPG
    IMG_4511.JPG
    757.2 KB · Views: 38
OP
OP

alecrmyers

Member
Joined
Sep 24, 2009
Messages
85
Format
Large Format
Excellent results - thank you for posting.

I've found Post-it notes make good single-use film leaders too, if I'm interpreting you correctly.
 
OP
OP

alecrmyers

Member
Joined
Sep 24, 2009
Messages
85
Format
Large Format
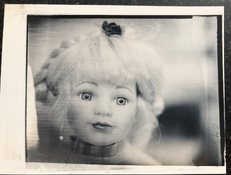
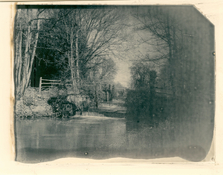
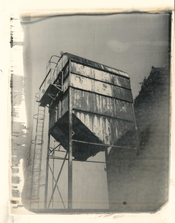
As you can see, today I got my hands on an 8x10 camera to test with. (Thanks to Gallery 44 in Toronto, for that.)

Things I learned today:

- a batch based on 10g of silica will plate 15-16 sheets of 8.5x11 paper, with a 4 mil coating bar

- making 8x10 prints uses up paper, developer, film - everything at 4 times the rate of testing with 4x5. (Actually 8 times as fast as I have been using half-sheets of 4x5 to save money)

- wrangling the paper, developer and processfor an 8x10 print is much much harder than for a 4x5 print. You've got to be really slick with laying things out. I've come up with all sorts of way to use painters' tape to keep things under control but it starts to feel like an origami session at times.

- I think I figured out how/why the pressure rollers in the laminator work effectively. I think the 'action' is happening in the bead of developer where the sheets are pressed together. Once a part of the film/paper sandwich has passed through the rollers the development and transfer is essentially over at that place. This is based on observations and experiments using a bigger manual laminator like this: https://www.aliexpress.com/item/32223984358.html where you can adjust the roller spacing and/or pressure, but have to push the paper through manually, or crank the handle, to get it to move.

What I found is this: if the rollers are set tight to squeeze the paper and film together you only get development if you move the paper through very very slowly - like around the same speed as the electric laminator. if you go too fast you get blank results. And when you go slowly enough to get print transfer the density of the print is very sensitive to how fast the paper moves through. (So what I thought was a disadvantage of the electric unit - it's slow - turns out to be vital for it to work.) If you set the roller spacing of the manual unit wide enough to leave a gap then you can push or pull the paper through quickly and still get good development and transfer but doing that has the following disadvantages: it needs a lot more developer, leaving a thick layer on the print. That takes a long time to dry, and sometimes leads to salting out - a white crust forms after drying. Also, because the laminator isn't a precision engineered item there's a lot of backlash in the screw jacks that set the roller spacing. And it's very hard to get a repeatable setting that works reliably.

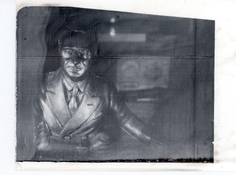
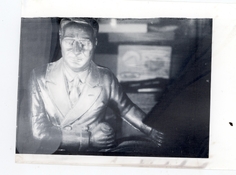
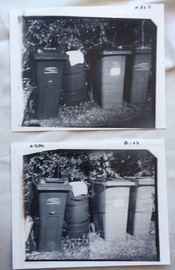
On the other hand there are problems with the electric laminator too: firstly, as you'll see on the image above, it leaves streaks down the print. I though these might be to do with how the paper was prepared, but now I'm quite sure they're caused by the way the developer spreads under pressure. One solution seems to be to decrease the viscosity of the developer so it spreads more easily. But that increases the way it puddles and makes it easier to run out of the sides of the paper into the laminator mechanism.

Secondly 8x10 paper is about as big as you can go in a desktop laminator designed for 11" wide materials. So that's not going to scale up to really big print sizes.

Obviously I'll keep working at it until I have solutions. As far as the viscosity issue goes I think there's an answer for which a clue appears in this video about a visit to the Polaroid factory. I won't spoil it here but send me a message if you think you also see what I think I see that might help.
 

richyd

Member
Joined
Jul 24, 2012
Messages
184
Location
London UK
Format
Medium Format
Enjoying some unusual bright sunshine here in England so went out yesterday afternoon to take some shots in the field. Unfortunately I used my Polaroid 110 conversion and the mechanism for retaining film holders with a rubber band is a bit unreliable, I usually use a grafmatic with this, so there is some light fogging at one end. However, really pleased with the outcome. These were shot at E.I. 320. Bear in mind these are scans so never entirely representative of the actual print but very close.. I couldn't see any discernible difference in tone straight out with the previous test.
 

Attachments

  • DTP05m016.jpg
    DTP05m016.jpg
    620.2 KB · Views: 37
  • DTP05m015.jpg
    DTP05m015.jpg
    680.2 KB · Views: 37
OP
OP

alecrmyers

Member
Joined
Sep 24, 2009
Messages
85
Format
Large Format
I like the compositions. You need to use more developer - it got a bit thin at the ends in the corners.
 
Photrio.com contains affiliate links to products. We may receive a commission for purchases made through these links.
To read our full affiliate disclosure statement please click Here.

PHOTRIO PARTNERS EQUALLY FUNDING OUR COMMUNITY:


Ilford ADOX Freestyle Photographic Stearman Press Weldon Color Lab Blue Moon Camera & Machine
Top Bottom