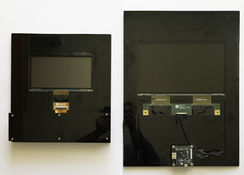
DIY 31 Megapixel Enlarger

Dried roses

A
Dried roses

  • 0
  • 0
  • 12
Hot Rod

A
Hot Rod

  • 1
  • 0
  • 32
Relics

A
Relics

  • 0
  • 0
  • 31
The Long Walk

A
The Long Walk

  • 1
  • 0
  • 51
totocalcio

A
totocalcio

  • 4
  • 2
  • 86

Recent Classifieds

Forum statistics

Threads
197,450
Messages
2,759,160
Members
99,501
Latest member
Opa65
Recent bookmarks
0

John Keitel

Member
Joined
Oct 12, 2023
Messages
2
Location
Austria
Format
35mm
Raspberry Pi 4 (4GB) works fine with the display and the adapter board.

This is both money saver and space saver - you don't need a computer, graphics card or even display. Or mouse and keyboard laying around.
Sounds pretty intresting! Have you been able to configure the Raspberry 4 to output the needed 2560x4320 (or 4320x2560?) resolution via hdmi to drive the "surrogate" 8k (7680x4320)?
I contacted the people at SUMAOPAI and they mentioned they were able to do so.

They also mentioned the fact that the upcoming 12K and 14K screens should be drivable with a standard Raspberry pi 4 too. They are reluctant (for the time being) to give more details on how to properly configure the Rpi.

In any case it should be a great project to be able to drive those lcds directly via the edp (or MIPI DSI?) interface via FPGA. Who knows if they are willing to give the datasheet for the MIPI commands.
 
Last edited:

radiant

Member
Joined
Aug 18, 2019
Messages
2,135
Location
Europe
Format
Hybrid
Sounds pretty intresting! Have you been able to configure the Raspberry 4 to output the needed 2560x4320 (or 4320x2560?) resolution via hdmi to drive the "surrogate" 8k (7680x4320)?
I contacted the people at SUMAOPAI and they mentioned they were able to do so.

They also mentioned the fact that the upcoming 12K and 14K screens should be drivable with a standard Raspberry pi 4 too. They are reluctant (for the time being) to give more details on how to properly configure the Rpi.

In any case it should be a great project to be able to drive those lcds directly via the edp (or MIPI DSI?) interface via FPGA. Who knows if they are willing to give the datasheet for the MIPI commands.

Yes I configured the RPi 4 for that resolution.

The display-board is actually basically "just" FPGA, I discussed about this with SUMOPAI guy. I was of course thinking myself that this could be fun FPGA project but as the RPi works so well, I don't see any point - maybe waste my time on printing and calibrating the last bits.

The "problem" with this solution is that the prints look absolutely perfect. There is no sign of analog process, if you don't pick up the paper you cannot tell if it is a quality inkjet print or silver gelatin wet print. Only benefit I can see of doing traditional B&W prints that these are lasting longer than inkjets.
 
OP
OP

avandesande

Subscriber
Joined
Sep 7, 2002
Messages
1,339
Location
Albuquerque, NM
Format
Med Format Digital
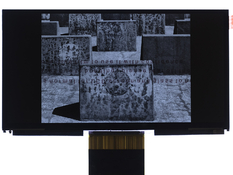
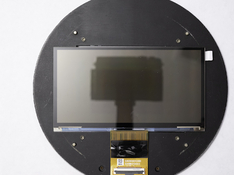
Some pictures of the 6.9" 9K LCD, displaying image and on top of Beselar 4x5 negative carrier.
 

Attachments

  • lcdcapture.jpg
    lcdcapture.jpg
    339.3 KB · Views: 190
  • negative carrier.jpg
    negative carrier.jpg
    208.7 KB · Views: 193

P1505

Member
Joined
Jun 30, 2019
Messages
91
Location
London
Format
35mm RF
Hi. Been a little under the weather which has slowed me down on kicking this off, however I now have an enlarger that can handle 6x7 and want to get going.

I’ll be going the Raspberry Pi route as I have plans to add buttons and options when working at the enlarger. In terms of screens with drivers, is there a new common consensus?

Have the scripts working on my Mac. Going to enjoy working on the upgrades :smile:
 

Carnie Bob

Member
Joined
Nov 5, 2023
Messages
321
Location
Toronto , Ont Canada
Format
4x5 Format
I used the QTR step wedge script, photoshop and a 21 step wedge (included with the tool)
Yes, it gets very tricky near the toes.
Below is curve for ilford warmtone and output chart. Don't worry about the image it is something random without level adjustment.
I hope to start building a tool that creates a lut based off of a gradient that you would crop to size and the software would read automatically.


View attachment 347659 View attachment 347660

Are you able to read your output LAB numbers on the print to verify if they match your LAB numbers on the Screen?
 

Carnie Bob

Member
Joined
Nov 5, 2023
Messages
321
Location
Toronto , Ont Canada
Format
4x5 Format
Another thought on contrast control. when we make digital negatives for contact printing they are matching the screen in a good way but in reverse. But we have found that when printing the silver
we split print using low grade filter to establish a basic density and then we use the #5 to bring in contrast. Even though we have what we think is a perfect first print we always seem to improve.
I have basically read through this thread, I am not very techno geeke so all the talk about the screen and devices make not a lot of sense to me ... but I. have done a lot of digital printing with a Lambda
for direct silver and as well negatives from the lambda and now from an Epson P7000 . silly thought - could you not match with your input the wavelength of light that is achieved when one uses filters, lets
say balance from filter 0 - 1-2-3-4-5 . then do split exposures for a first exposure through the lower filter light then do a second filter through the Higher filter, sometimes we do at least 3 hits of #5 even though
many would think the first single filter print would be perfect. We also dodge and burn on the contact print which is very difficult verse dodging and burning when an image is projected.
I like the thought process of the original poster of this thread and look forward to seeing more results.
Regarding Gum Proces.. your unit would have to output a tremendous amount of UV light to harden the gum, in my lab I use a cone edition light system where the light out put for Palladium is about 1.35 min and
the amount of light needed for hardening the gum is 1.50 min.. this would translate to an normal enlarger to about three hours of exposures, which I do not think is practical, But if this device or something like this
device could lay on the paper and you could Mimic 360nm of UV light then the world would be your oyster me thinks.
 

koraks

Moderator
Moderator
Joined
Nov 29, 2018
Messages
20,623
Location
Europe
Format
Multi Format
could you not match with your input the wavelength of light that is achieved when one uses filters, lets
say balance from filter 0 - 1-2-3-4-5

That's more something that would be done in the light source than in the LCD 'negative'. Moreover, the whole point of the digital enlarger is that you can shift all dodging, burning, contrast adjustment, finetuning etc. etc. to the digital stage (i.e. Photoshop) while you'd only need to print the paper on a single contrast and with the same settings everytime - no burning, dodging etc. Just a straight print, every time. Very much like the Lambda. Of course, one wouldn't be limited to such a workflow, and dodging etc. under the enlarger would still be possible, but it wouldn't be required anymore. I think that's part of the rationale for exploring this route - the other half being the direct marriage between digital capture and 'analog' output/print.

your unit would have to output a tremendous amount of UV light to harden the gum

Absolutely. There are promising results in some other threads that have now sunk down a bit, that dealt with UV enlargers for alt. processes. Of course, there are (significant) limitations, but with the advent of high-power COB LEDs, it's starting to become sort of feasible. Since the LCD's used here are in first instance aimed at UV hardening applications (3D printing resin), the combination of this LCD and a high-power UV LED light source isn't all that outlandish. For somewhat smallish prints (let's say up to 8x10) and with some patience, I think it could be done today.

If you want, I can root around for those threads about the UV enlargers. They date from about 18-24 months ago if memory serves.
 

Carnie Bob

Member
Joined
Nov 5, 2023
Messages
321
Location
Toronto , Ont Canada
Format
4x5 Format
That's more something that would be done in the light source than in the LCD 'negative'. Moreover, the whole point of the digital enlarger is that you can shift all dodging, burning, contrast adjustment, finetuning etc. etc. to the digital stage (i.e. Photoshop) while you'd only need to print the paper on a single contrast and with the same settings everytime - no burning, dodging etc. Just a straight print, every time. Very much like the Lambda. Of course, one wouldn't be limited to such a workflow, and dodging etc. under the enlarger would still be possible, but it wouldn't be required anymore. I think that's part of the rationale for exploring this route - the other half being the direct marriage between digital capture and 'analog' output/print.


Absolutely. There are promising results in some other threads that have now sunk down a bit, that dealt with UV enlargers for alt. processes. Of course, there are (significant) limitations, but with the advent of high-power COB LEDs, it's starting to become sort of feasible. Since the LCD's used here are in first instance aimed at UV hardening applications (3D printing resin), the combination of this LCD and a high-power UV LED light source isn't all that outlandish. For somewhat smallish prints (let's say up to 8x10) and with some patience, I think it could be done today.

If you want, I can root around for those threads about the UV enlargers. They date from about 18-24 months ago if memory serves.

My point is that even with all the dodge and burn in PS and we are pretty good at it , we still split print using low and high filters to get an more refined print.
 

koraks

Moderator
Moderator
Joined
Nov 29, 2018
Messages
20,623
Location
Europe
Format
Multi Format
Ok, thanks Bob. I now see what you mean. Of course, an LCD like this can be combined with any kind of light source, including something that works for split grade. This can either be old-fashioned filtered incandescent, an old cold light or some kind of more modern LED light source. The end result will be the same.
 

John Keitel

Member
Joined
Oct 12, 2023
Messages
2
Location
Austria
Format
35mm
Yes I configured the RPi 4 for that resolution.

The display-board is actually basically "just" FPGA, I discussed about this with SUMOPAI guy. I was of course thinking myself that this could be fun FPGA project but as the RPi works so well, I don't see any point - maybe waste my time on printing and calibrating the last bits.

The "problem" with this solution is that the prints look absolutely perfect. There is no sign of analog process, if you don't pick up the paper you cannot tell if it is a quality inkjet print or silver gelatin wet print. Only benefit I can see of doing traditional B&W prints that these are lasting longer than inkjets.

Did you manage to do so by just modify the Rpi4 "config.txt" file?
Would you be kind enough to share the Raspberry configuration code/method?
 

calebarchie

Subscriber
Joined
Jul 25, 2014
Messages
672
Location
Australia 2680
Format
Hybrid
14K Incoming...


Just wish they would ditch the 16:9 aspect ratio, even for 3D printing its awkward.

Given I have a 120 size enlarger I’m thinking of getting a smaller screen. What are the thoughts on this?


Generally, you would need an even higher resolution display due to greater enlargement factor - you will get an image but idk if 4K will cut it quality wise unless you keep them small.

C
 

P1505

Member
Joined
Jun 30, 2019
Messages
91
Location
London
Format
35mm RF
14K Incoming...


Just wish they would ditch the 16:9 aspect ratio, even for 3D printing its awkward.


Generally, you would need an even higher resolution display due to greater enlargement factor - you will get an image but idk if 4K will cut it quality wise unless you keep them small.

C

You’re right. I’m hunting for a higher resolution smaller display.
 
OP
OP

avandesande

Subscriber
Joined
Sep 7, 2002
Messages
1,339
Location
Albuquerque, NM
Format
Med Format Digital
Another thought on contrast control. when we make digital negatives for contact printing they are matching the screen in a good way but in reverse. But we have found that when printing the silver
we split print using low grade filter to establish a basic density and then we use the #5 to bring in contrast. Even though we have what we think is a perfect first print we always seem to improve.
I have basically read through this thread, I am not very techno geeke so all the talk about the screen and devices make not a lot of sense to me ... but I. have done a lot of digital printing with a Lambda
for direct silver and as well negatives from the lambda and now from an Epson P7000 . silly thought - could you not match with your input the wavelength of light that is achieved when one uses filters, lets
say balance from filter 0 - 1-2-3-4-5 . then do split exposures for a first exposure through the lower filter light then do a second filter through the Higher filter, sometimes we do at least 3 hits of #5 even though
many would think the first single filter print would be perfect. We also dodge and burn on the contact print which is very difficult verse dodging and burning when an image is projected.
I like the thought process of the original poster of this thread and look forward to seeing more results.
Regarding Gum Proces.. your unit would have to output a tremendous amount of UV light to harden the gum, in my lab I use a cone edition light system where the light out put for Palladium is about 1.35 min and
the amount of light needed for hardening the gum is 1.50 min.. this would translate to an normal enlarger to about three hours of exposures, which I do not think is practical, But if this device or something like this
device could lay on the paper and you could Mimic 360nm of UV light then the world would be your oyster me thinks.

Hi Bob, I am sure you can do split printing, I've used multi grade filters to alter the response in lith printing but haven't tried split printing. I have to admit not having much experience in the darkroom other than digital printing the last year.
I've had quite a bit of thought about UV source for alternative processes, I think that a point source condenser combined with a UV laser(with a lens to diverge the beam) might be powerful enough to do this. I have had my eye out forever for a point source enlarger but have never seen one available anywhere. There are larger LCDs available with a 15" diagonal that could be used for contact prints.
 
OP
OP

avandesande

Subscriber
Joined
Sep 7, 2002
Messages
1,339
Location
Albuquerque, NM
Format
Med Format Digital
That's more something that would be done in the light source than in the LCD 'negative'. Moreover, the whole point of the digital enlarger is that you can shift all dodging, burning, contrast adjustment, finetuning etc. etc. to the digital stage (i.e. Photoshop) while you'd only need to print the paper on a single contrast and with the same settings everytime - no burning, dodging etc. Just a straight print, every time. Very much like the Lambda. Of course, one wouldn't be limited to such a workflow, and dodging etc. under the enlarger would still be possible, but it wouldn't be required anymore. I think that's part of the rationale for exploring this route - the other half being the direct marriage between digital capture and 'analog' output/print.
Hello Koraks, I will have to respectfully disagree. A image for monitor display is a different medium than a silver gelatin print. No matter how hard you try they will never be the same.... a print changes just by looking at it in different rooms of the house or by a window. The last 10 or 20% of polish can only accomplished in the darkroom. With the Lamda printer you are forced to do everything up front because you have to work in bulk and the time and cost of materials are so I high. With the digital enlarger work exactly the same way as with a negative, tweaking to hearts content.
 
OP
OP

avandesande

Subscriber
Joined
Sep 7, 2002
Messages
1,339
Location
Albuquerque, NM
Format
Med Format Digital
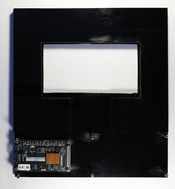
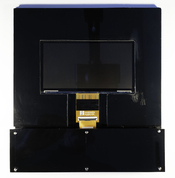
Here are the LCD carries for 4x5 and 8x10 stages of a Beseler enlarger. I should have some prints ready soon.
 

Attachments

  • negativecarrier.jpg
    negativecarrier.jpg
    127.4 KB · Views: 119
  • negativecarrier2.jpg
    negativecarrier2.jpg
    105.7 KB · Views: 118
  • negativecarrier3.jpg
    negativecarrier3.jpg
    119.8 KB · Views: 118

koraks

Moderator
Moderator
Joined
Nov 29, 2018
Messages
20,623
Location
Europe
Format
Multi Format
Hello Koraks, I will have to respectfully disagree.

If you mean that you can do burning & dodging etc. on the enlarger, then yeah, sure. And there's stuff like lith, of course. In that sense it's different than Lambda, I agree.
No matter how hard you try they will never be the same

Of course not. But in this sense the digital enlarger approach really isn't different from other digital output methods. The only difference is that you have a second (analog) stage of making adjustments (burning, dodging, filter grade). The question is really how much of the second stage you really need, or want to use, given what you can do in the digital domain. I mean, the argument that you can't predict what the print will look like based on the soft-proofed view of your monitor can also be regarded as a challenge waiting for the printer to work on that soft proof workflow and their skills in predicting the qualities of the tangible print. Between a calibrated workflow and sheer experience, there's a lot to be gained.
 

maltfalc

Member
Joined
May 11, 2007
Messages
108
Format
35mm
Hi Bob, I am sure you can do split printing, I've used multi grade filters to alter the response in lith printing but haven't tried split printing. I have to admit not having much experience in the darkroom other than digital printing the last year.
I've had quite a bit of thought about UV source for alternative processes, I think that a point source condenser combined with a UV laser(with a lens to diverge the beam) might be powerful enough to do this. I have had my eye out forever for a point source enlarger but have never seen one available anywhere. There are larger LCDs available with a 15" diagonal that could be used for contact prints.

a laser is the absolute last thing you should ever use. normal leds have higher output and will give much smoother illumination. a laser will litter your print with magnified shadows of every microscopic speck of dust between it and your print and all sorts of diffraction artifacts.

also, i've wanted to build something similar to your digital enlarger for years, but may never get around to it, so here's something for you to try. mount a traditional silver gelatin negative below the lcd with a sheet of diffusion material between them to blur out the individual pixels, then display photoshop or a similar program on the lcd and use that program to add digital dodging and burning, gradient filters, correct for vignetting, etc..
 
Last edited:

radiant

Member
Joined
Aug 18, 2019
Messages
2,135
Location
Europe
Format
Hybrid
Did you manage to do so by just modify the Rpi4 "config.txt" file?
Would you be kind enough to share the Raspberry configuration code/method?

Uups, sorry, I haven't noticed any notifications from here so I've missed your request.

Here is the configs I got from manufacturer:


# config rpi4_10.1 8K_mono 速猫派
#www.nanodlp.com
#www.sumaopai.com
disable_camera_led=1
dtparam=i2c_arm=on
#dtparam=audio=off

#dtoverlay = pi3-disable-bt
enable_uart=1

[HDMI:0]
hdmi_ignore_edid=0xa5000080
display_hdmi_rotate=0
hdmi_drive=1
hdmi_force_hotplug=1
hdmi_timings=2560 0 56 32 44 4320 0 25 3 6 0 0 0 25 0 221184000 0
hdmi_group=2
hdmi_mode=87
hdmi_pixel_freq_limit=500000000
hvs_priority=0x32ff
max_framebuffer_width=2560
max_framebuffer_height=4320
framebuffer_width=2560
framebuffer_height=4320
framebuffer_depth=32
framebuffer_ignore_alpha=1
config_hdmi_boost=4
gpu_mem=192
framebuffer_ignore_alpha=1

hdmi_pixel_encoding=2
disable_overscan=1

dtparam=audio=on
gpu_mem=128
dtoverlay=pi3-miniuart-bt
#CM4 WIFI天线
dtparam=ant2

force_turbo=1
enable_uart=1
dtparam=i2c_arm=on
dtoverlay=dwc2,dr_mode=host
dtoverlay=gpio-poweroff,active_low,gpiopin=23


# config rpi4_10.1 8K_mono speed cat pie
# www.nanodlp.com
# www.sumaopai.com
disable_camera_led = 1
dtparam=i2c_arm=on
#dtparam=audio=off

#dtoverlay = pi3-disable-bt
enable_uart = 1

[HDMI:0]
hdmi_ignore_edid = 0xa5000080
display_hdmi_rotate = 0
hdmi_drive = 1
hdmi_force_hotplug = 1
hdmi_timings = 2560 0 56 32 44 4320 0 25 3 6 0 0 0 25 0 221184000 0
hdmi_group = 2
hdmi_mode = 87
William = 500000000
hvs_priority = 0x32ff
max_framebuffer_width = 2560
max_framebuffer_height = 4320
framebuffer_width = 2560
framebuffer_height = 4320
framebuffer_depth = 32
framebuffer_ignore_alpha = 1
config_hdmi_boost = 4
gpu_mem = 192
framebuffer_ignore_alpha = 1

hdmi_pixel_encoding = 2
disable_overscan = 1

dtparam=audio=on
gpu_mem = 128
dtoverlay=pi3-miniuart-bt
# CM4 WIFI antenna
dtparam=ant2

force_turbo = 1
enable_uart = 1
dtparam=i2c_arm=on
dtoverlay=dwc2,dr_mode=host
dtoverlay=gpio-poweroff,active_low,gpiopin=23
---
 

Carnie Bob

Member
Joined
Nov 5, 2023
Messages
321
Location
Toronto , Ont Canada
Format
4x5 Format
a laser is the absolute last thing you should ever use. normal leds have higher output and will give much smoother illumination. a laser will litter your print with magnified shadows of every microscopic speck of dust between it and your print and all sorts of diffraction artifacts.

also, i've wanted to build something similar to your digital enlarger for years, but may never get around to it, so here's something for you to try. mount a traditional silver gelatin negative below the lcd with a sheet of diffusion material between them to blur out the individual pixels, then display photoshop or a similar program on the lcd and use that program to add digital dodging and burning, gradient filters, correct for vignetting, etc..

Ok - wow- have you ever printed with lasers? or LED for that matter , RGB lasers at 400ppi exposure has much more power to expose silver paper than LED (Chromira) and if you understand how a Lambda Laser printer works you would understand how wonderful the print or film can be.
 

Carnie Bob

Member
Joined
Nov 5, 2023
Messages
321
Location
Toronto , Ont Canada
Format
4x5 Format
Just to add to this thread : I have tested on my Lambda and my inkjet printer both ways to make silver prints from each device with a twist.

I would take a digital file from any source and first make a Lambda silver print . Then I would make a Lambda Negative of the same image and an Inkjet negative of
the same image .I would then make a print on Ilford paper to try to match the Lambda print using the lambda negative which is silver and the inkjet negative which is silver. These prints were all the same size - 16x 20 inches.
When comparing all three ways of making the print it was very difficult to decide which image is better... In fact I ditched the Lambda in Jan of this year and went completely to inkjet negatives and contacting on every type of paper you can imagine, I use quadtone rip to print the negs and I have to say I am very pleased with the results.
The Lambda negs were IMHO the best because the negatives would stand the test of time whereas the inkjet negs have a short shelf life but on close examination between the two ways of printing , even with my best print sniffing methods the difference was not worth the effort of maintaining a device from the 90's which needs service, lasers and took up a lot of space.

This is why I think the OP is on to something here.I believe that his/her prints will be very good and I encourage this type of experimentation. It kind of reminds me of the Devere Digital Enlarger which in fact if my memory serves me well was the first device to do silver prints on silver paper, - a small lab in USA was actually doing this before I purchased my Lambda. 2000-2002 era.

FWIW if you google digital silver murals on wikipedia you. will see that Ilford and Metro Imaging take claim to making the first digital silver murals in 2006, spoiler alert I have mural prints made in 2003 on Agfa Classic that were done 4 years before they launched there paper , I may someday have to change the record. ( one of the prints is by Russel Monk hanging in my lab at 30 x 40 inches)

I digress - today we work weekly making silvers, pt pd, gum overs using inkjet digital negatives... Koraks above mentioned a new line of printers that may come into our world of printmaking that use resins - I agree with him that there is great potential out there.
Salto in conjunction with a Japanese company developed a flat bed device that could do pt pd prints, there is also company's that are using resin to harden images on many substrates, not to mention all the work with 3 D printers...


My Bucket List device is a 30 x 40 device is one that can lay down pt pd as a first layer on paper and then in registration over production timelines lay down pigmented gum layers in perfect register and wash out as normal, this device would not be limited to pt pd but other alternative process to lay. down , and if there is a really smart McGuiver out there make it possible to register silver print as the base image and then coloured gum registered layers above..

Call me crazy but I do believe this is the next stage of my life in printmaking... If the OP stretches his concept , incorporate UV exposure to the mix he/she may hit pay dirt.

Bob
 

koraks

Moderator
Moderator
Joined
Nov 29, 2018
Messages
20,623
Location
Europe
Format
Multi Format
Koraks above mentioned a new line of printers that may come into our world of printmaking that use resins - I agree with him that there is great potential out there.

Yes, although to clarify I was referring to resin 3D printers used for additive manufacturing, not 2D printmaking. They are the reason why these 'stand-alone' LCD's exist, because they are used in conjunction with an UV source to selectively harden out resin (much like gum etc.) layer by layer (also like gum, carbon etc.) to build 3D objects (that's where the analogy ends).

As to lasers, I think you and @maltfalc may have been talking past each other. There's no doubt the Chromira and basically every chromogenic color printer out there uses lasers to demonstrably excellent effect - unless they use tiny LED bars. In an enlarger setting I see the point @maltfalc infers, which is that highly collimated light would make any kind of dust etc. painfully visible. There's a difference between scanning with tiny laser beams a print surface within the controlled and virtually sealed environment of a digital imaging system like the Chromira and an enlarger, with its inherently longer optical path and basically way much more opportunity to get all kinds of muck in it. I never tried it, but I understand those who have tried printing with a true point source through a condenser stack are familiar with the challenges it brings. It's unforgiving. Employing lasers in an enlarger would be very much the same - unless the laser would be diffused, of course, but that would defy the purpose of using a laser.
incorporate UV exposure to the mix he/she may hit pay dirt.
That's within feasible limits now. Exposures will be very slow, still, because you need *a lot* of UV power to focus it through a lens system. But it's been done, with some degree of success. Small prints, very long exposure times. But still.
It would work sort of conveniently if you'd move from ca. 100W of UV power up to 1kW or more. This of course brings significant challenges in light source design.
 

calebarchie

Subscriber
Joined
Jul 25, 2014
Messages
672
Location
Australia 2680
Format
Hybrid
If you allow me, I'll chime in here about a few topics having experience with a range of AM and Photolab tech. @Carnie Bob , I posted earlier in the UV enlarger thread but let me draw your attention to it again:


This is a UV DLP Engine and probably the closest thing today to a UV enlarger in reach to an average person (bar step and repeat machines etc). The optics, light source and DLP chip are already handled just give it an input. I imagine a lot could be done with these outside of 3D and UV printing contexts and I will have a play myself when time and funds allow. Point being, there are lots of these kind of modules actively being developed, this is just one of the more consumer friendly options - just keep an eye on this space.

As for the Devere machines, I have used one and yes they use two separate blue and green exposures, its just the most logical and controlled way to achieve the full range of contrast available. Traditional dodging and burning is possible within limits, though you will quickly hit the ceiling with only 8 bits of data to play with. Also apologies, I believe you have reached out to me before about some of these plans, I have so many projects on my plate for work I have been unable to add more!

@koraks Correct me if I am wrong, but I believe Chromira moved away from lasers a long while ago. The logic for this being is that all lasers (solid state or not) have a gaussian dot profile and associated scatter which affects the final sharpness but also collimation complexity (the most uniform and tightest dot is that of deep blue used in Bluray). At the time, the easiest way to get around this was to simply use LEDs instead once they became powerful enough, fortunately there have been leaps and bounds in laser technology since then. There are now an array of different types of lasers and micro-optic beam shaping diffusers to give an example, however all of these come at a cost of course and right now limited to scientific and research fields.

C
 
Last edited:

koraks

Moderator
Moderator
Joined
Nov 29, 2018
Messages
20,623
Location
Europe
Format
Multi Format
As for the Devere machines, I have used one and yes they use two separate blue and green exposures, its just the most logical and controlled way to achieve the full range of contrast available. Traditional dodging and burning is possible within limits, though you will quickly hit the ceiling with only 8 bits of data to play with.

Yeah, I recognize that. That's why even for the first version of my LED enlarger light source I went for 12 bit (and currently 16 bit) PWM resolution. Also because this enables regular exposure (i.e. all 3 colors at the same time), which makes burning & dodging work the same as with an incandescent light source.

As to the Chromira / LED - you may well be right; I'd have to check my notes. Currently in the chromogenic/RA4 domain there are both LED and laser machines in active use. The LED ones have several staggered bars on a single 'head', the laser machines use a scanning approach AFAIK. The laser exposures are in the 100ns range AFAIK, the LED exposures considerably longer (two orders of magnitude or so?)
 

calebarchie

Subscriber
Joined
Jul 25, 2014
Messages
672
Location
Australia 2680
Format
Hybrid
I am also not completely up to date, at least regarding the photo equipment. I recall some Nortisu minilabs used halogen with and LCD mask, perhaps you may be getting confused with that? A lot of them used polygon mirrors to increase throughput (a line instead of a dot) and certainly lasers are still far more efficient then LEDs leading the shorter exposure times (they just have a lot more variable to control).

Also, I think what maltfalc is trying to say is something along the lines of this; although there may be various designs of point source enlargers, the majority of them use collimation and expanding optics to focus on the filament of a traditional light source (hence turning it into a point). A laser, by design is inherently a point source, simply shooting this into aforementioned optical system, I imagine would only intensify the scattering phenomenon which would of course be evident in the resultant print.

A decade ago, a DPUG user developed a similar retrofit system using lasers - except the beam was simply scanned using a galvo although there were other issues with the approach (focus, intensity control and costs). I do wonder where he is at nowadays, I don't think his account survived the merger.

C
 
Photrio.com contains affiliate links to products. We may receive a commission for purchases made through these links.
To read our full affiliate disclosure statement please click Here.

PHOTRIO PARTNERS EQUALLY FUNDING OUR COMMUNITY:


Ilford ADOX Freestyle Photographic Stearman Press Weldon Color Lab Blue Moon Camera & Machine
Top Bottom