DIY 31 Megapixel Enlarger

totocalcio

A
totocalcio

  • 3
  • 0
  • 33
Untitled

A
Untitled

  • 5
  • 2
  • 91
Jerome Leaves

H
Jerome Leaves

  • 3
  • 0
  • 65
Jerome

H
Jerome

  • 2
  • 0
  • 69
Sedona Tree

H
Sedona Tree

  • 1
  • 0
  • 71

Recent Classifieds

Forum statistics

Threads
197,438
Messages
2,758,972
Members
99,498
Latest member
spiewak2
Recent bookmarks
1

calebarchie

Subscriber
Joined
Jul 25, 2014
Messages
672
Location
Australia 2680
Format
Hybrid
Yeah, I recognize that. That's why even for the first version of my LED enlarger light source I went for 12 bit (and currently 16 bit) PWM resolution. Also because this enables regular exposure (i.e. all 3 colors at the same time), which makes burning & dodging work the same as with an incandescent light source.

Sorry I was speaking to Bob, but also with reference to the LCD panel itself not the light source but by all means more resolution is better when it comes to these kind of things.
 

koraks

Moderator
Moderator
Joined
Nov 29, 2018
Messages
20,598
Location
Europe
Format
Multi Format
I recall some Nortisu minilabs used halogen with and LCD mask, perhaps you may be getting confused with that?

Certainly not. I'm talking about contemporary digital exposure systems for RA4 paper. But I never looked deeply into how they (esp. the laser units) work. I always assumed they would scan similarly to a regular laser printer, i.e. a rotating mirror.

but also with reference to the LCD panel itself

OK, gotcha. 8 bit is probably OK on the pixel level. I ran into problems with 8 bit being insufficient for color work.

Apologies for the digression into color printing domain; it's top of mind, but it's offtopic here. We might discuss this elsewhere; it's interesting stuff in its own right!
 

Carnie Bob

Member
Joined
Nov 5, 2023
Messages
316
Location
Toronto , Ont Canada
Format
4x5 Format
If you allow me, I'll chime in here about a few topics having experience with a range of AM and Photolab tech. @Carnie Bob , I posted earlier in the UV enlarger thread but let me draw your attention to it again:
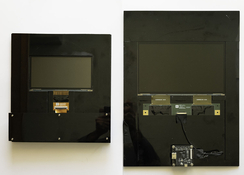

This is a UV DLP Engine and probably the closest thing today to a UV enlarger in reach to an average person (bar step and repeat machines etc). The optics, light source and DLP chip are already handled just give it an input. I imagine a lot could be done with these outside of 3D and UV printing contexts and I will have a play myself when time and funds allow. Point being, there are lots of these kind of modules actively being developed, this is just one of the more consumer friendly options - just keep an eye on this space.

As for the Devere machines, I have used one and yes they use two separate blue and green exposures, its just the most logical and controlled way to achieve the full range of contrast available. Traditional dodging and burning is possible within limits, though you will quickly hit the ceiling with only 8 bits of data to play with. Also apologies, I believe you have reached out to me before about some of these plans, I have so many projects on my plate for work I have been unable to add more!

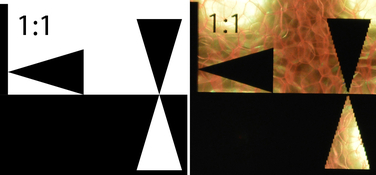
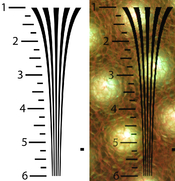
@koraks Correct me if I am wrong, but I believe Chromira moved away from lasers a long while ago. The logic for this being is that all lasers (solid state or not) have a gaussian dot profile and associated scatter which affects the final sharpness but also collimation complexity (the most uniform and tightest dot is that of deep blue used in Bluray). At the time, the easiest way to get around this was to simply use LEDs instead once they became powerful enough, fortunately there have been leaps and bounds in laser technology since then. There are now an array of different types of lasers and micro-optic beam shaping diffusers to give an example, however all of these come at a cost of course and right now limited to scientific and research fields.

C

Correct Chromira has always been a LED device and was never strong enough to produce silver gelatin prints.
 

calebarchie

Subscriber
Joined
Jul 25, 2014
Messages
672
Location
Australia 2680
Format
Hybrid
@koraks Which particular modern machines that still use lasers are you referring to? AFAIK I don't think even Noritsu ever switched to solid state yet and still use gas (improved gamut) I'm not privy to the optical setup of their newer green machines (if they aren't led already). Chromira had a later minilab that may have used lasers, too.

Yes colour is a completely different beast, my time with the devere was not extensive but I believe it consisted of RGB LED and similar monochrome 8-bit LCD (which is limited to 256 tones). Minor dodging and burning was OK but different to traditional negative of course, keep in mind you had to do this with split-grade exposure too (not sure if there was an option to change this).

@Carnie Bob thanks for clarifying, my memory is a bit sketchy. I'm guessing this is why you opted for lambda? Though sounds like you wanted to do contact prints too otherwise there are various film recorders that could do well for enlargement. Imagesetter negs are probably best for alt, but like the lambda there is far too much upkeep - inkjet diginegs are certainly the way to go here.

C
PS. Annoyingly, there doesn't seem to be a way to insert quotes in editing previous messages (I used to go into the advanced editor to do so)
 
Last edited:

Carnie Bob

Member
Joined
Nov 5, 2023
Messages
316
Location
Toronto , Ont Canada
Format
4x5 Format
@koraks Which particular modern machines that still use lasers are you referring to? AFAIK I don't think even Noritsu ever switched to solid state yet and still use gas (improved gamut) I'm not privy to the optical setup of their newer green machines (if they aren't led already). Chromira had a later minilab that may have used lasers, too.

Yes colour is a completely different beast, my time with the devere was not extensive but I believe it consisted of RGB LED and similar monochrome 8-bit LCD (which is limited to 256 tones). Minor dodging and burning was OK but different to traditional negative of course, keep in mind you had to do this with split-grade exposure too (not sure if there was an option to change this).

@Carnie Bob thanks for clarifying, my memory is a bit sketchy. I'm guessing this is why you opted for lambda? Though sounds like you wanted to do contact prints too otherwise there are various film recorders that could do well for enlargement. Imagesetter negs are probably best for alt, but like the lambda there is far too much upkeep - inkjet diginegs are certainly the way to go here.

C
PS. Annoyingly, there doesn't seem to be a way to insert quotes in editing previous messages (I used to go into the advanced editor to do so)

I had a very interesting set of conversations with the owner of the group selling the Devere Digital Enlarger, in fact with his comments I decided on Lambda, he was very miffed with me about image quality concerns and at the time I was in a position where a Lambda made sense, Even now a Lambda is probably one of the most quality control units I have ever owned or worked on in my career. I just decided on inkjet negs for contacts rather than Lambda negs for contact and I am ok with my decision to get rid of the machine 12 months ago.
 

calebarchie

Subscriber
Joined
Jul 25, 2014
Messages
672
Location
Australia 2680
Format
Hybrid
I had a very interesting set of conversations with the owner of the group selling the Devere Digital Enlarger, in fact with his comments I decided on Lambda, he was very miffed with me about image quality concerns and at the time I was in a position where a Lambda made sense, Even now a Lambda is probably one of the most quality control units I have ever owned or worked on in my career. I just decided on inkjet negs for contacts rather than Lambda negs for contact and I am ok with my decision to get rid of the machine 12 months ago.

So I understand, you are even doing silver contact prints with digital negatives? What medium are you using - there were always problems with dithering patterns but I had few ways to get around it with caveats.

Sorry for veering a bit off-topic but feel free to message me!
 

Carnie Bob

Member
Joined
Nov 5, 2023
Messages
316
Location
Toronto , Ont Canada
Format
4x5 Format
So I understand, you are even doing silver contact prints with digital negatives? What medium are you using - there were always problems with dithering patterns but I had few ways to get around it with caveats.

Sorry for veering a bit off-topic but feel free to message me!

Yes I am using quadtone rip program , my calibration was done by Greg Brophy using Boutwell's system, originally my curve was designed by Ron Reeder here in my shop.I am using a very simple pictorico like material and I print on Pt PD , Cyanotype, Gum overs both bases and of course Ilford Multigrade papers, I have only used two curves ever... one by Ron and a couple of years back the other by Greg. We are now testing with another lab who I collaborate with here in Toronto so that I can offer and make 30 x 40 inch multitone silvers. We are not using Quad tone rip but rather a program that the lab uses to calibrate all their papers..... With the Lambda there is an onboard densitometer that can work reflective or transmission mode and in its case a curve was developed to adjust the power levels of each laser to lay down a very accurate 21 step tablet.... I think there is a lot of Voodoo in this area where the poindexters try to make it very difficult for the average person to understand.
All we need to do is to produce a steptablet that accurately matches LAB numbers that are in the original file to final out put numbers that are read in the printed file. There will be some aberration's but I have always said this ... If it looks like a neg, if it walks like a neg, if it quacks like a neg THEN it is probably is a neg. I think we obsess over the nuances too much and forget that all we are actually doing when printmaking is laying down tone on paper. Some do it more accurately than others but on the flip side other don't care as much and their prints are very good. I happen to be on both sides of the fence where I understand the basics and can lay down a good tonal step wedge, but from this curve I have modified all my printing practices to make the same negative work with all the different types of prints.
 

calebarchie

Subscriber
Joined
Jul 25, 2014
Messages
672
Location
Australia 2680
Format
Hybrid
Bob, please message me directly to avoid taking this thread off-topic further. There are a few interesting ways to use QTR including controlling ink densities directly, and I know there are a bunch of other RIPs with similar capabilities (GutenPrint comes to mind among other commercial options).

I am surprised you are not seeing ink droplets on silver contacts when using transparency media, last time I tested the very fine 5760dpi/1.5pl nozzles it was still evident but I haven't kept up with newer tech and that was a while ago.

C
 

radiant

Member
Joined
Aug 18, 2019
Messages
2,135
Location
Europe
Format
Hybrid
Just some mobile snaps of my digital enlarger prints (cropped to show only image) . Image area rougly 18cm x 18cm.

IMG_6821_1024.JPG


IMG_6820_1024.JPG


IMG_6819_1024.JPG
 

Sandokan63

Member
Joined
Aug 17, 2021
Messages
8
Location
Switzerland
Format
35mm
I am thinking the other way round - use a film camera and macro lens to take a photo of the digital image being displayed and create a negative/transparency archive of your best digital photos which will survive into the 21st and 22nd century.
 

koraks

Moderator
Moderator
Joined
Nov 29, 2018
Messages
20,598
Location
Europe
Format
Multi Format
I am thinking the other way round - use a film camera and macro lens to take a photo of the digital image being displayed and create a negative/transparency archive of your best digital photos which will survive into the 21st and 22nd century.

A kind of 'poor man's LVT'. Nice, but it's different in every way from what's being discussed in this thread, so maybe open a new one for it.
 

radiant

Member
Joined
Aug 18, 2019
Messages
2,135
Location
Europe
Format
Hybrid
I am thinking the other way round - use a film camera and macro lens to take a photo of the digital image being displayed and create a negative/transparency archive of your best digital photos which will survive into the 21st and 22nd century.

Now that is a cool idea!

This could be done automatically too, just a program that shows images in series and triggers the camera (with autowinder).

Also what comes to my mind is how you could manipulate the exposure to achieve just the right kind of negatives for your needs.
 

radiant

Member
Joined
Aug 18, 2019
Messages
2,135
Location
Europe
Format
Hybrid
I've been thinking about an approach for large prints where a flashed/developed film is epoxied to the LCD (probably bottom). You would focus on the grain in the film instead of the grid lines. This would allow large prints to 'break up' naturally.

Avandesande, did you have a try on this? How did it turn out?
 
OP
OP

avandesande

Subscriber
Joined
Sep 7, 2002
Messages
1,339
Location
Albuquerque, NM
Format
Med Format Digital
Some prints from the small 9K lcd in the beseler 4x5 stage.....
 

Attachments

  • atlantic highlands.jpg
    atlantic highlands.jpg
    318.1 KB · Views: 185
  • chama_cemetary.jpg
    chama_cemetary.jpg
    302.7 KB · Views: 173
  • sky_sandyhook.jpg
    sky_sandyhook.jpg
    225.2 KB · Views: 180
  • negativecarrier3.jpg
    negativecarrier3.jpg
    119.8 KB · Views: 168

AndrewBurns

Member
Joined
Jul 12, 2019
Messages
177
Location
Auckland, New Zealand
Format
35mm
Hey I have a mono LCD screen and UV light source on the way from China which I plan to use for exposing alternative process prints. Would anybody in this thread who has produced software for these screens be willing to share their code? (e.g. processing images for the mono screens or display of multiple images for dynamic range expansion). I plan to use a raspberry pi to drive the screen but ideally I wouldn't have to reinvent the wheel as people here have clearly already done some very good work to make these displays usable...
 

MarkT

Member
Joined
Apr 17, 2024
Messages
3
Location
Australia, Queensland
Format
Medium Format
Avandesande could you tell me which driver board you are using on the 9K panel? (I hope it is not the discontinued one you mention above)
 

AndrewBurns

Member
Joined
Jul 12, 2019
Messages
177
Location
Auckland, New Zealand
Format
35mm
My 13.6" 7k monochrome LCD screen and 300W UV lightsource arrived and I've managed to get it hooked up to a Raspberry pi 4 (using an LED tracing pad behind the screen so I can see what I'm doing).


Next step I guess will be to install python + OpenCV and have a go at manipulating images so that they display correctly on the screen. As you can see above the image is currently horizontally stretched as the monochrome screens address each RGB sub-pixel to a distinct real pixel.
 

AndrewBurns

Member
Joined
Jul 12, 2019
Messages
177
Location
Auckland, New Zealand
Format
35mm
Well I've managed to get the screen and UV lamp unit making decent-quality cyanotype contact prints. Lots of quality-of-life improvements to make and I want to work out a way to tile multiple exposures together for larger prints, but the concept definitely works.


Carnie Bob

Member
Joined
Nov 5, 2023
Messages
316
Location
Toronto , Ont Canada
Format
4x5 Format
Ok this may not be related but I visited my friend Mike Robinson a few months ago and he graciously did a portrait of me using the daguerreotype process. Now I am not a huge fan of this process but I must admit I really liked the result. At the same time of my visit he was working with Christine Fitzgerald and they both showed me dags that were produced by using a 4 x 5 inch dag camera which was focused on a computer screen. Simply amazing results I was gobsmacked to say the least, I assumed the image would be soft and mushy but actually the exact opposite, the images were as crisp as the dag Mike did traditionally for me. Bottom line I do not think the OP is off base here whatsoever and I encourage his or her work.
 

AlexMk

Member
Joined
Sep 5, 2024
Messages
6
Location
Moscow
Format
35mm
Hello, please forgive me for my not very good English.
I want to find an adequate way to print photos in a dark room from a digital source.
I tried different things - printing on transparent film on a printer, I put a smartphone in a photo enlarger instead of a film, then I bought an LCD screen with the backlight removed and experimented with contact printing.
This gave the most interesting results. Despite the modest 322 dpi, I managed to keep the detail (as much as possible) and at the same time completely remove the pixel grid.
But my results cannot compare with yours - an 8k screen is a completely different level.

As far as I understand, there are no subpixels in the monochrome screen and because of this, the horizontal resolution of 7680 pixels is recognized by Windows as 2560 pixels in the RGB format.
That is, one horizontal R/G/B pixel is equal to three monochrome pixels.
And in order for Windows to show the correct image in 8K, it needs to be converted in a special way.
Unfortunately, I am not very good at programming and I understand that I cannot do such a transformation myself.
Maybe you have some utility for Windows so that such a conversion can be done?
 
OP
OP

avandesande

Subscriber
Joined
Sep 7, 2002
Messages
1,339
Location
Albuquerque, NM
Format
Med Format Digital
Hello, please forgive me for my not very good English.
I want to find an adequate way to print photos in a dark room from a digital source.
I tried different things - printing on transparent film on a printer, I put a smartphone in a photo enlarger instead of a film, then I bought an LCD screen with the backlight removed and experimented with contact printing.
This gave the most interesting results. Despite the modest 322 dpi, I managed to keep the detail (as much as possible) and at the same time completely remove the pixel grid.
But my results cannot compare with yours - an 8k screen is a completely different level.

As far as I understand, there are no subpixels in the monochrome screen and because of this, the horizontal resolution of 7680 pixels is recognized by Windows as 2560 pixels in the RGB format.
That is, one horizontal R/G/B pixel is equal to three monochrome pixels.
And in order for Windows to show the correct image in 8K, it needs to be converted in a special way.
Unfortunately, I am not very good at programming and I understand that I cannot do such a transformation myself.
Maybe you have some utility for Windows so that such a conversion can be done?

Hi Alex, I've put the converter in a google drive so anyone can download it.


AlexMk

Member
Joined
Sep 5, 2024
Messages
6
Location
Moscow
Format
35mm
Hi Alex, I've put the converter in a google drive so anyone can download it.


Thank you very much! I did it, it's amazing! It remains to buy a suitable screen and start experimenting.

And which screens may be suitable, and which will not work correctly when displaying images in Windows?
As far as I understand, there will be no problems with resolutions up to 8K, but there is a 9K screen, now you can buy a 12K and 14K screen and even 16K on pre-order.

A 10-inch 8K resolution screen would suit me, but I found two types of them, please tell me are they the same, or will one of them be better?
 

Attachments

  • 1.png
    1.png
    167.7 KB · Views: 32
  • 2.png
    2.png
    232.9 KB · Views: 38
Last edited:
OP
OP

avandesande

Subscriber
Joined
Sep 7, 2002
Messages
1,339
Location
Albuquerque, NM
Format
Med Format Digital
Thank you very much! I did it, it's amazing! It remains to buy a suitable screen and start experimenting.

And which screens may be suitable, and which will not work correctly when displaying images in Windows?
As far as I understand, there will be no problems with resolutions up to 8K, but there is a 9K screen, now you can buy a 12K and 14K screen and even 16K on pre-order.

A 10-inch 8K resolution screen would suit me, but I found two types of them, please tell me are they the same, or will one of them be better?

The 10.1 8k screen is by far the best. The higher resolution screens have rectangular pixels which complicate processing and have little advantage.
 

AlexMk

Member
Joined
Sep 5, 2024
Messages
6
Location
Moscow
Format
35mm
The 10.1 8k screen is by far the best. The higher resolution screens have rectangular pixels which complicate processing and have little advantage.

Good afternoon, today I received this 10.1-inch screen with a resolution of 8K, and I started studying.

The screen connected to the Nvidia RTX 3060 video card via HDMI without any problems.
I set up a resolution of 2560 X 4320, 23 hertz, CVT with reduced flashing (there was a screenshot of the settings here, I did everything the same way)
I used your converter. The test table is 6919 X 4320 in size, the converted size is 2306 X 4320.

Then I opened the converted image on the screen in full-screen mode and please see what happened.
On the left side is the original template before conversion, on the right side is the final result on the screen.
In this topic there is a photo of a screen with the same table - everything is high-quality and smooth there. I have a different result.
I have prepared an image according to the PNG instructions of 8 bits in grayscale.

I managed to take a screenshot of the converter's operation - please take a look.
It is written in Cyrillic:
Unhandled exception, System.Runtime.....: A general error occurred in GDI+,
......\Program.cs:line 67
......\Program.cs:line 167
I also tried to output a photo that was in the archive (it has already been converted) - the result is the same as with the table.
Please tell me - what could be wrong?
 

Attachments

  • 1.jpg
    1.jpg
    147 KB · Views: 48
  • 2.jpg
    2.jpg
    643.7 KB · Views: 47
  • 3.jpg
    3.jpg
    300.4 KB · Views: 43
  • 0.jpg
    0.jpg
    635.3 KB · Views: 43
  • error.png
    error.png
    23 KB · Views: 49
Photrio.com contains affiliate links to products. We may receive a commission for purchases made through these links.
To read our full affiliate disclosure statement please click Here.

PHOTRIO PARTNERS EQUALLY FUNDING OUR COMMUNITY:


Ilford ADOX Freestyle Photographic Stearman Press Weldon Color Lab Blue Moon Camera & Machine
Top Bottom