Nikon F4: Mission Aperture Lever - two ways to fix the aperture problem

Forum statistics

Threads
197,375
Messages
2,758,073
Members
99,473
Latest member
Jerry C
Recent bookmarks
0
OP
OP
Andreas Thaler

Andreas Thaler

Subscriber
Joined
Nov 19, 2017
Messages
4,258
Location
Vienna/Austria
Format
35mm
Did you know that the computer-controlled Nikon F4 from 1988 still has a cable pull?

1.jpg


It is used to transmit the aperture set on the lens.

Contacts (sliders) are moved along a ring-shaped resistance track via the rotatable aperture simulator ring on the lens bayonet of the camera.

Depending on the position, a certain voltage value is produced for each aperture, which is probably digitized and transmitted to the camera's computer.
 
Last edited:

dgQc

Member
Joined
May 31, 2024
Messages
1
Location
Canada
Format
35mm
Thank you for the great infos !!!!

My F4 had the squawk noise but my aperture lever was functioning properly. I applied a couple of drop of Break Free CLP oil (similar to Ballistol) using the bent syringue shortcut method. After many attempt pressing on the aperture preview button or the lever manually I cannot get rid of the grinding squawk. It is only after shooting the camera (about 10 fast shots) that the noise completely disappear. Now my F4 is like new ! No more annoying noise when I use the DOF preview button or if I manually move the aperture lever. It seem in my case the shutter mechanism as to be actuated for the lubricant to work itself in the right place but not sure why exactly. Is there a possibility that more than one gear/part was the cause of the noise ??? Will see how long it stay that way !
 
OP
OP
Andreas Thaler

Andreas Thaler

Subscriber
Joined
Nov 19, 2017
Messages
4,258
Location
Vienna/Austria
Format
35mm
Thank you for the great infos !!!!

My F4 had the squawk noise but my aperture lever was functioning properly. I applied a couple of drop of Break Free CLP oil (similar to Ballistol) using the bent syringue shortcut method. After many attempt pressing on the aperture preview button or the lever manually I cannot get rid of the grinding squawk. It is only after shooting the camera (about 10 fast shots) that the noise completely disappear. Now my F4 is like new ! No more annoying noise when I use the DOF preview button or if I manually move the aperture lever. It seem in my case the shutter mechanism as to be actuated for the lubricant to work itself in the right place but not sure why exactly. Is there a possibility that more than one gear/part was the cause of the noise ??? Will see how long it stay that way !

Congratulations!

As far as I can see, it's just the one ratchet gear that's making the screeching noise:

IMG_8754.jpeg


Here's another exploration of how the syringe method can affect the inside of the camera:


LensReporter

Member
Joined
Aug 4, 2024
Messages
29
Location
México
Format
35mm
Hello, my name is Israel, I'm from Mexico, your work is fabulous, I'm a fan of the Nikon F4, thanks to you I have been able to learn what its insides are like, I am always looking for your content, I had the Canon T-90 and Canon T-50 and again thanks to you I know what its electronics are like, you have a whole team that I could only have in my dreams, the shutter on my F4 is broken, I already bought it on e-Bay but I have decided not to change it on my own since I have no experience in soldering, it's a shame you live so far away, it would be an honor to see you work repairing these jewels that are not from the past, they are from our time.
 

LensReporter

Member
Joined
Aug 4, 2024
Messages
29
Location
México
Format
35mm
I will always be grateful if you ever have a chance to write a topic about how to change the shutter on the F4. I know that you have to follow the 22 steps of disassembly, apart from removing the lower flexible circuit, the rewind motor shaft and the rewind motor, remove the two screws that hold the shutter and the last screw which is the one behind the shutter control assembly. I don't understand how to remove it. The manual says that you have to press the shutter lever. I'm not going to remove it because I don't have the knowledge or skill to unsolder/solder it, but it would be a privilege to know how to do it.
 

LensReporter

Member
Joined
Aug 4, 2024
Messages
29
Location
México
Format
35mm
Oh! One more thing, sorry for writing to you in Spanish, I forgot to turn off the translator. I think if I knew you we would talk for hours!
 
OP
OP
Andreas Thaler

Andreas Thaler

Subscriber
Joined
Nov 19, 2017
Messages
4,258
Location
Vienna/Austria
Format
35mm
I will always be grateful if you ever have a chance to write a topic about how to change the shutter on the F4. I know that you have to follow the 22 steps of disassembly, apart from removing the lower flexible circuit, the rewind motor shaft and the rewind motor, remove the two screws that hold the shutter and the last screw which is the one behind the shutter control assembly. I don't understand how to remove it. The manual says that you have to press the shutter lever. I'm not going to remove it because I don't have the knowledge or skill to unsolder/solder it, but it would be a privilege to know how to do it.

The procedures for removing and installing the shutter block have been described in detail by Larry Lyells in an issue of the SPT Journal, in the PDF from page 8, see


The USD 2.58 for the download is also worthwhile because it describes the inner workings of the F4 with technical information.
 
OP
OP
Andreas Thaler

Andreas Thaler

Subscriber
Joined
Nov 19, 2017
Messages
4,258
Location
Vienna/Austria
Format
35mm
Hello, my name is Israel, I'm from Mexico, your work is fabulous, I'm a fan of the Nikon F4, thanks to you I have been able to learn what its insides are like, I am always looking for your content, I had the Canon T-90 and Canon T-50 and again thanks to you I know what its electronics are like, you have a whole team that I could only have in my dreams, the shutter on my F4 is broken, I already bought it on e-Bay but I have decided not to change it on my own since I have no experience in soldering, it's a shame you live so far away, it would be an honor to see you work repairing these jewels that are not from the past, they are from our time.

Thank you for your feedback!

The Nikon F4 already has limitations when it comes to repairs, as adjusting the AF or the angle of the mirror, for example, requires hardware that only Nikon had available.

Apart from that, the F4 is already a not in detail documented computer system and I think the chances of getting something going here are practically non-existent.

Maybe @koraks and @ic-racer can say more about the basic technical background.

The problem with the aperture control is purely mechanical, which is fortunate. But in order to put that one drop of oil on the gear, the long route via 22 disassembly stations has to be taken.
 
Last edited:

LensReporter

Member
Joined
Aug 4, 2024
Messages
29
Location
México
Format
35mm
Hello, I know that when you change, for example, the front of the body that contains the mirror box, you have to adjust the AF and the angle that you indicate. From what I have read, changing the shutter is unrelated to this. I am just intrigued by the screw that is behind the shutter release control. I have already decided to have it repaired in the workshop, but first I will look for another technician with two estimates, so I can make a decision.

Shutter.jpg
 

LensReporter

Member
Joined
Aug 4, 2024
Messages
29
Location
México
Format
35mm
That and desoldering and soldering the fragile flexible printed circuit board stopped me from trying it on my own, to top it off the screw is size 66! I have a video of how they designed in CAD and manufactured the F70 and you can clearly see how the operator with a pink cap solders the delicate printed circuit boards in the blink of an eye. She has a soldering station with a base and temperature control and a special screwdriver with a motor; a novice would crash into a wall against that.
 

LensReporter

Member
Joined
Aug 4, 2024
Messages
29
Location
México
Format
35mm
The procedures for removing and installing the shutter block have been described in detail by Larry Lyells in an issue of the SPT Journal, in the PDF from page 8, see


The USD 2.58 for the download is also worthwhile because it describes the inner workings of the F4 with technical information.

Thank you, yes, I will investigate how to pay because I am safer with Google Pay, there you can see that they name the parts to be disassembled in detail.
 
OP
OP
Andreas Thaler

Andreas Thaler

Subscriber
Joined
Nov 19, 2017
Messages
4,258
Location
Vienna/Austria
Format
35mm
Hello, I know that when you change, for example, the front of the body that contains the mirror box, you have to adjust the AF and the angle that you indicate. From what I have read, changing the shutter is unrelated to this. I am just intrigued by the screw that is behind the shutter release control. I have already decided to have it repaired in the workshop, but first I will look for another technician with two estimates, so I can make a decision.

View attachment 375482

I have an abandoned F4 that I had practiced removing the front panel on before, I don't think I put it back together, so we can look at that.
 

LensReporter

Member
Joined
Aug 4, 2024
Messages
29
Location
México
Format
35mm
I have an abandoned F4 that I had practiced removing the front panel on before, I don't think I put it back together, so we can look at that.

If you have the chance I would appreciate it, just to keep it in mind, I don't think that the shutter release control needs to be removed, screw 66 is located behind the shutter release lever which aligns with the one that controls the Time position, well I can only imagine that from seeing the photographs you upload of the repairs you carry out.
 
OP
OP
Andreas Thaler

Andreas Thaler

Subscriber
Joined
Nov 19, 2017
Messages
4,258
Location
Vienna/Austria
Format
35mm
If you have the chance I would appreciate it, just to keep it in mind, I don't think that the shutter release control needs to be removed, screw 66 is located behind the shutter release lever which aligns with the one that controls the Time position, well I can only imagine that from seeing the photographs you upload of the repairs you carry out.

Noted as a project for the next few days.
 
OP
OP
Andreas Thaler

Andreas Thaler

Subscriber
Joined
Nov 19, 2017
Messages
4,258
Location
Vienna/Austria
Format
35mm
If you have the chance I would appreciate it, just to keep it in mind, I don't think that the shutter release control needs to be removed, screw 66 is located behind the shutter release lever which aligns with the one that controls the Time position, well I can only imagine that from seeing the photographs you upload of the repairs you carry out.

I looked at how the shutter unit is attached to the F4.

Essentially, there are three screws and a flexible circuit board that can be easily removed.

However, in my case, the unit is held in place by a clutch lever and so I could not remove it. Though, I did not look in the service manual or the SPT Journal to see what the procedure for disassembly is.

So if you do not understand exactly how the shutter unit is mechanically coupled to the motor, I would not recommend to do anything here. The probability of damaging something or not coupling it correctly is high.


1.jpg


The rear housing part with the shutter in the middle and vertically to the left of it the associated mechanics and control electronics.


2.jpg


Screw #66 can be reached and loosened with the screwdriver after folding out this lever.


3.jpg


The other two retaining screws for the shutter unit.


4.jpg


5.jpg


Removing the flex connector.


6.jpg


This cable must be desoldered (done).


7.jpg


The shutter unit is now free and can be moved.


8.jpg


This clutch lever cannot be moved to the right, so the unit cannot be lifted out.


9.jpg


The flex connection of the shutter unit
 

LensReporter

Member
Joined
Aug 4, 2024
Messages
29
Location
México
Format
35mm
Hi friend, I forgot to write that you have to disassemble the rewind motor, first unscrew the three screws that hold the lower flexible printed circuit, then the two screws that hold the motor support, that shaft that you mention is also removed with its terminals, gears and shaft, then the shutter is held by sliding underneath, you have to press the trigger lever while you extract it.
 

LensReporter

Member
Joined
Aug 4, 2024
Messages
29
Location
México
Format
35mm
Today I dared to unscrew the rewind lever, that's as far as I got, you need a small pair of pliers to remove the safety catches but these pliers are millimetric, I couldn't get one, I got a very large one and the tips don't work, I don't know which one, millimetric pliers are expensive here, I also managed to carefully and nervously remove the knurled rubber from the shutter speed selector and the small cover and the cover of the exposure compensation selector but there I almost lost the tiny spring that causes the tension of the safety catch that releases the selector, I regret to write to you that in a fit of rage I bought the soldering iron with temperature selector and the FLUX in liquid spray, but I am very discouraged that it is so complicated, apart from that I can't see well and I need an LED magnifying glass, I can't go that far, I'm not that skilled apart from the precious time that I don't have.
 

Attachments

  • WhatsApp Image 2024-08-10 at 20.06.42.jpeg
    WhatsApp Image 2024-08-10 at 20.06.42.jpeg
    180 KB · Views: 22

LensReporter

Member
Joined
Aug 4, 2024
Messages
29
Location
México
Format
35mm
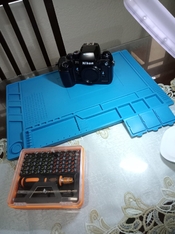
I also bought the Zippo and a Chinese lubricating oil model 8300 which indicates that it does not resinify and does not expand, I bought the blue antistatic mat, the antistatic bracelet and a small soldering paste, what I will return to the physical electronics store tomorrow will be the soldering iron, soldering paste and the FLUX, something that I also detected is that my screwdrivers are not so precise because I see that you have the JIS #0 and others, mine is not JIS it is with interchangeable tips for mobile phone and tablet screws it has very few cross ones.
 

LensReporter

Member
Joined
Aug 4, 2024
Messages
29
Location
México
Format
35mm
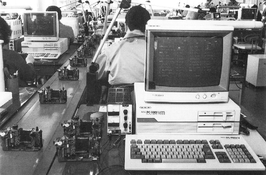
I work in the metalworking industry in the purchasing area, my boss is an engineer, he explained to me last week that the product determines the complexity of a manufacturing process and I see that the F4 was brutal, I don't understand how Japanese engineers achieved a technical feat like this, simply determining the amount of supplies, metrology instruments, oscilloscopes, calibrators, gages! and other optical instruments apart from the software that must have been programmed in COBOL or PASCAL to be supported in MS-DOS already tells me how big Mitsubishi's investment was, I buy a lot of consumables for Mitsubishi eroding machines for the CNC area, but I don't go that far, I have limits.
 

Attachments

  • Línea de ensamblaje, Nikon F4, 1988.jpg
    Línea de ensamblaje, Nikon F4, 1988.jpg
    225.5 KB · Views: 15

LensReporter

Member
Joined
Aug 4, 2024
Messages
29
Location
México
Format
35mm
You must disassemble the lower flexible printed circuit board, there are three screws and then the motor with its base, there are three screws, the rewind shaft with its gears and terminals come out alone, when assembling you must adjust a filter actuation sensor, that is a small plate that is on one side of the lower side of the rewind shaft.

1723343764764.png
 

LensReporter

Member
Joined
Aug 4, 2024
Messages
29
Location
México
Format
35mm
I don't have the filter located correctly, but you do have to locate it. Before mounting the rewind motor, it must be adjusted to 0.4 lower end of the shutter.

1723345779183.png
 
OP
OP
Andreas Thaler

Andreas Thaler

Subscriber
Joined
Nov 19, 2017
Messages
4,258
Location
Vienna/Austria
Format
35mm
Today I dared to unscrew the rewind lever, that's as far as I got, you need a small pair of pliers to remove the safety catches but these pliers are millimetric, I couldn't get one, I got a very large one and the tips don't work, I don't know which one, millimetric pliers are expensive here, I also managed to carefully and nervously remove the knurled rubber from the shutter speed selector and the small cover and the cover of the exposure compensation selector but there I almost lost the tiny spring that causes the tension of the safety catch that releases the selector, I regret to write to you that in a fit of rage I bought the soldering iron with temperature selector and the FLUX in liquid spray, but I am very discouraged that it is so complicated, apart from that I can't see well and I need an LED magnifying glass, I can't go that far, I'm not that skilled apart from the precious time that I don't have.

It's all just practice and every designer of such a camera seems to have made it their goal to build in little traps 😉

Magnifying glasses are indispensable for me, and the lenses on mine can be changed to four strengths.

I wouldn't practice on a camera that is to be repaired. Perhaps you want to look for a definitely irreparable F4 to practice assembling and disassembling?

That's what I did and for a long time I didn't have the courage to try to repair the aperture control, which requires less disassembly than your project with the shutter replacement.
 
OP
OP
Andreas Thaler

Andreas Thaler

Subscriber
Joined
Nov 19, 2017
Messages
4,258
Location
Vienna/Austria
Format
35mm
I also bought the Zippo and a Chinese lubricating oil model 8300 which indicates that it does not resinify and does not expand, I bought the blue antistatic mat, the antistatic bracelet and a small soldering paste, what I will return to the physical electronics store tomorrow will be the soldering iron, soldering paste and the FLUX, something that I also detected is that my screwdrivers are not so precise because I see that you have the JIS #0 and others, mine is not JIS it is with interchangeable tips for mobile phone and tablet screws it has very few cross ones.

The tools come little by little over time and it takes time until you are fully equipped.

Even if you have only used some tools once or have never used them at all, the day will come when you are glad you have them.

JIS is indispensable for the Japanese cameras of this era, as otherwise there is a risk of damaging the screw head profiles.

You can find recommendations for JIS screwdrivers here:


They are not easy to find and it is sometimes not clear whether the screwdrivers being offered are Phillips or JIS.

If you are going to start soldering, I would practice it first. I find it to be the most challenging part of the repair.

The soldering tasks on the F4 to remove and install the front panel are manageable, but there is very little space and the risk of damaging other cables is present.
 
OP
OP
Andreas Thaler

Andreas Thaler

Subscriber
Joined
Nov 19, 2017
Messages
4,258
Location
Vienna/Austria
Format
35mm
I don't have the filter located correctly, but you do have to locate it. Before mounting the rewind motor, it must be adjusted to 0.4 lower end of the shutter.

View attachment 375941

Larry Lyells dedicated an entire issue of the SPT Journal to the Nikon F4. There you will find detailed technical information and procedures for disassembly and reassembly.

I think it is more useful for DIY than the Nikon Service Manual, as the latter only provides very brief information and requires prior knowledge, as it was intended for trained service personnel.

 
Photrio.com contains affiliate links to products. We may receive a commission for purchases made through these links.
To read our full affiliate disclosure statement please click Here.

PHOTRIO PARTNERS EQUALLY FUNDING OUR COMMUNITY:


Ilford ADOX Freestyle Photographic Stearman Press Weldon Color Lab Blue Moon Camera & Machine
Top Bottom