- Home
- Forums
- Analog Workflow Forums (100% Analog/Traditional)
- Analog Equipment
- Camera Building, Repairs & Modification
You are using an out of date browser. It may not display this or other websites correctly.
You should upgrade or use an alternative browser.
You should upgrade or use an alternative browser.
Nikon F4: Mission Aperture Lever - two ways to fix the aperture problem
-
A
- Thread starter Andreas Thaler
- Start date
Recent Classifieds
-
For Sale Plaubel Peco rail 4x5
- Started by Gaston 012
-
Want to Buy Jobo Expert 3006
- Started by OlliJ
-
For Sale Enlarging Lenses - Bundle of 3
- Started by jdart3000
Forum statistics
Andreas Thaler
Subscriber
Wow, good job!
Thank you

Now the F4 has to pass the test with film.
Andreas Thaler
Subscriber
See also:

 www.photrio.com

Nikon F4: Mission Aperture Lever - two ways to fix the aperture problem
{Moderator note 12 Jan 25: five threads on the F4/F4S aperture lever repair have been merged into the present thread. You may encounter one or two dead links to 'other' threads. The posts they pointed to, are now all part of this thread, which mostly still follows the journey in a logical and...
Andreas Thaler
Subscriber
See also:

 www.photrio.com

Nikon F4: Mission Aperture Lever - two ways to fix the aperture problem
{Moderator note 12 Jan 25: five threads on the F4/F4S aperture lever repair have been merged into the present thread. You may encounter one or two dead links to 'other' threads. The posts they pointed to, are now all part of this thread, which mostly still follows the journey in a logical and...
Andreas Thaler
Subscriber
Andreas Thaler
Subscriber
Andreas Thaler
Subscriber
Now I can get to work.
Five more F4s are waiting here to be repaired ...
Five more F4s are waiting here to be repaired ...

Andreas Thaler
Subscriber
If I can help someone get their F4 to close the aperture correctly again, I'd be happy to post here in the thread.
The work is exciting the first time, you have to keep track, but it is doable.
Good luck!
The work is exciting the first time, you have to keep track, but it is doable.
Good luck!

Now I can get to work.
Five more F4s are waiting here to be repaired ...
Are you buying these to repair? I already have about 75 cameras, so I shouldn't buy any more, even though I see a lot on ebay with what look like easy fixes.
Andreas Thaler
Subscriber
Are you buying these to repair? I already have about 75 cameras, so I shouldn't buy any more, even though I see a lot on ebay with what look like easy fixes.
I also collect and some purchases cannot be explained rationally

I have had some of the F4 for years and the others have come since I started looking into repairs of these gems.
I recently spoke to a dealer for analog Nikons in Germany and sent him my repair threads for the F4. He said that it made no sense for him to have the F4 repaired because the costs for a precision mechanic's work were too high.
But I think that the aperture problem can be repaired quite quickly after two or three F4s. After the first time, you know what to do and it is not complicated at all.
The same applies to the LCD in the F4 and in the standard DP-20 viewfinder; you just have to find replacements from abandoned F4s. But defective Nikons are rare and they are expensive, at least here in Europe.
Maybe I'm too late with these repair topics because not too many photographers work with the F4 anymore.
Andreas Thaler
Subscriber
I think you shouldn't be intimidated by legends like the Nikon F4.
From the outside, the camera looks as if every attempt to open it is doomed to fail. Its surface is too smooth, its workmanship too precise.
But that's deceptive, because the F4 is also made of metal and plastic, the latter being surprisingly dominant. As soon as the plastic covers are removed, you see a computer with impressive mechanics.
Fortunately, the problems seem to be mostly limited to the aperture control and the LCDs. I wouldn't want to have to solve problems with the other mechanics and electronics.
The repair manual with the technical drawings is also impressive. What Nikon has built there can only be described as ingenious.
I would like to find out more about the function of the aperture control. The photointerrupter obviously counts the turns and speed of the ratchet gear with the coupled perforated disk.
I suspect that the signals generated in this way control the motor for the aperture. This motor should control the aperture in the two P and S modes, i.e. close the aperture to values selected by the camera.
Since the aperture must always be set on the lens to the smallest value for these modes, the motor then moves the aperture lever in the mirror box so that it sets the aperture. The further down the lever goes, the smaller the aperture.
But in M and A modes, the photographer preselects the aperture on the lens and the F4 fully folds down the aperture lever in the mirror box. The aperture then jumps automatically, driven by a spring in the lens, to the preselected value.
Maybe I can find out something about it.
Last edited:
Andreas Thaler
Subscriber
Are you buying these to repair? I already have about 75 cameras, so I shouldn't buy any more, even though I see a lot on ebay with what look like easy fixes.
Are you thinking about buying an F4?
I have experienced that sellers are not aware of the possible problems with the aperture.
Great work, I maybe tempting fate but both my F4s have worked without any faults at all since I purchased them in the early 90s. Good to know that people are still willing to dive in and learn how to repair these marvellous cameras. Well done.
Andreas Thaler
Subscriber
Great work, I maybe tempting fate but both my F4s have worked without any faults at all since I purchased them in the early 90s. Good to know that people are still willing to dive in and learn how to repair these marvellous cameras. Well done.
Thank you very much

I had very good instructions with the tutorial from @F4user, the Repair Manual and the SPT Journal. @Christiaan Phleger comments on his experiences with a shortcut for the aperture problem were also helpful.
Regarding the two main problems with the aperture control and leaky LCDs, it shouldn't matter whether you work with the F4 or if it lives in a display case.
Perhaps newer models have been improved in this regard, there were some modifications during the production period.
Are you thinking about buying an F4?
I have experienced that sellers are not aware of the possible problems with the aperture.
I don't really 'collect' cameras, but some day I would like to have the set, F1, F2, F3, F4, F5. I only have the F6 though.
Andreas Thaler
Subscriber
The red arrow points to the lever that tensions the mirror, the green arrow to the lever that releases the mirror.
The aperture mechanism underneath is activated by the mirror.
View attachment 366495
The screeching noise when you press the stop down lever is caused by this ratchet gear:
View attachment 366496
The ratchet gear is coupled to a perforated disk behind it (red arrow). This disk runs through a photointerrupter underneath (blue arrow) generating electronic pulses that are sent as signals to the control electronics of the F4:
View attachment 366498
The ratchet gear should run quickly and freely when the mirror folds up.
Here it runs sluggishly, as do the gears it is connected to.
I will clean the mechanism with benzine and then oil the axes of the ratchet gear and the gears sparingly and move the mechanism through.
A big thank you to @vandergus for this tip with video that explains how the aperture control mechanism with ratchet gear, coupled perforated disk and photointerrupter works on a Pentax SLR.
It should work exactly the same on the Nikon F4.
Post in thread 'What a circuit diagram doesn't tell us'
https://www.photrio.com/forum/threads/what-a-circuit-diagram-doesnt-tell-us.205815/post-2782466
Andreas Thaler
Subscriber
Shortcut works
The aperture lever of the Nikon F4, which I treated with the shortcut, now moves quickly over its full length. This means that the oil has spread further and that the benzine has removed any resinous build-up.
View attachment 366467
The camera works perfectly, and there are no signs of any impairment caused by oil.
I therefore consider the shortcut with syringe, adapted cannula, benzine and Nyoil to have been a success.
The method can obviously be used to permanently solve the aperture problem.
Nevertheless, I will continue to monitor the F4, as it is my work camera and is in regular use.
Although this shortcut works, I just had bad experiences with it in another project.
Benzine and oil simply cannot be applied precisely enough with the syringe. The two together produce a mixture that spreads too easily in the camera, even where none of it should go. It works with the F4, but I won't do it again.
See
Post in thread 'Leica R3 ELECTRONIC: Stiff mirror mechanism'
https://www.photrio.com/forum/threads/leica-r3-electronic-stiff-mirror-mechanism.205406/post-2783876
Andreas Thaler
Subscriber
After a bad experience I had with the shortcut (benzine, oil, syringe) in another project, I only recommend it with reservations.
See
Post in thread 'Nikon F4S: Mission Aperture Lever'
https://www.photrio.com/forum/threads/nikon-f4s-mission-aperture-lever.205433/post-2783895
See
Post in thread 'Nikon F4S: Mission Aperture Lever'
https://www.photrio.com/forum/threads/nikon-f4s-mission-aperture-lever.205433/post-2783895
Andreas Thaler
Subscriber
Before I continue with the uncooperative mirror of the Nikon F3P, I will bring the Nikon F4, for which I have presented the shortcut with syringe, benzine and Nyoil, back to the table.
That the shortcut works is shown by the fact that the aperture lever now functions perfectly.
However, since I was not successful with this method in another project (Leica R3) and had problems with oil I had added, I would like to examine the F4 in detail:
We start tomorrow (CET).
Stay tuned
That the shortcut works is shown by the fact that the aperture lever now functions perfectly.
However, since I was not successful with this method in another project (Leica R3) and had problems with oil I had added, I would like to examine the F4 in detail:
- How does the addition of benzine and oil affect the mechanics?
- Does the oil spread further in the camera, and if so, where and what damage can it cause?
- I would also like to see what effect the addition of benzine and graphite had, as an earlier approach to make the aperture lever moving again.
We start tomorrow (CET).
Stay tuned

Andreas Thaler
Subscriber
I used a shortcut to fix a Nikon F4 whose aperture control was no longer working properly due to a lack of lubrication, meaning that even small apertures were not formed correctly.
In three attempts separated in time, I first applied
I was able to get the camera working again.
See also

 www.photrio.com
However, I could not apply the solvent and lubricant precisely with a syringe, as the aperture mechanism cannot be seen directly.
Today I removed the mirror box of this F4 to see what effect these measures had had on the inside of the camera.
Too much oil or oil in the wrong place is particularly critical, as it can spread inside the camera, even to places where it shouldn't be, e.g. the shutter blades or the prism.

The candidate
Disassembly was problem-free, apart from one scratch that I put on a cover cap (original spare available).
Right down to the tripod plate on the bottom of the camera, which is mounted with four screws that are secured with glue.
I was able to remove two of them with the screwdriver, one after heating it up with a soldering iron. But the forth resisted all attempts to remove it.
So I milled off the screw head freehand with the Dremel and removed the rest of the screw with the thread. This worked with almost no damage. And I have an original spare.
It was worth it that I had practiced milling beforehand:


To stabilize the camera on the table without covers, I use my circuit board holder and the vice from Dremel.
The vice is ideal for this kind of work. It holds the camera firmly, is easy to use and its soft jaws mean it doesn't damage anything. If it were grounded to protect the exposed camera electronics, it would be perfect. But it's made of plastic, so I make sure it doesn't come into contact with the electronics.

Separation of the two camera halves after four hours of work.

The right side of the mirror box with the aperture mechanism.

Traces of oil can be seen on the IC housing underneath.


The ratchet gear in the middle left has an oily sheen and runs freely. It is the gear that makes the aperture control sluggish if it is not lubricated. So here I was successful with my oil injection.
There are also graphite parts visible on the mechanism. I doubt that they contribute to the lubrication.
In three attempts separated in time, I first applied
- electronic cleaner,
- then Zippo lighter fluid mixed with graphite,
- and finally benzine and Nyoil to the aperture control mechanism from the outside.
I was able to get the camera working again.
See also

Nikon F4: Mission Aperture Lever - two ways to fix the aperture problem
{Moderator note 12 Jan 25: five threads on the F4/F4S aperture lever repair have been merged into the present thread. You may encounter one or two dead links to 'other' threads. The posts they pointed to, are now all part of this thread, which mostly still follows the journey in a logical and...
However, I could not apply the solvent and lubricant precisely with a syringe, as the aperture mechanism cannot be seen directly.
Today I removed the mirror box of this F4 to see what effect these measures had had on the inside of the camera.
Too much oil or oil in the wrong place is particularly critical, as it can spread inside the camera, even to places where it shouldn't be, e.g. the shutter blades or the prism.
The candidate
Disassembly was problem-free, apart from one scratch that I put on a cover cap (original spare available).
Right down to the tripod plate on the bottom of the camera, which is mounted with four screws that are secured with glue.
I was able to remove two of them with the screwdriver, one after heating it up with a soldering iron. But the forth resisted all attempts to remove it.
So I milled off the screw head freehand with the Dremel and removed the rest of the screw with the thread. This worked with almost no damage. And I have an original spare.
It was worth it that I had practiced milling beforehand:
To stabilize the camera on the table without covers, I use my circuit board holder and the vice from Dremel.
The vice is ideal for this kind of work. It holds the camera firmly, is easy to use and its soft jaws mean it doesn't damage anything. If it were grounded to protect the exposed camera electronics, it would be perfect. But it's made of plastic, so I make sure it doesn't come into contact with the electronics.
Separation of the two camera halves after four hours of work.
The right side of the mirror box with the aperture mechanism.
Traces of oil can be seen on the IC housing underneath.
The ratchet gear in the middle left has an oily sheen and runs freely. It is the gear that makes the aperture control sluggish if it is not lubricated. So here I was successful with my oil injection.
There are also graphite parts visible on the mechanism. I doubt that they contribute to the lubrication.
Last edited:
Andreas Thaler
Subscriber
Graphite particles can also be seen on the frame of the shutter. They have no business being there.
There is also graphite on the shutter mechanism and the circuit board above it. I obviously hit this area with the cannula.
Overall, I don't see any damage, some oil is visible on the shutter mechanic. Same reason: Hitting the area with the cannula.
I'm now going to clean the aperture mechanism with Zippo and then lightly oil the gears again. I'll also clean the area around the shutter.
Then it's time to reassemble the F4.
Last edited:
Andreas Thaler
Subscriber
After eleven hours of work, the F4 is whole again and works perfectly.
At the end, things got exciting when I tried to release the shutter for the first time after assembling it: No reaction, dark in the viewfinder. Only the LED next to the ASA wheel was flashing: setting on DX! The camera is programmed to intentionally not triggering.
Then I looked in the viewfinder.
Confusing displays on the LEDs!
I could already see myself disassembling the camera again and looking for the fault.
But it was just a contact problem between the DP-20 and the housing, caused by guide rails for the viewfinder on the housing that were not quite parallel. According to the repair manual, this can be adjusted using the fastening screws, which worked. Now the viewfinder can be pushed in again easily, previously it was difficult.
Then I checked aperture priority, turned the aperture ring on the lens, but there were no changes in the shutter speeds in the viewfinder.
But it was only the driver for the AI coupling that I had disengaged. So no aperture could be transferred.
I tell you, I have atoned for my sins today

Andreas Thaler
Subscriber
Conclusion
All information provided without guarantee and use at your own risk.
- Benzine with graphite as a shortcut does not solve the problem because the cause is a gear whose axle is lacking lubrication. Oil needs to be on the axle, and graphite cannot get there. This attempt achieved nothing except dirt and graphite where it shouldn't be.
- Injecting oil with the syringe was successful; I hit the spot and the oil reached the gear's axle. However, that was a shot from the shotgun and not the rifle. Excess oil was visible that reached as far as the shutter area. Part of the charge had obviously missed the mark. If you manage to get a small amount of oil on the gear, the shortcut will work with no sideffects. But it's a gamble because you can't see the spot from the outside.
- So the only safe solution is to disassemble the F4, clean it and lubricate it.
All information provided without guarantee and use at your own risk.
Last edited:
-

- Andreas Thaler
- Deleted
- Reason: Redundant
Andreas Thaler
Subscriber
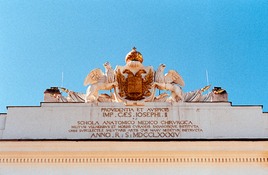
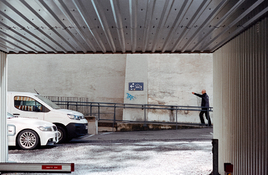
Today I quickly exposed a test film and had it developed by the laboratory.
This F4 also works perfectly after assembly

Vienna, today at Donaukanal
Nikon F4
Nikkor AF 85/1.8 D
Kodak Ektar
This F4 also works perfectly after assembly

Vienna, today at Donaukanal
Nikon F4
Nikkor AF 85/1.8 D
Kodak Ektar
| Photrio.com contains affiliate links to products. We may receive a commission for purchases made through these links. To read our full affiliate disclosure statement please click Here. |
PHOTRIO PARTNERS EQUALLY FUNDING OUR COMMUNITY:  |


