What did you fix today? (part 2)

Dog Opposites

A
Dog Opposites

  • 0
  • 0
  • 14
Acrobatics in the Vondelpark

A
Acrobatics in the Vondelpark

  • 5
  • 0
  • 81
Finn Slough Fishing Net

A
Finn Slough Fishing Net

  • 1
  • 0
  • 58
Dried roses

A
Dried roses

  • 10
  • 7
  • 132
Hot Rod

A
Hot Rod

  • 4
  • 0
  • 90

Recent Classifieds

Forum statistics

Threads
197,458
Messages
2,759,303
Members
99,508
Latest member
JMDPhelps
Recent bookmarks
0

John Earley

Member
Joined
May 1, 2012
Messages
423
Location
Central Virginia
Format
Multi Format
Disassembled the helicoids and aperture rings of a number of old Nikon Ai-S and Ai lenses to clean the interiors, renew the helicoid grease, and lubricate the aperture rings. Went very smoothly (apart from misplacing a couple of screws for a short time) with the right JIS screwdrivers and a variety of helicoid greases of different viscosities.

No glass element or other optical module tear-downs as the glass is fine with all, but they sure feel nice with smooth, even and quiet mechanisms.
I wish I could get the screws out of my Nikkor Ai-S 135/2.8 lens so I could renew the helicoid grease. Even with JIS screwdrivers, solvents, heat, cold and repeated effort I haven't been able to get the back plate off the lens. It is a mint lens that I got for next to nothing and even though I can use it as is, I would really like for it to have smooth focusing instead of stiff.
 

David R Williams

Subscriber
Joined
Dec 6, 2017
Messages
62
Location
Calgary, Alberta
Format
Medium Format
I wish I could get the screws out of my Nikkor Ai-S 135/2.8 lens so I could renew the helicoid grease. Even with JIS screwdrivers, solvents, heat, cold and repeated effort I haven't been able to get the back plate off the lens. It is a mint lens that I got for next to nothing and even though I can use it as is, I would really like for it to have smooth focusing instead of stiff.

I had trouble getting enough leverage with my JIS driver to get the lens mount screws loose too. I wasn’t able to get enough hand/finger torque on the driver while also pressing down to prevent the head stripping, so I grabbed a pair of small vice-grips, clamped the handle of the driver in the jaws of the grips, and while pushing the bit of the screwdriver into the screw very firmly to prevent the bit from riding up, twisting the screwdriver with a little extra torque that the vice grips enabled did the trick almost immediately. I was very VERY careful while doing this to prevent the bit of the screwdriver from riding up where it could/would strip the head and/or slip and do damage to the lens, but was fortunate each time that they unseated with that extra little bit of torque that this applies to the screws.
 

John Earley

Member
Joined
May 1, 2012
Messages
423
Location
Central Virginia
Format
Multi Format
I had trouble getting enough leverage with my JIS driver to get the lens mount screws loose too. I wasn’t able to get enough hand/finger torque on the driver while also pressing down to prevent the head stripping, so I grabbed a pair of small vice-grips, clamped the handle of the driver in the jaws of the grips, and while pushing the bit of the screwdriver into the screw very firmly to prevent the bit from riding up, twisting the screwdriver with a little extra torque that the vice grips enabled did the trick almost immediately. I was very VERY careful while doing this to prevent the bit of the screwdriver from riding up where it could/would strip the head and/or slip and do damage to the lens, but was fortunate each time that they unseated with that extra little bit of torque that this applies to the screws.
I just may try that vice-grip trick and some acetone and see if that works.
 

Greg Heath

Member
Joined
Jul 13, 2008
Messages
591
Location
Racine, Wisc
Format
Medium Format
I'm rebuilding my 7th Kodak Retina IIIc. Almost done. I just ordered some new bottom leather and just to get the rangefinder reattached and calibrated tomorrow. It will be done in a week or so. Then on to a new IIIc and then a Ia.
 

awty

Subscriber
Joined
Jul 24, 2016
Messages
3,643
Location
Australia
Format
Multi Format
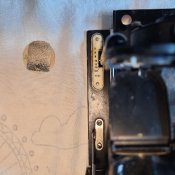
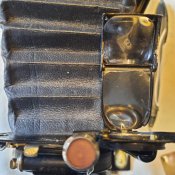
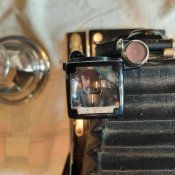
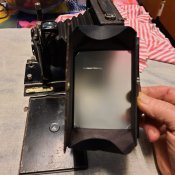
Replaced the mirror in the view finder on my little 1/4" plate Klimax with a little mirror disc I found in the third draw down. Cut to shape using mums good sewing scissors (dont tell her). All good to go. Even found the right size film holder in my stash. Just need to make a new ground glass and she will be right to go.

20200725_110853.jpg 20200725_110922.jpg 20200725_110824.jpg
 

awty

Subscriber
Joined
Jul 24, 2016
Messages
3,643
Location
Australia
Format
Multi Format
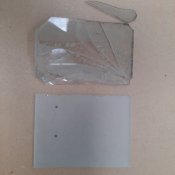
Replaced the glass.
20200725_170516.jpg 20200725_170053.jpg

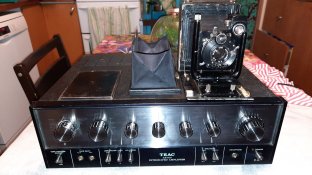
Also fixed up my old TEAC as 100 amp while I'm in a fixarama mood.
The preamp hadn't worked for about 5 years, amp worked fine, after spending a lot of time checking stuff I started on the capacitors, lucky for me it was the first cap on the control panel I tried, just a bad solder joint. All running again. Might put it in the darkroom.

20200725_170324.jpg
 

hartacus

Member
Joined
Nov 15, 2016
Messages
115
Location
Sydney, Australia
Format
35mm
Opened up my Zenit 12XP to check for battery corrosion (well, vinegar corrosion following battery corrosion - i am NEVER using vinegar to neutralise alkaline battery electrolyte again, it eats copper like I eat Tim Tams and now I'm a Wii controller down) and thankfully found none. While in there, replaced the prism foam with some pure wool felt.
 

Truzi

Member
Joined
Mar 18, 2012
Messages
2,625
Format
Multi Format
gotta fix the lawnmower again, replaced the carb and seals but it don't wanna start
Did you try starting fluid?
Check the magneto? I had to replace a one last year... on a mower my father got in the late 80s.

If you replaced the carb you probably know how to test for spark, but if not...
- You can get a tester
or
- Have someone pull the rope while you hold the detached plug wire (using an insulated screwdriver) near the block to see if it sparks
or
- You can hold the detached plug wire with one hand and grab the block with the other; it's fun... once. Better yet, get a friend to do the holding while you pull the rope.
 

MattKing

Moderator
Moderator
Joined
Apr 24, 2005
Messages
51,933
Location
Delta, BC Canada
Format
Medium Format
gotta fix the lawnmower again, replaced the carb and seals but it don't wanna start
John,
You just can't use caffenol or Ansco 130 in the lawn mower.
You need gasoline!:D:angel:
 

removed account4

Subscriber
Joined
Jun 21, 2003
Messages
29,844
Format
Hybrid
John,
You just can't use caffenol or Ansco 130 in the lawn mower.
You need gasoline!:D:angel:

Thanks for your concern Matt
I modified the engine ! it runs on cinnamon roasted coffee now :smile:
My carb-rebuild went well, descaled it with lemon juice but sadly
... after giving the lawn a nice hair cut, the hose from the coffee tank and carburetor came loose
without me realizing it and spilled some delightful Sumatra on the garage floor ..

J. :smile:
 

removed account4

Subscriber
Joined
Jun 21, 2003
Messages
29,844
Format
Hybrid
Did you try starting fluid?
Check the magneto? I had to replace a one last year... on a mower my father got in the late 80s.

If you replaced the carb you probably know how to test for spark, but if not...
- You can get a tester
or
- Have someone pull the rope while you hold the detached plug wire (using an insulated screwdriver) near the block to see if it sparks
or
- You can hold the detached plug wire with one hand and grab the block with the other; it's fun... once. Better yet, get a friend to do the holding while you pull the rope.

Hi Truzi
Thanks for the suggestions !
I used an old "snapper" for years keeping it on the road :smile:
replaced the magnet coil, carb , seals. gave me good practice for the current beast.
Sadly ethanol gas gums things up (even with sea foam or other additives ) and I get tired of
buying un-ethanoled gas from the lawnmower place for a kidney each time so I swap out a carb and seals
about once a season :smile:. I checked the sparky and it looks good. not sure exactly what was not happy but its all good now :smile:
except for all the coffee on the floor :smile:

great suggestions -- hopefully another small engine mechanic wannabe like me :smile:. will also find them helpful :smile:

J
 

jay moussy

Subscriber
Joined
Jun 10, 2019
Messages
1,314
Location
Eastern MA, USA
Format
Hybrid
Baby steps, here: first work on my just-adopted 2A Ansco Buster Brown Folding, made the shutter work more reliably by using very light touches of cleaner fluid, with the housing cover off.

Tense moments at reassembly, as I did not quite see where the speed selection ring should engage. Steeping back a bit, I gave it a few minutes, tried light wiggles, and it eventually fell in place. Whew!

There seem to be a few very fine chips on shutter leaves - metal wear on this 1915 shutter?
That would be for another day, as I can access that by just removing the front lens element, and perhaps use a light vac action?
 

Pentode

Member
Joined
Feb 14, 2017
Messages
959
Location
Brooklyn, NY
Format
Multi Format
Just got a Hickok Duplex meter back up and running. Not super accurate (was it ever?) but I'm going to let it drink up some room light for a couple of weeks before I try to "calibrate" it.

Calibrate in quotes because I only intend to try to get it to match a known working meter in outdoor daylight because that's likely to be the only set of conditions I'd use it in anyway. It just seemed a shame to have it sitting there broken.
 

Lucid

Member
Joined
Jun 18, 2018
Messages
102
Location
England
Format
Multi Format
Baby steps, here: first work on my just-adopted 2A Ansco Buster Brown Folding, made the shutter work more reliably by using very light touches of cleaner fluid, with the housing cover off.

Tense moments at reassembly, as I did not quite see where the speed selection ring should engage. Steeping back a bit, I gave it a few minutes, tried light wiggles, and it eventually fell in place. Whew!

There seem to be a few very fine chips on shutter leaves - metal wear on this 1915 shutter?
That would be for another day, as I can access that by just removing the front lens element, and perhaps use a light vac action?

I have an identical issue. I've also noticed some chipping or flaking of the black paint on the leaves. I suspect when there has been a shutter jam, and the mechanism was forced, the leaves took damage. From then on their operation would always be impaired.

On my first attempt of repair, I tried a little isopropanol to loosen things. That worked for all of 5 minutes until the iso evaporated. On my second attempt, I disassembled the entire shutter and cleaned each component. Despite everything being spotless, the shutter leaves are still sticking. The spring tension is sufficient, but I have noticed there is some slightly buckling/wave to the leaves, but as I have the dexterity of a gorilla, I'll leave tweaking those for last. For my third attempt, I'll apply a very tiny amount of clock makers oil between the outermost edge of the leaves and the brass cavity in which it fits. Hopefully that'll do it!

Each go around I clean the main camera body a little more. I don't think it's been this clean for over 100 years!

kodak.jpg
 

Tel

Subscriber
Joined
May 9, 2011
Messages
932
Location
New Jersey
Format
Multi Format
A neglected Schneider 240mm in a sticky Copal No.3 needed tune-ups. Took the elements apart in the Schneider and gave each of them a good cleaning, and now the haze is gone. The shutter was hanging up on the slow speeds, so I took out the escapement and gave it a thorough cleaning. All fine except, for some reason, the lens fires at something like 1/60 when it's set on 1/4 second. All the other slow speeds are right on but this one. Anyone have similar experiences?
 

MattKing

Moderator
Moderator
Joined
Apr 24, 2005
Messages
51,933
Location
Delta, BC Canada
Format
Medium Format
I put some more feet on one of my two matching enlarger baseboards.
Now both will fit and sit level both on the rolling cart I use for transporting the one in use, as well as the bathroom counter I'm likely to use it on.
I also put up the blackout curtain and brackets that came from Amazon - when added to the curtain rod I already had I can now have a dark bathroom/darkroom, so can look forward to printing again soon (fingers crossed).
 

Mr Flibble

Member
Joined
Mar 12, 2014
Messages
363
Location
The Lowlands
Format
35mm RF
Nice work, I have a couple waiting on new curtains, what material did you use?

Bought a large sheet from Aki-Asahi.com a couple of years to restore a Popular Pressman. Using up the leftover. Not sure,but I think this is the rubberised nylon they sell.
 

Pentode

Member
Joined
Feb 14, 2017
Messages
959
Location
Brooklyn, NY
Format
Multi Format
Encouraged by my partial success rejuvenating the old Hickok selenium meter I dove into last week, I dug a Weston Master II out of the potentially-dead meter bin and was able to get it responding to light. I'll now let it sit with the Hickok and drink up room light for a few weeks before I move them to non-direct window light for a few more. I've heard this process can revive selenium cells if they're not totally shot. I don't have my hopes up but it costs me nothing to try.
 

Kino

Subscriber
Joined
Jan 20, 2006
Messages
7,599
Location
Orange, Virginia
Format
Multi Format
Encouraged by my partial success rejuvenating the old Hickok selenium meter I dove into last week, I dug a Weston Master II out of the potentially-dead meter bin and was able to get it responding to light. I'll now let it sit with the Hickok and drink up room light for a few weeks before I move them to non-direct window light for a few more. I've heard this process can revive selenium cells if they're not totally shot. I don't have my hopes up but it costs me nothing to try.
So, you just sit them in the sun to begin with? What's your technique? I have a few Westons I'd like to rejuvenate if possible.
 
Photrio.com contains affiliate links to products. We may receive a commission for purchases made through these links.
To read our full affiliate disclosure statement please click Here.

PHOTRIO PARTNERS EQUALLY FUNDING OUR COMMUNITY:


Ilford ADOX Freestyle Photographic Stearman Press Weldon Color Lab Blue Moon Camera & Machine
Top Bottom