What did you fix today? (part 2)

Table Rock and the Chimneys

A
Table Rock and the Chimneys

  • 3
  • 0
  • 88
Jizo

D
Jizo

  • 3
  • 1
  • 78
Top Floor Fun

A
Top Floor Fun

  • 0
  • 0
  • 64
Sparrow

A
Sparrow

  • 3
  • 0
  • 80
Another Saturday.

A
Another Saturday.

  • 3
  • 0
  • 136

Recent Classifieds

Forum statistics

Threads
197,403
Messages
2,758,458
Members
99,488
Latest member
JKB
Recent bookmarks
0

Andreas Thaler

Subscriber
Joined
Nov 19, 2017
Messages
4,291
Location
Vienna/Austria
Format
35mm
On the other hand I bought a rather neglected and dusty TEAC AS-100 amp. I already have one and they are great, built like a tank. They generally go for good money these days, got it cheap because of the appearance and the fact the seller said it was down a channel and the switches and pots were noisy, sold as junk.
View attachment 361076 View attachment 361075 View attachment 361072 View attachment 361070

Must of been sitting in a shed for a very long time, but cleaned up nicely.

The underside was spotless
View attachment 361074

The circuits are original and unmolested
View attachment 361071

One speaker fuse was blown, hopefully the cause of the bad channel.
View attachment 361073

Dirty knobs.
View attachment 361068

Cleaned face plate
View attachment 361069

All cleaned up, cleaned the Pots and switches and all is working again and sounding good. Need to repaint the metal shell.
View attachment 361067

Impressive, you still have space to work here and you can see individual electronic components and their connections.

However, I would be afraid of the mains voltage present 🥶
 

awty

Subscriber
Joined
Jul 24, 2016
Messages
3,643
Location
Australia
Format
Multi Format
Impressive, you still have space to work here and you can see individual electronic components and their connections.

However, I would be afraid of the mains voltage present 🥶

I have good eye sight and great restraint for not putting my hands where there not supposed to be. I didn't power the amp up till after it was cleaned. I think that would give the caps plenty of time to discharge.
It's a nice solid well built amp I thought might be interesting for someone.
I've been building and repairing amps, record players, tape players, pre amps, tube amps, projectors etc. as a hobby long before I started photography.
It was just a basic clean up, I'll make sure to put up a warning if I show anything real scary.
 

Andreas Thaler

Subscriber
Joined
Nov 19, 2017
Messages
4,291
Location
Vienna/Austria
Format
35mm
I have good eye sight and great restraint for not putting my hands where there not supposed to be. I didn't power the amp up till after it was cleaned. I think that would give the caps plenty of time to discharge.
It's a nice solid well built amp I thought might be interesting for someone.
I've been building and repairing amps, record players, tape players, pre amps, tube amps, projectors etc. as a hobby long before I started photography.
It was just a basic clean up, I'll make sure to put up a warning if I show anything real scary.

Thanks for the information.

I'm very interested in that!
 

MFstooges

Member
Joined
Feb 10, 2010
Messages
955
Format
35mm
There is a whole thread on this very subject that goes into many possible solutions:


Good luck!

Thank you. I went ahead and bang a slot screwdriver.
 

Bob Helmond

Member
Joined
Jan 28, 2024
Messages
1
Location
Stockholm,N.J., U.S.A.
Format
35mm
In 1972 my great uncle, Charlie, left me a 1940s Omega DII with color head and all accessories that came with the enlarger when he bought it. It was my workhorse in the darkroom (formerly known as a kitchen) of my 3-room apartment in Brooklyn. Over the years I've expanded on the accessories with the 35mm Rapid Shift Carrier, Glass 4x5, 3 1/4"x4 1/4", a bunch of other carriers and lenses of varied focal lengths.

In recent years, the old gal has been disconnected from the baseboard and leaning against a wall in my attic since the demon digital overtook my attention. BUT I've always missed that near spiritual air of working alone in silence (save for the gurgling water from the Kodak tray siphon.)

So last month I began building a darkroom in one of the rooms of the downstairs apartment in my mother-daughter residence, and I decided to give my old enlarger some new life with a thorough cleaning and removed the locking screw that secures the head to the frame rails. Uh-oh. The friction block then came loose inside, between and the enlarger head frame and the u-channel of the rail. And there was no way of nudging the friction block back into position since the spring that maintains tension on the block to keep it from floating around in the channel had come loose, too.

After weeks of trying to locate repair info on old DIIs to no avail, this morning I laid the rail and head assembly on a table and figured out how to get things back together by disconnecting the spring-loaded counter-weight straps, removing the bottom mount that rotates on the cone of the baseboard and sliding the rails up and thereby fished out the block got the spring tensioner reattached and put everything back together again.

I then got my Dymo Labelmaker out and made a label with an arrow pointing at the set screw..."NEVER REMOVE THIS SCREW."
 

Mr Flibble

Member
Joined
Mar 12, 2014
Messages
363
Location
The Lowlands
Format
35mm RF
PH403case.jpg

Beautified a DIY battery box to power the motor-drives that attach to my military B&H Filmo/Eyemo cameras.

I've never come across an original of one of these cases, so I made one from a LP-carrying case and a Hubble Twist-Lock connector.
It houses a couple of gel batteries.

Ordered a reproduction nomenclature tag for it.
 

Kino

Subscriber
Joined
Jan 20, 2006
Messages
7,599
Location
Orange, Virginia
Format
Multi Format
Beautified a DIY battery box to power the motor-drives that attach to my military B&H Filmo/Eyemo cameras.

I've never come across an original of one of these cases, so I made one from a LP-carrying case and a Hubble Twist-Lock connector.
It houses a couple of gel batteries.

Ordered a reproduction nomenclature tag for it.

Nice. I have never seen one myself, and that's coming from someone who attended a University that their film equipment collection consisted mainly of WWII surplus B&H 16mm cameras. There were many of the detachable motors, but we tended to just use the spring wind motor.

Now I have seen many Auricon and Maurer "suitcase" battery packs for field sound recording; what a nightmare they were to use.
 

Roger Thoms

Subscriber
Joined
Nov 18, 2007
Messages
1,765
Location
Flagstaff, AZ
Format
8x10 Format
I’ve got an Eastman Kodak 2D 5x7 that’s in moderately rough shape to restore. The first order of business was to order new bellows, which I now have in hand. Lol, I actually got the bellows 2 years age truth be told. Sometimes it take me awhile as I have way to many projects.

The Next thing was to figure out the best way to refinish the brass hardware. I didn’t want to lose the satin finish that came on the hardware ware originally. So I bought a small bench top media blast cabinet and some extra fine glass bead. Got everything set up and tested it out last night and I’m very pleased with the results. This is one of the springs for the film back with a clear coat of satin lacquer. I think the original finish on the brass might have had a little tint in it and I may play around with that, but in the mean time, I’m pleased with the results.

Roger


IMG_2871.jpeg
IMG_2869.jpeg
IMG_2868.jpeg
.
 

Roger Thoms

Subscriber
Joined
Nov 18, 2007
Messages
1,765
Location
Flagstaff, AZ
Format
8x10 Format
View attachment 361530
Beautified a DIY battery box to power the motor-drives that attach to my military B&H Filmo/Eyemo cameras.

I've never come across an original of one of these cases, so I made one from a LP-carrying case and a Hubble Twist-Lock connector.
It houses a couple of gel batteries.

Ordered a reproduction nomenclature tag for it.

Wow, the box looks great. Did you build the box or is the a box you repurposed? Either way it look great.
 

mshchem

Subscriber
Joined
Nov 26, 2007
Messages
14,203
Location
Iowa City, Iowa USA
Format
Medium Format
I’ve got an Eastman Kodak 2D 5x7 that’s in moderately rough shape to restore. The first order of business was to order new bellows, which I now have in hand. Lol, I actually got the bellows 2 years age truth be told. Sometimes it take me awhile as I have way to many projects.

The Next thing was to figure out the best way to refinish the brass hardware. I didn’t want to lose the satin finish that came on the hardware ware originally. So I bought a small bench top media blast cabinet and some extra fine glass bead. Got everything set up and tested it out last night and I’m very pleased with the results. This is one of the springs for the film back with a clear coat of satin lacquer. I think the original finish on the brass might have had a little tint in it and I may play around with that, but in the mean time, I’m pleased with the results.

Roger


View attachment 361542 View attachment 361543 View attachment 361544 .

Well done!
 

Roger Thoms

Subscriber
Joined
Nov 18, 2007
Messages
1,765
Location
Flagstaff, AZ
Format
8x10 Format
Well done!

Thanks! I’m still investigating clear finishes for the brass. Just sent an email to Ceracote inquiring about which finish they would recommend. The spray can lacquer is easy but probably not that durable. The Ceracote finishes look promising. If anyone has used Ceracote it would be great to here your experiences.

Roger
 

Roger Thoms

Subscriber
Joined
Nov 18, 2007
Messages
1,765
Location
Flagstaff, AZ
Format
8x10 Format
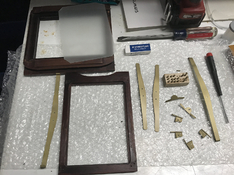
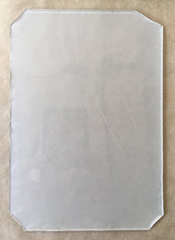
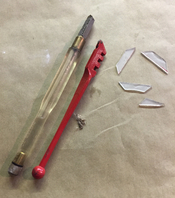
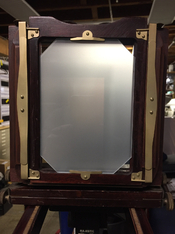
So the ground glass for the above mentioned camera had very unevenly cut corners. I recut them and cleanup the edges of the ground glass. I also reassembled the ground glass back with the refinished hardware. I have a bottle of Cerakote MC-2200 Multipurpose Clear on its way to test on the brass. I’m hoping it will be more durable than the spray lacquer. The next hurdle is to figure out what to do with the wood finish on this camera. The previous owner did a hack job of trying to restore the camera and has partially stripped and/or sand the old finish. He also had the ground glass frame on backwards, focus must have been way off. I will probably end up completely disassembling the camera and refinishing all the wood. I’d really like to bring the camera back to dark red mahogany finish that it came with. There’s also a some wood repair that needs to be done on the front rail. Basically I’m testing the waters and sneaking up on a full restoration.

Roger
 

Attachments

  • IMG_2877.jpeg
    IMG_2877.jpeg
    446 KB · Views: 33
  • IMG_2875.jpeg
    IMG_2875.jpeg
    217.1 KB · Views: 32
  • IMG_2876.jpeg
    IMG_2876.jpeg
    354.4 KB · Views: 31
  • IMG_2878.jpeg
    IMG_2878.jpeg
    225.6 KB · Views: 36

mshchem

Subscriber
Joined
Nov 26, 2007
Messages
14,203
Location
Iowa City, Iowa USA
Format
Medium Format
Looks great. I love these old cameras. I have taken a clean first, with wood, see what is what before removing old finishes. Looks like you're fixing prior missteps. Good work.
 

Mr Flibble

Member
Joined
Mar 12, 2014
Messages
363
Location
The Lowlands
Format
35mm RF
Nice. I have never seen one myself, and that's coming from someone who attended a University that their film equipment collection consisted mainly of WWII surplus B&H 16mm cameras. There were many of the detachable motors, but we tended to just use the spring wind motor.

I've got 3 'small' gel batteries in it and it's already pretty hefty to lug around.

ph403case01.jpg


This is one shown in the 1950s Directory of Signal Corps Equipment,
The WW2 one is similar but they have a split-riveted hard fibre body, like the Graflex cases of the time. A friend in the US has one of those in his collection.

Wow, the box looks great. Did you build the box or is the a box you repurposed? Either way it look great.

The box itself is a record carry case. It's dimensions are pretty close to the thing I'm trying to recreate. I only painted it and added the Twist-Pull socket.
There are still a few things I can change or add to improve it, like the top handle, the D-rings for the carrying strap and the corner reinforcements

PH403case02.jpg


Also, impressive work on that Eastman Kodak 2D, Roger.
 

jwd722

Subscriber
Joined
Jan 15, 2012
Messages
360
Location
Michigan
Format
Multi Format
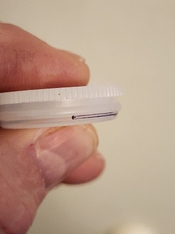
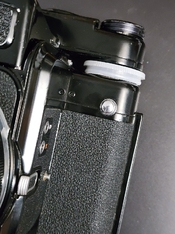
Bought a Pentax 6x7 very recently with a metered prism (not working) but came without the shutter speed adapter.
Not wanting to spend 50+ dollars for one I came up with a replacement.
I used the top of a Fuji 35mm film container. I cut off the bottom, slightly sanded it for flatness and it slides over the shutter dial nice and snug. Works perfectly.
 

Attachments

  • 20240201_131349.jpg
    20240201_131349.jpg
    98.7 KB · Views: 33
  • 20240201_125341.jpg
    20240201_125341.jpg
    220.6 KB · Views: 37
Last edited:

campy51

Subscriber
Joined
Oct 16, 2014
Messages
1,210
Location
Boston area USA
Format
Multi Format
Was at a camera store today and there was a guy selling all his camera stuff. Had some very nice things, Hasselblad, Mamiya 6 and some others. He also had a EF 16-35mm f2.8 v1 but they didn't want it because the front barrel was loose and the decorating ring on the front was falling off. I offered the guy $30 for it and he said sure. Got home removed the front rubber focus ring, rotated to access the screws and tightened. Works perfect. I know it's not the sharpest but I don't have a wide angle zoom so this is perfect for me.
 

Helios 1984

Member
Joined
Aug 4, 2015
Messages
1,844
Location
Saint-Constant, Québec
Format
35mm
I just finished this 1952 Singer button-style foot pedal which was in a sad state. It doesn't look like it but there are a couple hours of job in the picture below heh.

Capture.JPG
 

gordrob

Subscriber
Joined
Jan 29, 2005
Messages
988
Location
Western Cana
Format
Multi Format
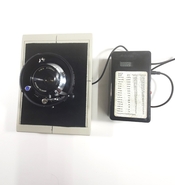
I found a hack on line that allowed me to make a level base for testing shutter speeds with the Calumet Shutter Speed Tester. A good fix instead of either having to balance the lens on top of the tester or trying to test lenses horizontally.
 

Attachments

  • Shutter Tester.jpg
    Shutter Tester.jpg
    798.9 KB · Views: 27

Andreas Thaler

Subscriber
Joined
Nov 19, 2017
Messages
4,291
Location
Vienna/Austria
Format
35mm
I found a hack on line that allowed me to make a level base for testing shutter speeds with the Calumet Shutter Speed Tester. A good fix instead of either having to balance the lens on top of the tester or trying to test lenses horizontally.

Interesting!

Could you tell a bit more about the Calumet which is unknown to me. Is this a current product?
 

kl122002

Member
Joined
Apr 17, 2022
Messages
385
Location
Hong Kong
Format
Analog
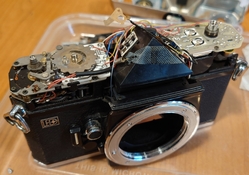
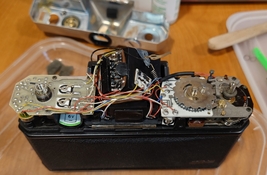
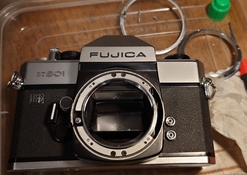
Another Fujica ST801 cleaned today. The Fujica ST 801 is a fun M42 camera to own. The LED exposure meter is a real advance tech back then .
As said previously, one has to make sure no static in working it out .


DSC_2873.JPG

Above: After top cover removed . Under the hot shoe has a screw to attach the flash wire (black) to the hot shoe. Nothing real tricky there.
Most of the foams are dead as it aged , and so just remove them and put a new one


DSC_2875.JPG

Above : The Left side has a transparent plastic ring on the rewind side. It is for insulation , don loose.
The top cover also has transparent plastic film for insulation
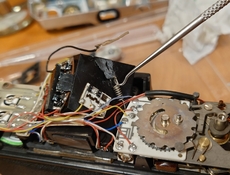
You can see the main IC chip is on the left side of the prism, and thats why using static-proof tools are recommended.


DSC_2876.JPG

As for the prism, lift up the spring on the right side using the spring hook. Be careful with the chipset next to it
This spring usually has been glued on the another end.
But I have met few that doesn't have this chip set and the spring didn't glued on .


After that, just left up the rubber-like cover slightly and slowly pull out the prim for cleaning .
The focusing screen is just below it.
The viewing lens and the metering sensor are also there . Cleaning them if necessary.


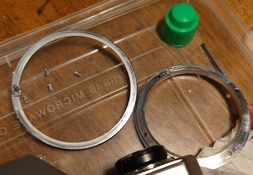
And here is a the aperture ring disassembly:
Removed 4 screws of the M42 mounting ring , simply lift it up and there is nothing special about .
DSC_2879.JPG

DSC_2880.JPG
 

Helios 1984

Member
Joined
Aug 4, 2015
Messages
1,844
Location
Saint-Constant, Québec
Format
35mm
Photrio.com contains affiliate links to products. We may receive a commission for purchases made through these links.
To read our full affiliate disclosure statement please click Here.

PHOTRIO PARTNERS EQUALLY FUNDING OUR COMMUNITY:


Ilford ADOX Freestyle Photographic Stearman Press Weldon Color Lab Blue Moon Camera & Machine
Top Bottom